In a nutshell
- 🔥 A warm towel applies gentle heat that raises vapour pressure, softens the finish slightly, and lets trapped moisture diffuse out, while the towel wicks it safely away.
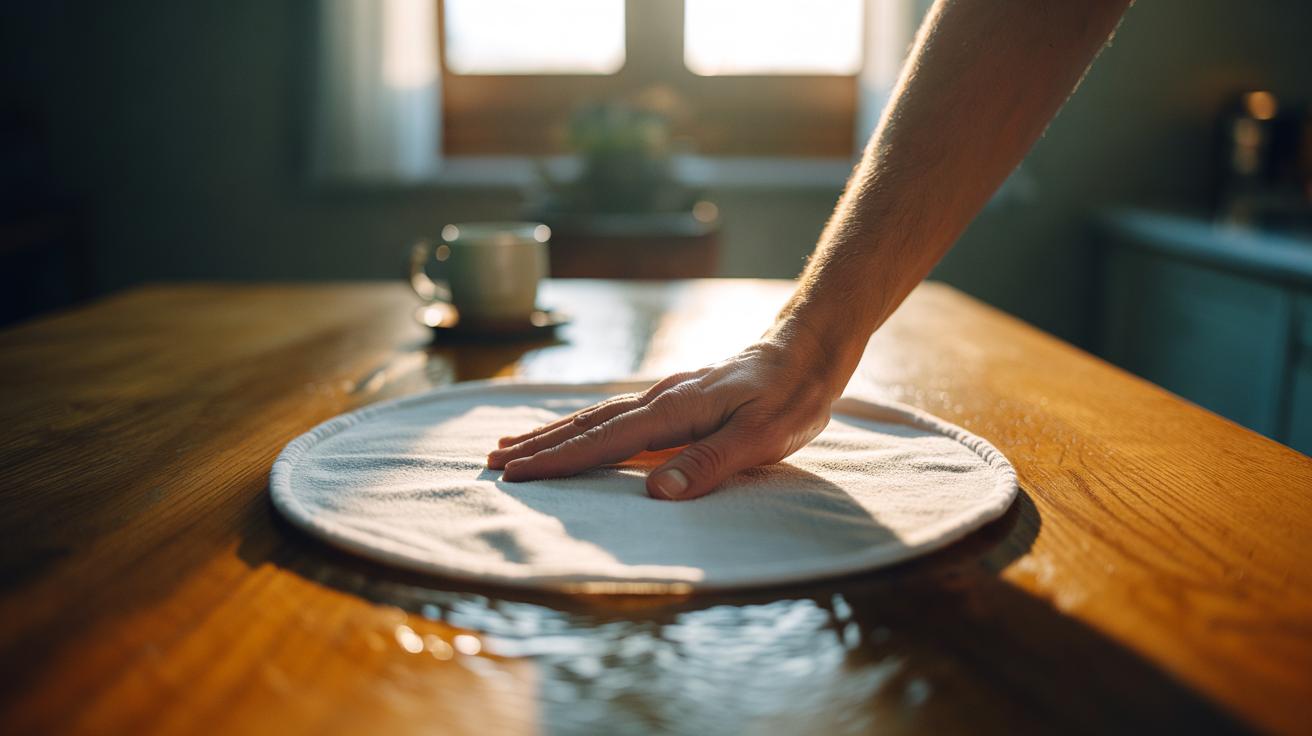
- 🧰 Step-by-step: use a clean cotton towel, warm and barely damp or preheated; apply in short passes, optionally with a low, no-steam iron hovering; check frequently, cool between cycles, then finish with light wax/polish.
- 🧵 Temperature and materials: keep to low heat, avoid steam, and prefer cotton; finishes respond differently—shellac/lacquer clear quickly, polyurethanes take longer, and veneers need extra caution.
- ⚠️ Safety and diagnosis: if a ring stays dark, it’s likely in the wood, not the finish; don’t escalate heat—spot-test, consider mild abrasion, and reserve oxalic acid bleaching for professional refinishing.
- 🛡️ Prevention: use coasters and saucers, manage humidity, wipe spills promptly, and refresh protective wax or polish to reduce future water-ring risk—especially on valued antiques.
A pale halo on an oak table can ruin the look of a room, yet it rarely signals disaster. Those milky water rings are usually moisture trapped just beneath the finish rather than deep damage to the timber. The quickest fix often involves nothing more complex than a warm towel and a watchful eye. By applying gentle, controlled heat, you can coax the moisture back out of the finish and erase the haze. The secret is giving vapour somewhere cooler and drier to go while protecting the surface from overheating. Here’s how the science works, how to do it safely, and when to switch tactics.
Why Heat Releases Trapped Moisture
White rings happen when condensed moisture infiltrates the finish—often lacquer, shellac, or varnish—without reaching the wood fibres. Light scatters inside these micro-pockets, creating the visible bloom. Applying mild heat softens the finish slightly, lowers viscosity, and raises water’s vapour pressure. That combination encourages diffusion towards the surface. A towel warmed to a safe level sets up a gentle temperature gradient: the warm side mobilises trapped vapour, while the fabric’s cooler fibres absorb it. This controlled warming clears the haze without stripping or reflowing the finish.
Think of the finish as a semi-permeable film with microscopic voids. Heat increases molecular motion and opens pathways just enough for wetness to escape. Because the towel also buffers the surface, you avoid hot spots that a bare iron or hairdryer might create. The process is reversible only briefly; once the finish cools and re-hardens—with the water gone—the scattering stops and the ring fades. Use steady, modest heat rather than blasts of high temperature to prevent imprinting or gloss change.
Step-By-Step: The Warm Towel Method
Start with a clean, light-coloured cotton tea towel. Warm it with hot tap water, then wring thoroughly until it’s barely damp, or preheat a dry towel in a tumble dryer for a few minutes. Place the folded towel over the water ring. Rest your palm on the towel for 20–30 seconds to gauge warmth; the goal is cosy, not hot. If using an iron, select the lowest, no-steam setting and hover with feather-light contact for 5–10 seconds at a time. Check the finish after every short pass. You should see the white haze dull, then clear.
Lift, blot, and allow brief cooling between cycles. Repeat as needed for up to 10–15 minutes total. If the towel cools, re-warm it. For a hairdryer, use low heat, 20–30 cm away, sweeping constantly, towel still in place to wick moisture. Stop if you notice softening, tackiness, or a smell of melting finish. Once the ring clears, let the surface rest, then burnish gently with a soft cloth. Finish with a thin coat of paste wax or furniture polish to restore sheen and provide light moisture resistance.
Choosing the Right Temperature and Towels
The right heat is mild, even, and brief. Cotton is ideal: absorbent, lint-free, and safe against most finishes. Microfibre can work, but some variants trap heat too efficiently. Avoid wet towels that drip; liquid water can push deeper into the finish. If you’re unsure of the finish, test in an inconspicuous area first. Shellac and older lacquers respond quickly; modern polyurethanes may take longer. Waxed pieces need extra care because wax can smear with warmth. Veneered tops are sensitive to heat and moisture at the glue line, so proceed cautiously.
| Surface/Finish | Heat Guidance | Time Increments | Notes |
|---|---|---|---|
| Lacquer/Shellac | Low heat via towel | 5–10 sec passes | Responds quickly; avoid tackiness |
| Oil-Based Varnish/Poly | Low–medium via towel | 10–20 sec passes | Slower to clear; be patient |
| Water-Based Poly | Low only | 5–10 sec passes | Watch for whitening returning; re-warm |
| Waxed Surface | Lowest heat | 5 sec passes | Wax can smear; re-wax after |
| Veneer | Very low; limited cycles | 5 sec passes | Risk to glue lines; stop early |
Do not use steam. Steam introduces new water and can worsen hazing. Keep movements gentle, and never park an iron. The towel is your buffer and blotter; refresh its warmth, not its moisture. A final protective polish helps slow future moisture ingress from hot mugs or damp vases.
Safety, Stains, and Long-Term Prevention
If a ring stays dark or tan after heating, the mark may be in the wood fibres—often a reaction with iron or tannins—or an oil stain, not trapped vapour. In that case, mild abrasion with a non-woven pad and polish may help. For stubborn dark stains on bare or thinly finished wood, professionals use oxalic acid (wood bleach) after stripping, but that’s a refinishing job. Never escalate heat to compensate for the wrong diagnosis. Overheating risks blooming, gloss shift, or imprinting the towel weave into softened lacquer.
Prevention is simpler. Use coasters with a vapour barrier, ensure plant pots have saucers, and refresh a wax or polish layer seasonally to add minor moisture resistance. Control indoor humidity to reduce condensation and expansion cycles. Train household habits: no hot mugs on bare timber, wipe spills promptly, and let freshly polished surfaces cure before use. When in doubt, consult a restorer—especially with antiques or French-polished tops—where minimal, reversible intervention preserves value.
A warm towel works because gentle heat mobilises and releases trapped moisture without shocking the finish. The approach is quick, quiet, and low-risk when you keep temperatures modest and check progress often. If the haze clears, seal the win with a light wax for protection and lustre. If it doesn’t, you’ve learned something vital about the stain’s depth—and can plan the next, appropriate step with confidence. Which tabletop in your home is most in need of this calm, careful rescue—and what result will you aim for first?
Did you like it?4.5/5 (20)