In a nutshell
- 🪥 Use a simple paste of bicarbonate of soda and water (2:1), scrub each grout line with a toothbrush for 60 seconds, then rinse and buff dry for fast whitening.
- 🧪 It works because the mild alkali loosens grime while the fine grains provide micro-abrasion; safe on most glazed tiles and cement grout—avoid natural stone.
- ⚙️ For tougher stains, swap water for 3% hydrogen peroxide, add a drop of washing-up liquid for grease, or a dab of white toothpaste for extra grit.
- 🛡️ Stay safe: don’t mix bleach with acids, wear gloves, patch-test surfaces, keep the paste moist, and rinse thoroughly to prevent residue attracting new dirt.
- 🏠 For lasting results, improve ventilation, dry surfaces after use, apply a quality grout sealer, and call a pro if cracks, pitting, or recurring mould persists.
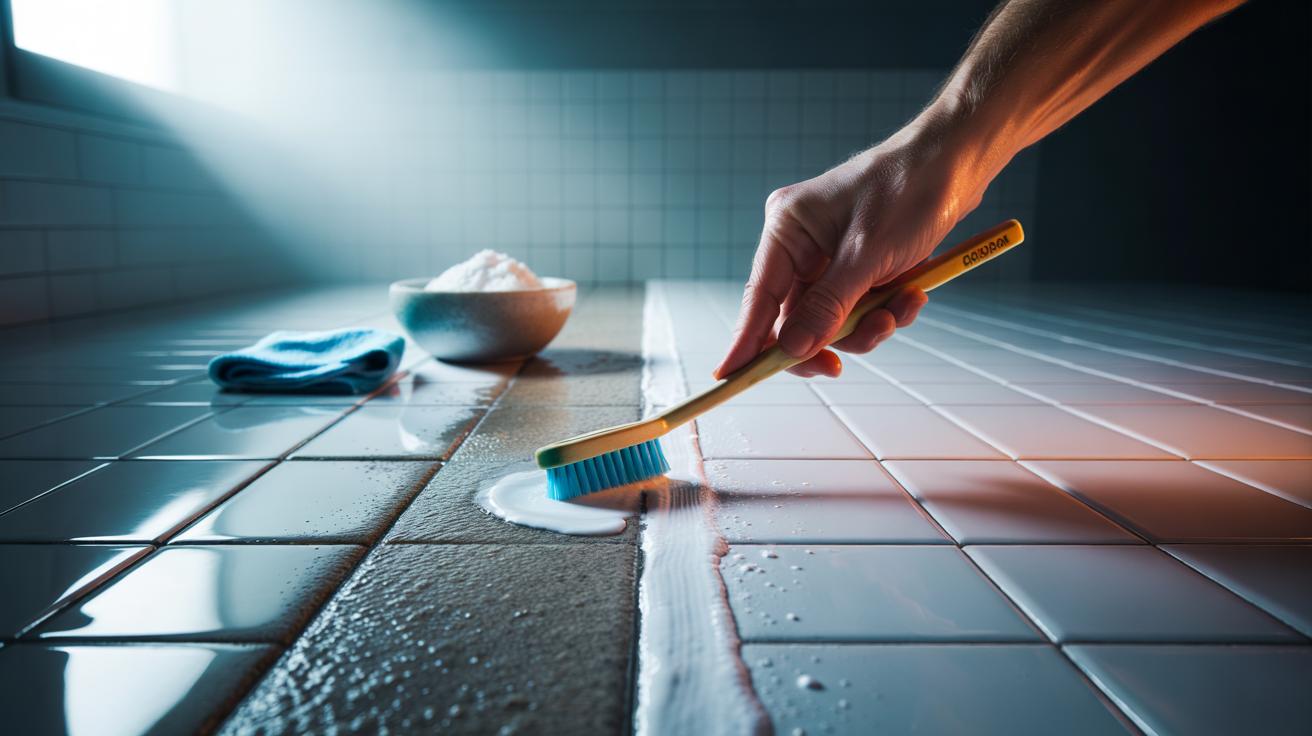
There’s a fast, frugal trick doing the rounds in UK homes that turns grubby grout lines bright again in the time it takes to brew a cuppa. It calls for nothing exotic: just bicarbonate of soda, water, and an old toothbrush. In one focused minute per line, the mild alkali and fine grit lift soap scum, kitchen splatter, and that grey film that steals the sparkle from tiles. It’s gentle on most glazed ceramics and tough on everyday grime, making it a smart first port of call before harsher chemicals. Here’s how to get the most out of the one-minute bicarb method—plus when to tweak the mix and when to call it quits.
What Is the One-Minute Toothbrush + Bicarb Trick?
At its core, this is a quick scrub using a simple paste of bicarbonate of soda and water. The grains act as a micro-abrasive, while the alkaline pH loosens oily residue and everyday dirt. A soft toothbrush concentrates that action exactly where you need it: along the grout lines. The magic is focus and speed—sixty seconds of energetic scrubbing per line, followed by a prompt rinse. For light discolouration, the change is immediate; for older stains, expect a second pass or a slight tweak to the paste.
Unlike acidic hacks, this method is kinder to most cement-based grout and avoids bleaching mishaps. It’s budget-friendly and odour-free, ideal for small bathrooms, rental flats, and late-night spruce-ups. Avoid natural stone such as marble, limestone, or travertine, where abrasives and alkalinity can dull the surface. If you’ve got sealed grout, the approach still works—just keep the paste moist, work lightly, and rinse twice to prevent powdery residue drying into the seal.
How to Do It in 60 Seconds, Step by Step
Start with a small bowl of paste: two parts bicarbonate of soda to one part water. Mix until it’s the texture of toothpaste, then load a clean, soft-bristled toothbrush. Mask off any natural stone edges with tape if needed. Scrub one grout line at a time for a brisk, uninterrupted minute, moving the brush in short back-and-forth strokes. Keep the paste slightly damp so the grains glide rather than scour. When the minute is up, mist with warm water and wipe with a microfibre cloth. Rinse again and buff dry to reveal the true colour.
| Item | Amount | Why it helps |
|---|---|---|
| Bicarbonate of soda | 2 tbsp | Mild alkali; fine abrasive for lifting grime |
| Water | 1 tbsp | Forms paste; controls abrasion |
| Soft toothbrush | 1 | Targets narrow grout lines efficiently |
| Microfibre cloth | 1 | Wipes residue; polishes tiles |
For tougher tea-like stains, replace the water with 3% hydrogen peroxide for a brightening boost, testing in an inconspicuous spot first. A pea-sized dab of white toothpaste can add extra fine grit. Rinse thoroughly so no powdery film dries on the grout, which can attract fresh dirt. If you’re cleaning a whole shower, work in small sections to keep timing tight and the paste fresh. Finish by ventilating well; dry grout resists mould longer than grout left slightly damp.
Why Bicarbonate Works on Grout Stains
Grout is porous and micro-textured, trapping soap residues, minerals, and airborne oils that dull its colour. Bicarbonate of soda tackles all three. Its alkalinity helps break down greasy films and light organic stains, loosening their grip on the pores. The fine particles then provide a gentle scrubbing action without gouging the grout. This dual action—chemical lift and mechanical lift—explains the quick win. On white grout, the paste often restores brightness in minutes, especially where the discoloration is surface-level rather than deep-set.
Mineral build-up from hard water can be trickier. Acidic treatments like vinegar dissolve limescale, but vinegar is risky on cement-based grout and disastrous on natural stone. The bicarb approach side-steps etching while still shifting light scaling when paired with firm brushing. For persistent yellowing or mould shadows, a short contact time with 3% hydrogen peroxide helps oxidise stains. Keep expectations realistic: deeply stained or crumbling grout usually needs a re-grout or a professional clean followed by sealing.
Safety, Variations, and When to Call a Pro
Stick to basics: do not mix bleach with acidic products, and avoid aggressive scrubbing on delicate tiles. Gloves keep skin from drying out, and a patch test protects finishes you’re unsure about. If your grout is painted or newly sealed, scrub lightly and confirm compatibility with the manufacturer’s care guide. Add a drop of plain washing-up liquid to the bicarb paste for kitchen grease; skip fragrance oils that can leave films. A final rinse and dry is non-negotiable to prevent residue attracting fresh grime.
When stains return quickly, the issue is often moisture. Improve ventilation, fix weeping silicone, and consider a quality grout sealer once the lines are clean and fully dry. If you see cracking, pitting, or widespread mould that recurs within days, it’s time for specialist help. Know the limits of a one-minute fix: it’s brilliant for maintenance and cosmetic refreshes, less so for structural issues or long-neglected grout. A pro clean can reset the baseline; the bicarb routine then keeps it bright.
The clever part of this hack isn’t just the toothbrush or the bicarbonate of soda; it’s the discipline of focused, timed cleaning and a proper rinse. Used monthly in bathrooms and weekly in splash-prone kitchens, it keeps grout fresher for longer and delays the cost of re-grouting. Work small, scrub briskly, rinse well, and dry—simple rules that deliver satisfying results and a noticeable lift in the look of your tiles. What will you tackle first: the shower corners, the worktop splashback, or that stubborn strip by the oven that’s been bothering you for ages?
Did you like it?4.6/5 (24)