In a nutshell
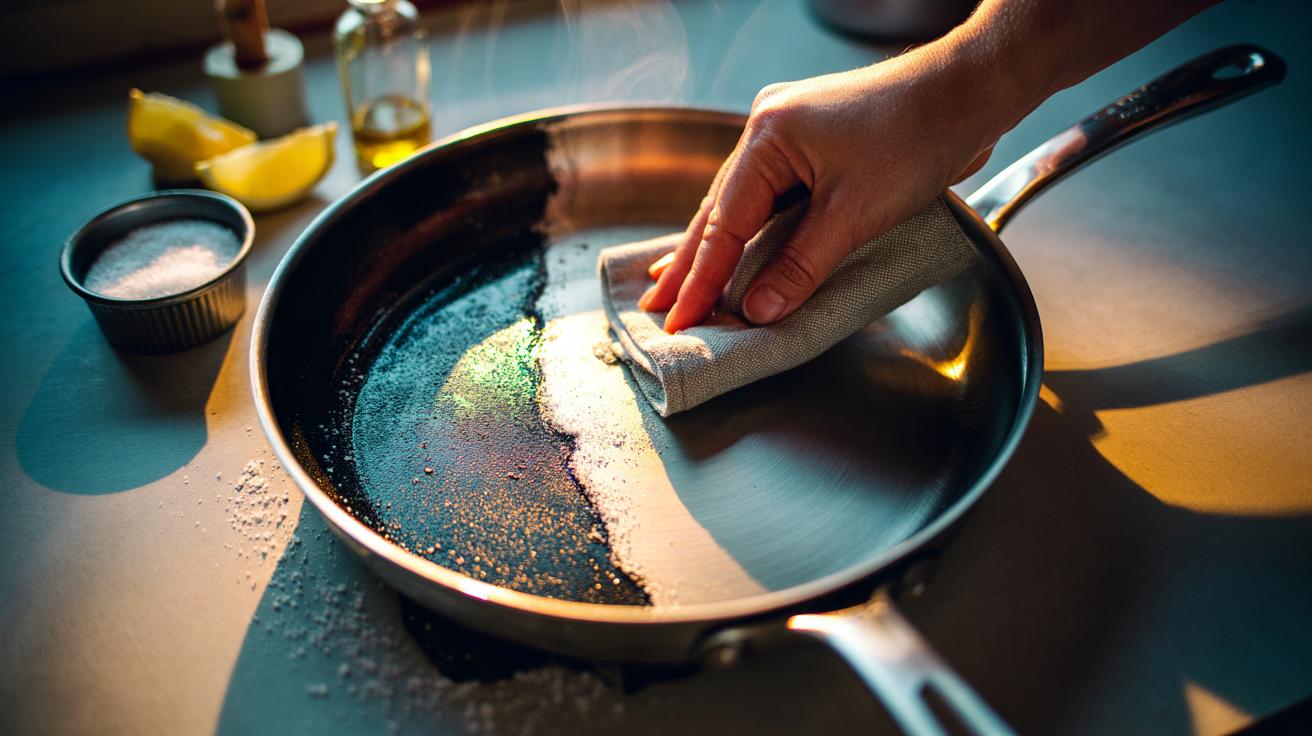
- 🧂 The salt scrub uses coarse salt as a self-limiting abrasive to lift burnt residue without scratching, especially when the pan is warm and slightly damp.
- 🔧 Step-by-step: deglaze with hot water, sprinkle 1–3 tbsp salt, scrub gently with towel/cloth or cut potato, refresh salt as needed, then rinse and dry; let the salt do the work.
- 🍳 Adapt by pan: cast iron (coarse salt + drop of oil; dry and re-season), stainless steel (coarse salt + heat), enamel (medium salt + light pressure), non-stick (very light passes, plenty of water).
- ⚠️ Troubleshooting: use oil or lemon for stubborn patches, pre-boil water for sticky scorch, alternate with bicarb on stainless; do not escalate pressure and avoid metal scouring pads.
- 🌱 Sustainability and care: this method is low-cost, chemical-light, and reduces waste; routine maintenance cleans prevent carbon build-up and keep cookware performing well.
Every cook knows the sinking feeling when dinner clings to the pan like a barnacle. Before you reach for harsh chemicals or bin a beloved skillet, try a deceptively simple fix from pro kitchens: the salt scrub. This method relies on the natural abrasiveness of coarse salt to lift burnt-on residue without scratching metal or enamel. Add a touch of heat and moisture, and the crystals shear away carbonised bits while sparing the surface. It’s fast, inexpensive, and kinder to cookware than scouring pads or aggressive cleaners. With the right grain and a gentle hand, you can rescue stainless steel, cast iron, and even enamelled pans, restoring a smooth, ready-to-cook finish in minutes.
Why Salt Works on Burnt Residue
At the heart of the trick is simple mechanics. Coarse sodium chloride forms irregular crystals that act like thousands of tiny scrapers. When pushed across a pan, they dislodge brittle, carbonised food without embedding grit or gouging metal. The key is that salt is hard enough to abrade residue but soft enough to spare the pan’s surface. Unlike steel wool, salt breaks down as you work, effectively self-limiting the abrasion. Add a splash of water or oil and those crystals glide, distributing pressure evenly and reducing the risk of micro-scratches.
Heat also helps. Warm metal expands microscopically, loosening the bond between burnt sugars, fats, and the pan. A brief deglaze with hot water softens residue, while salt supplies controlled friction. Kosher salt and sea salt are ideal, as their larger grains resist dissolving too quickly. For delicate coatings, use a gentler touch and fewer passes. When applied correctly, the salt scrub balances chemistry and physics to lift scorch without collateral damage.
Step-by-Step: The Salt Scrub Method
1) Loosen: Add a small amount of hot water to the warm (not blazing) pan and let it sit for 60–90 seconds. Swirl to lift browned bits. Pour off excess, leaving the surface damp. 2) Dose: Sprinkle 1–3 tablespoons of coarse salt across the affected area. 3) Scrub: Using a folded paper towel, soft cloth, or a cut potato (skin-side down), apply light, circular pressure. Let the salt do the heavy lifting; force is less effective than steady movement. 4) Refresh: If the salt dissolves or cakes, add a pinch more. 5) Rinse and check: Rinse with hot water, inspect, and repeat once if needed.
For stubborn patches, add a few drops of neutral oil or half a lemon’s juice to the salt. Oil lubricates; lemon provides mild acidity to loosen sugars. Avoid metal scouring pads, which can mar finishes. If residue persists after two gentle rounds, pause and switch to a soak rather than increasing pressure. Finish by drying thoroughly; for cast iron, heat briefly and wipe with a scant film of oil to protect seasoning.
Adapting the Trick for Different Pans
Not all cookware reacts the same. The salt scrub adapts with small tweaks to grain size, pressure, and add-ins. Cast iron enjoys the method because its polymerised seasoning tolerates gentle abrasion, while stainless steel benefits from salt’s ability to undercut burnt proteins. Enamelled surfaces prefer medium grains and minimal pressure, and non-stick coatings demand especially light, brief passes with coarse salt and plenty of moisture. When in doubt, start milder: larger grains, less force, and more lubrication.
| Pan Type | Salt Grade | Add-Ins | Notes |
|---|---|---|---|
| Cast Iron | Coarse/Kosher | Few drops oil | Re-season lightly after; avoid soaking. |
| Stainless Steel | Coarse | Hot water deglaze | Use circular strokes; heat aids release. |
| Enamelled | Medium sea salt | Lemon juice | Gentle pressure to protect glaze. |
| Non-Stick | Coarse, sparingly | Plenty of water | Test a small area first; keep strokes light. |
For aluminium and copper, keep the scrub quick to avoid dulling. If you see discolouration, switch to a soak with warm water and a touch of mild washing-up liquid, then resume with fresh salt. Never use the method on pans already peeling, flaking, or deeply pitted—those need repair or replacement.
Troubleshooting, Safety, and Sustainability
If odours persist or sticky sugars cling, pre-boil a centimetre of water for two minutes, drain, then apply the salt. Starch burns respond well to a lemon-and-salt paste; protein scorch benefits from heat plus salt. Do not escalate pressure when frustrated—refresh the salt and extend contact time instead. Two gentle passes beat one aggressive scrub that risks scratches. For lingering oil varnish on stainless, alternate a salt scrub with a bicarbonate of soda paste on a separate session to avoid mixing abrasives.
The salt scrub is also a greener choice. You skip single-use scouring pads and harsh chemicals, and you use tap water sparingly. A tablespoon or two of cheap, coarse salt usually suffices, and the by-product is just brine and loosened food. Store a small jar by the hob to make it second nature after sautéing. Maintenance cleans—little and often—prevent the kind of carbon build-up that demands heavy intervention. With practice, you’ll judge grain size, moisture, and pressure on instinct.
The humble salt scrub earns its place in any kitchen kit: quick, low-cost, and surprisingly gentle on beloved pans. By leaning on controlled abrasion, a bit of heat, and patience, you can whisk away scorch without scarring metal or enamel. Coarse salt is the hero, and a light touch is your best technique. Treat the pan you have, not the pan you wish you had—adjust the method to its material. Ready to retire the scouring pad and rescue your next culinary mishap with a pinch of salt—what pan will you test first, and which tweak do you plan to try?
Did you like it?4.4/5 (27)