In a nutshell
- 🌱 Leverage terracotta’s porosity to create air pockets, aid capillary action, and relieve compaction—while avoiding the perched water table trap caused by thick drainage layers.
- 🧱 Choose unglazed shards, cleaned and safely broken into 5–10 mm chips, 20–30 mm pieces, and flat sections; discard sharp slivers and aim for chunky, irregular structures.
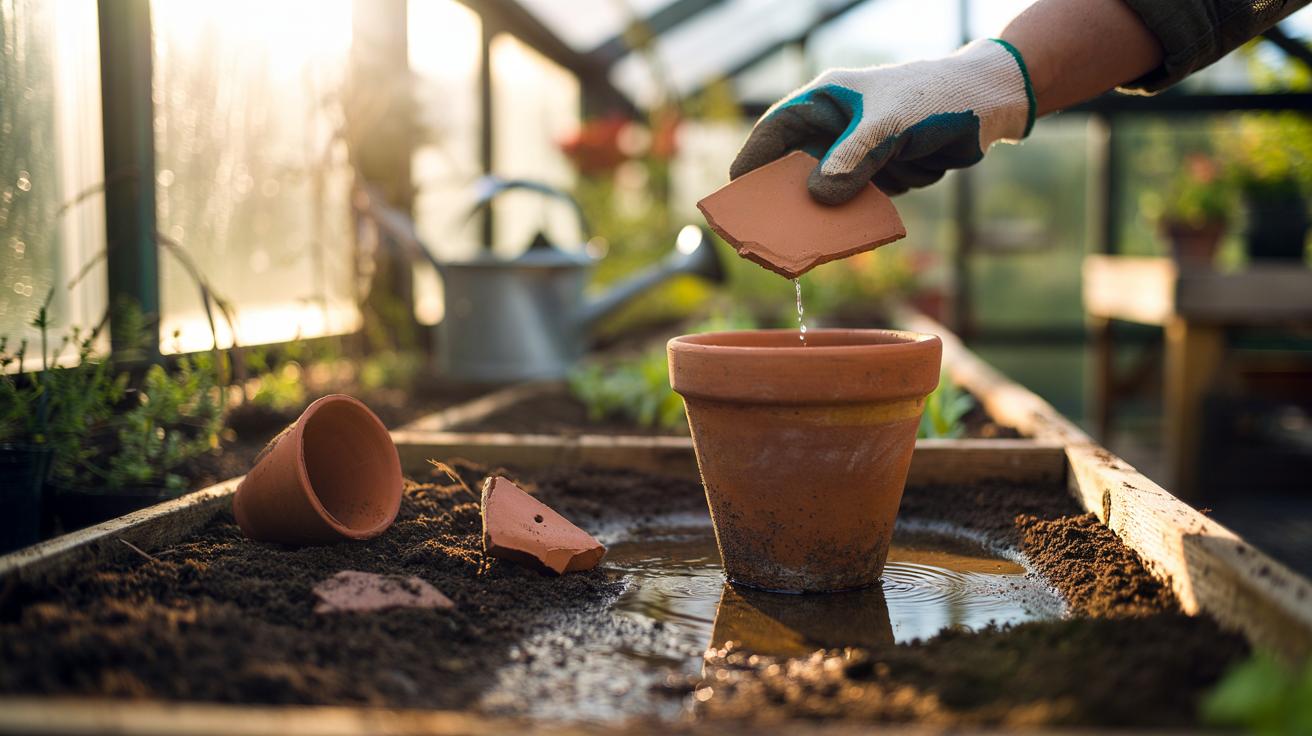
- 🪴 Apply smartly: place a shard over the pot hole (angled), mix 5–10 mm chips into the top 10–15 cm of beds with organic matter (about 10–20% by volume), and use flat shards as a breathable mulch or pot feet—no thick drainage layer.
- ♻️ Treat broken pots as a circular resource: refresh mixes by screening fines, mulch seasonally to protect structure, and check outlets after storms to keep water moving.
- ⚠️ Avoid pitfalls: overpacking shards, using glazed pieces, or creating rubble trenches that form a water sump; prioritise distribution and verify results with a simple watering test.
Waterlogged borders, sad-looking houseplants and slippery patios often trace back to the same culprit: compacted, poorly drained soil. Gardeners across the UK have a time-honoured fix ready to hand in the shed—broken terracotta pots. These humble shards offer a smart, low-cost way to create air spaces, prevent clogged drainage holes and slow the march of clay-induced puddling. Used thoughtfully, they help roots breathe and soils warm faster in spring. The trick is knowing where and how to deploy them so they enhance, rather than hinder, natural percolation. Here is a practical guide to using broken terracotta pieces to improve drainage without wasting materials or compromising planting volume.
Why Terracotta Improves Drainage
Traditional fired clay is naturally porous, with microchannels that encourage moisture to move away from saturated zones and into drier ones. That gentle wicking aids capillary action and leaves behind valuable air pockets around roots. In soils prone to compaction—especially heavy clay—small, irregular terracotta fragments act like grit, propping apart fine particles and preventing them from collapsing after rain. The goal is not to make soil bone-dry, but to create a balance where excess water can escape while some moisture is retained for steady growth. Terracotta’s rough surfaces also help biofilms and beneficial microbes establish, supporting longer-term soil structure.
There is a caveat worth understanding. A thick “drainage layer” at the bottom of containers is a common myth. Water does not suddenly drop from fine compost into coarse rubble; it forms a perched water table at the interface. Instead of a heavy layer, use modestly sized shards only to keep the pot’s hole clear and rely on a freely draining compost mix. In the ground, terracotta pieces should be sparing and well distributed, never dumped in a trench where they could impede roots.
Choosing and Preparing Terracotta Shards
Not all shards are equal. Aim for a mix of sizes that complements the task: tiny chips to open tight textures, medium shards to shield pot holes, and a few flatter pieces to stabilise containers on saucers or gravel. Clean, unglazed terracotta is ideal; glazes can block pores and sometimes contain residues. Rinse off soil, then dry and break safely inside a bag with a light hammer tap. Wear gloves and eye protection, and avoid inhaling dust. Sharp slivers should be discarded; you want chunky, irregular pieces that create structure without slicing roots. Below is a quick reference for typical uses.
| Shard Size | Placement | Best For | Notes |
|---|---|---|---|
| 5–10 mm chips | Mixed through top 10–15 cm | Clay soils, seed trays | Add 10–20% by volume with organic matter |
| 20–30 mm pieces | Around, not above, pot hole | Houseplants, patio pots | Prevents blockage; does not form a layer |
| Flat 40–60 mm shards | Surface mulch or pot feet | Algae control, airflow under pots | Discourages slugs and splashing |
Keep shards modest in volume—amendments should enhance the soil, not replace it. Blend terracotta with composted bark, leaf mould or sharp sand for a balanced mix that improves both drainage and fertility.
How to Use Shards in Pots, Raised Beds, and Borders
For containers, place one or two medium shards over the drainage hole at a slight angle so water can escape while compost cannot compact into the aperture. Fill with a peat-free, free-draining mix—ideally with some perlite or horticultural grit. Water thoroughly once, then let excess drain. Do not create a thick rubble layer at the base; it reduces effective rooting depth and can trap water above. For houseplants that dislike wet feet, stand the pot on flat shards in a tray to lift it clear of runoff.
In raised beds, fork 5–10 mm chips into the top 10–15 cm alongside organic matter. This opens the surface, speeds infiltration and reduces crusting after summer showers. For borders on heavy clay, target problem zones rather than the entire bed. Work in small amounts around planting holes and along footpaths where compaction is worst. Combine terracotta with regular mulching so improved structure is maintained by earthworms and roots. On slopes, use shards as part of a stepped mulch to limit runoff and keep pores open.
Finally, use flat shards as a protective mulch under tap-rooted or drought-tolerant plants. They limit evaporation, reduce splash-back that spreads disease, and deter slugs. Keep gaps between pieces so rainfall can reach the soil; do not smother the surface entirely.
Maintenance, Sustainability, and Common Mistakes
Broken pots are an inherently circular resource. Reuse old terracotta rather than buying new aggregates, and refresh mixes each repotting by screening out fines that clog pores. Keep an eye on pots after storms: if water sits on the surface, lift the container and ensure the hole isn’t blocked by roots or algae. In beds, seasonal top-ups of organic mulch will protect the micro-structure you’ve created. Good drainage is an ongoing habit, not a one-off fix.
Avoid three pitfalls. First, do not overpack shards—too much coarse material reduces water-holding capacity and nutrient availability. Second, skip glazed ceramics and painted pieces where pores are sealed. Third, beware the “sump” effect: trenches filled with rubble can concentrate water where roots can’t breathe. Think distribution, not dumping. If in doubt, test with a watering can; well-improved soil should take steady watering without pooling and drain within minutes.
Safety matters, too. Handle shards with gloves, store them in a crate, and dampen dust before breaking. A little care keeps this thrifty technique both effective and safe.
Used with a light touch, broken terracotta pieces help containers drain cleanly, keep soil airy in beds, and reduce disease splash without stripping moisture away. They pair brilliantly with composts and mulches, giving roots the mix of air and water they need to thrive. Focus on keeping outlets clear, opening compacted layers, and maintaining structure over time. As you look around your garden, where could a handful of well-placed shards turn a soggy spot into a resilient planting that shrugs off rain and thrives between showers?
Did you like it?4.5/5 (23)