In a nutshell
- 🌱 Stems root swiftly thanks to wound signals and hormones: auxin pools at nodes, triggering cell reprogramming into adventitious roots, with warmth and oxygen accelerating the process.
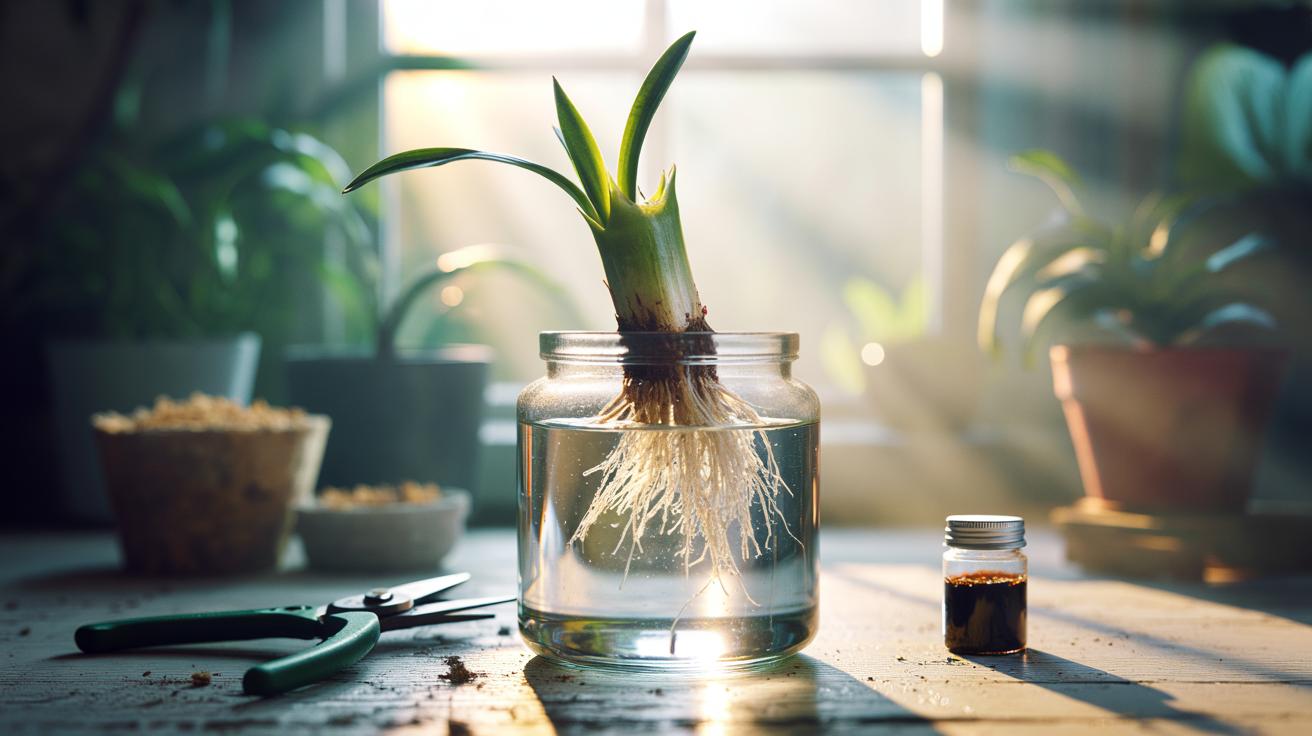
- ✂️ Method that works: use a sterile blade, cut just below a node, remove lower leaves, optionally dip in IBA, then place in water or airy media; keep 20–24°C, 60–80% humidity, and bright, indirect light.
- 🌡️ Control the pace: bottom heat (22–25°C) often halves rooting time, while perlite or sphagnum improves aeration; maintain gentle airflow and clean, room‑temperature water—prioritise oxygen over excess moisture.
- 📊 Timelines that set expectations: Basil 3–7 days (water), Pothos 7–14 (water/perlite), Monstera 14–28 (sphagnum), Rosemary 21–42 (perlite/sand), with IBA speeding woody cuttings.
- 🛡️ Finish strong: pot up when roots are 2–5 cm and branching, harden off gradually, keep tools and media sterile, label dates, and take extras—paired with bright, indirect light and a breathable mix, success rates climb.
The cut-and-propagate trick has become a minor horticultural sensation because it looks like sleight of hand: snip a stem, pop it in water or a light substrate, and within days roots appear. What seems like magic is plant biology doing what it does best—repair, reroute, regrow. Adventitious roots form with astonishing speed when conditions cue the plant to survive and expand. For home growers, that means a steady supply of fresh herbs, new houseplants, and backup specimens without buying more pots. With a sharp blade, a keen eye for nodes, and consistent warmth, stems root faster than most people expect.
Why Stems Root Faster Than You Think
Plants are engines of regeneration. When you cut a stem, hormones flood to the wound. Auxin accumulates near the node, instructing cells to switch job descriptions and become root initials. Think of it as emergency engineering: parenchyma tissues de-differentiate, then reassemble as adventitious roots. Sugars flow from leaves to the cut site, fuelling construction. Wound signals such as jasmonates start the process; oxygen and warmth keep it moving. Plants are pre-wired to regenerate when a node is present and energy is available.
The architecture matters. Nodes house dormant meristems and vascular crossroads, so they root far quicker than internodes. Lenticels and cambial tissue aid gas exchange and division. In water, diffusible oxygen can be a bottleneck; in airy media, oxygen is plentiful and rooting often accelerates. That is why a cutting kept in bright, indirect light, with leaves intact for photosynthesis, can produce roots in under a week for soft-stemmed herbs. Speed is not luck—it is anatomy meeting the right signals.
The Cut-and-Propagate Method, Step by Step
Start clean. Use a sterile blade and make a decisive cut just below a node—about 45 degrees if you are placing it in substrate, straight across for water. Remove lower leaves to expose the node; keep one or two leaves at the top to power rooting but limit transpiration. Cut below a node: no node, no roots. Optionally dip the base in rooting hormone (IBA) for woody or slow species. Place in water changed every few days, or in perlite, sphagnum, or a light mix that holds moisture and air.
Microclimate finishes the job. Aim for 20–24°C room temperature and 60–80% humidity; a clear bag works as a simple propagator. Provide bright, indirect light to feed the cutting without scorch. Keep media damp, never sodden. Most cuttings fail from low oxygen, not low water. Label dates and varieties, then resist fussing. When roots reach 2–5 cm and show branching, pot on gently into a breathable mix. Harden off by easing humidity over several days to avoid shock.
Fast-Rooting Conditions You Can Control
Light sets the pace. Leaves need photons to supply sugars, yet too much sun desiccates cuttings. Place them near an east window or under LED grow lights at low intensity. Temperature is the quiet accelerator: bottom heat of 22–25°C often halves rooting time by nudging enzyme activity. Warm roots and cool heads are the sweet spot for fast, tidy rooting. Airflow should be soft, not stagnant; stale, still air invites rot. Water quality matters too—use room-temperature tap water left to stand, rainwater, or filtered water to avoid extreme chlorine spikes.
Medium choice determines oxygen. Water is simple and transparent—great for watching progress—but perlite, pumice, or a perlite–coco blend often produces sturdier, more transplant-ready roots thanks to better aeration. Sphagnum moss, rung out to “just damp”, is a forgiving option for a wide range of houseplants. Change water regularly or flush inert media to prevent pathogens. Keep the medium moist, never soggy, and allow air to reach the cut. A light feed (quarter-strength) only after root tips extend helps avoid burn.
Common Species and Realistic Timelines
Some plants sprint, others jog. Soft-stemmed annuals and many aroids initiate roots in days, while woody Mediterranean herbs demand patience. The table below offers realistic expectations for popular cuttings and a quick tip to shave days off the wait. Use it as a guide, not gospel: your home’s temperature, light, and humidity will nudge the numbers. If in doubt, increase warmth and oxygen before adding more water.
| Plant | Typical Rooting Time (Days) | Best Medium | Speed Tip |
|---|---|---|---|
| Basil | 3–7 | Water | Bright window; change water often |
| Coleus | 4–8 | Water or Perlite | Keep one leaf pair only |
| Tradescantia | 5–10 | Water | Cut below every node |
| Pothos (Epipremnum) | 7–14 | Water or Perlite | Warm base; indirect light |
| Philodendron | 10–21 | Perlite | High humidity, airy mix |
| Monstera | 14–28 | Sphagnum | Use nodes with aerial roots |
| Pelargonium | 10–20 | Perlite or Sand | Let the cut callus 24 hours |
| Rosemary | 21–42 | Perlite/Sand | IBA dip; bottom heat |
For tougher subjects—rosemary, lavender, some figs—dusting the cut with IBA or using a gel speeds the leap from callus to roots. Sterility is your ally: clean shears, fresh media, and containers rinsed in diluted bleach reduce losses dramatically. Take more cuttings than you need and expect a few to fail—propagation is a numbers game. When roots are established, pot into a gritty, well-drained mix and water lightly to encourage them to explore.
The cut-and-propagate trick works because you are collaborating with a plant’s survival instincts. By targeting nodes, maintaining warmth and humidity, and prioritising oxygen, you convert a simple snip into a living clone with surprising speed. Bright, indirect light, modest leaves, and a breathable medium are the quiet catalysts that shave days off the calendar. Keep records, tweak one variable at a time, and your success rate will climb. Which plant on your windowsill will you trial next—and what micro-adjustment will you make to coax roots out even faster?
Did you like it?4.5/5 (28)