In a nutshell
- 🧊 Use an ice cube tray as an earring organiser: individual slots keep pairs separated, prevent tangles, and stop losses.
- 🔎 Maximise visibility: the grid layout encourages pair-by-pair discipline and speeds selection without rummaging.
- 🧴 Choose smartly: compare rigid plastic vs silicone, opt for lids to block dust and moisture, and match cavity size to earring types.
- 🗂️ Set up a routine: clean pieces, assign one slot per pair, group by metal or occasion, and maintain a simple daily put-back habit.
- 🛡️ Care and storage: avoid humidity, use a jewellery cloth and anti-tarnish tabs, and stack trays to save small-space real estate.
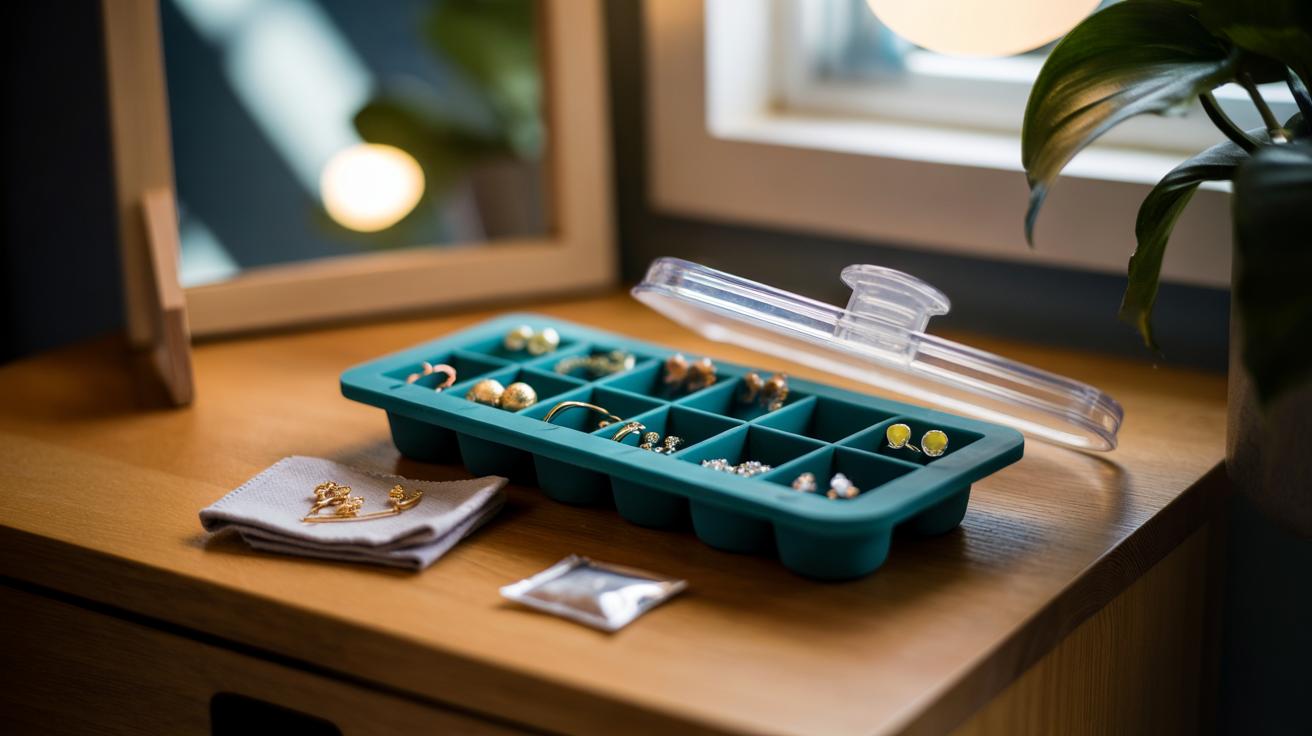
Here’s the most delightfully simple jewellery hack you’ll read this week: a common ice cube tray becomes a tidy vault for earrings, with each slot acting like a miniature drawer. By assigning one recess to one pair, you gain instant visibility, stop tangling, and, crucially, stop losing a partner to the back of the drawer. The approach is cheap, adaptable, and satisfying to scan at a glance. Whether you wear studs, hoops, or tiny drops, the rigid boundaries of a tray keep components apart, backs intact, and finishes unscuffed. It’s storage that works with habit: remove, drop, replace, repeat—no rummaging, no mismatches, no drama.
Why Ice Cube Trays Make Brilliant Jewellery Organisers
An ice cube tray offers a grid of individual compartments that prevents contact between metals and stones, limiting scratches and tarnish. Each cavity becomes a defined home, encouraging pair-by-pair discipline and eliminating the chaotic bowl where earrings go to vanish. You see every option instantly, so you actually wear more of what you own. The format is especially strong for studs and small hoops: they nestle into a cavity, backs attached, safe from snags. For renters and students, the footprint is tiny and the setup is tool-free.
There is also a psychological payoff. When we designate a slot for each pair, we interrupt the cycle of “I’ll sort it later”. The cube grid offers a tangible, bite-sized task: one pair, one space. That clarity protects sentimental pieces and streamlines mornings. It’s low-friction organisation that quietly trains better habits, and it costs less than a bus fare.
Choosing the Right Tray: Materials, Shapes, and Lids
Start with material. Rigid plastic holds shape and stacks neatly; it’s ideal for lighter studs and small hoops. Silicone flexes, useful if you have chunkier earrings or want to pop pieces out with ease. A tray with a lid keeps dust and bathroom humidity at bay—handy if you store jewellery in shared spaces. Look at cavity size: classic 14-cube trays suit everyday pieces, while mini-cube designs corral delicate studs. If you travel, a lidded, compact tray doubles as a grab-and-go capsule.
Mind finish and colour. Pale trays improve visibility of dark gemstones; darker trays help you spot gold and silver quickly. Consider a shallow tray to prevent diving fingers, and check that edges are smooth to avoid snagging fine chains or delicate wires. If in doubt, buy two matching trays—one for metals, one for colour or occasion—so your system scales without confusion.
| Option | Pros | Cons | Best For |
|---|---|---|---|
| Rigid Plastic | Stackable, clear shape, low cost | Less forgiving with chunky pieces | Studs, small hoops, daily wear |
| Silicone | Flexible, gentle, easy to clean | Can flop without a rack or lid | Statement earrings, mixed sizes |
| With Lid | Dust and moisture control, travel-ready | Slightly higher cost | Bathrooms, shared homes, commuters |
Set-Up and Daily Routine: Keep Pairs Together and Visible
Give yourself ten minutes. Lay a soft cloth on the table, wipe each piece with a gentle microfibre, and match pairs. Assign one slot per pair, backs attached, facing up so stones and shapes are visible. Group by metal tone across the rows—gold, then silver, then colour—or by occasion: workday minimal, weekend playful, evening sparkle. Visibility is your ally: if you can see it, you’ll wear it. Slip a tiny silica gel sachet under the tray to deter moisture, especially in UK bathrooms.
Build the habit at two moments: undressing and getting ready. At night, remove earrings and drop them directly into their home slot; in the morning, choose from the tray rather than a dish. If you rotate favourites, dedicate the top row to this week’s lineup. For travel, lift the pairs you need into a lidded tray or cover with cling film. This micro-routine keeps every pair together without effort.
Care, Hygiene, and Small-Space Storage
Metal and moisture are uneasy companions. Keep trays away from steamy showers and windowsills; a lidded option or cupboard shelf is safer. Wipe earrings occasionally with a jewellery cloth, and clean silicone or plastic trays with mild soap and cool water. Dry thoroughly before restocking. Regular light maintenance beats occasional deep rescues, especially for plated pieces that dislike harsh polishing. If you own sterling silver, park those pairs together and add an anti-tarnish tab beneath the tray.
Living small? Stack trays vertically in a drawer, label edges by category, or slide one atop your dressing-table organiser. In shared homes, a lidded tray fits neatly in a locker or bedside drawer. For safety, avoid placing tiny studs where children or pets can reach. Think of the tray as a modular file—one you can scale from a single grid to a tower of tidy, instantly readable compartments without spending on bespoke jewellery boxes.
The genius of the ice cube tray is its disciplined simplicity: fixed slots prevent mixing, encourage care, and make your collection feel curated rather than chaotic. It’s democratic storage—cheap, clear, effective—that protects finishes and saves time every morning. When each pair has a home, you stop haemorrhaging money on replacements and start enjoying what you already own. Whether you’re a minimalist with three studs or a magpie with thirty pairs, this tiny grid becomes a daily pleasure. How will you lay out your tray—by metal, mood, or the stories your favourite earrings carry?
Did you like it?4.5/5 (30)