In a nutshell
- 🧵 Cardboard tubes act like mini spools, giving each lead its own berth to prevent crossovers and knots, reducing wear and extending cable lifespan for smarter cable management.
- 🛠️ Simple DIY: trim and reinforce tubes, coil cables to match diameter, slide in, and add clear labels (e.g., “Laptop USB‑C 65W”); size choices range from loo-roll cores to sturdier postal tubes.
- 🗂️ Smart placement and labelling: position organisers where cables are used, group by task (charging/audio-data), use colour codes, and build drawer grids or travel pouches for fast retrieval.
- ⚠️ Prioritise safety: avoid tight fits for warm power bricks, ensure airflow for mains leads, keep away from moisture and heat, and recycle damaged cables instead of storing them.
- 🌱 Sustainability and low-cost wins: repurpose waste, support the circular economy, reduce e‑waste by preventing kinks, and save time and money versus commercial organisers.
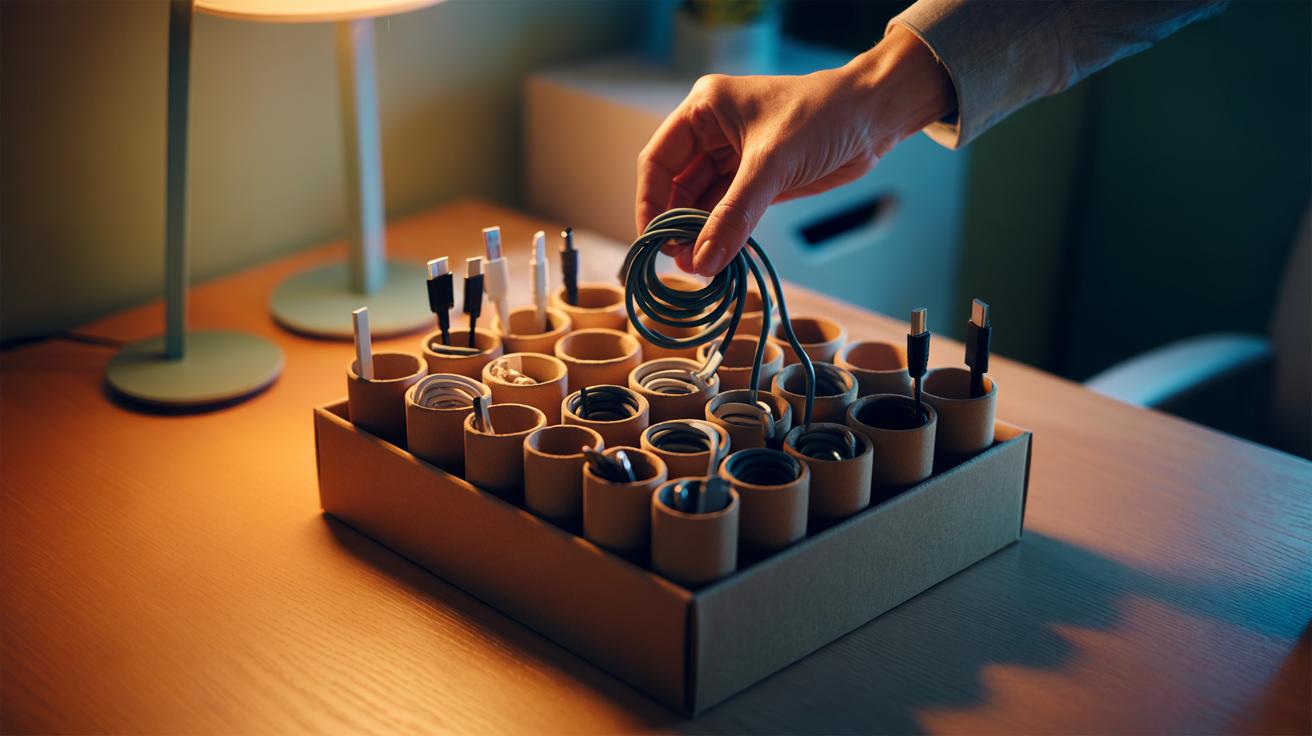
From laptop chargers to HDMI leads, homes and offices are awash with cables that seem magnetically drawn to knots. The simplest fix is hiding in your recycling bin: the humble cardboard tube. Whether it’s a loo-roll core or a sturdy postal cylinder, these rolls keep each lead contained, visible, and ready to deploy. They slide neatly into drawers, line up in a shoebox, or stack on a shelf. Minimal spend, maximum order is the promise, and it holds up. With a marker and a minute, you get a modular, expandable system for everyday cable management that actually matches how you live and work.
Why Cardboard Tubes Tame Cable Chaos
Cables tangle when loose loops cross, twist, and pull against each other. Give each lead its own cylindrical “berth” and the chance for knotting plummets. The tube acts like a mini spool, limiting slack and keeping the coil intact, so there’s no messy crossover. A snug fit also adds light friction, which stops cables from uncoiling in a drawer. Structure prevents chaos; the roll simply enforces separation. One cable, one tube, zero knots sums up the physics: fewer contact points and less movement mean fewer tangles.
The shape matters as much as the material. A cardboard tube has smooth edges, absorbs tiny amounts of moisture, and doesn’t build static—helpful for lightweight leads. It’s flexible enough to trim for length yet firm enough to stack into rows. Short tubes suit USB and earbuds; wider kitchen-roll cores house chargers and HDMI. Because each cable stays coiled, you also preserve the wire’s lifespan by avoiding sharp bends that strain internal conductors.
Building a DIY Tube Organizer Step by Step
Gather cores from loo rolls, kitchen rolls, or mailing tubes, plus scissors, tape, and a marker. Trim ragged ends and reinforce with a ring of paper tape if the cardboard feels soft. For visibility, write the device name on the outside and add a colour stripe. Fifty seconds per tube is enough to turn recycling into order. If you want a uniform look, cut all tubes to the same length before you begin.
| Tube Source | Suggested Length | Best For | Notes |
|---|---|---|---|
| Loo roll core | 8–10 cm | Earbuds, USB-A to USB-C | Compact; ideal for travel pouches |
| Kitchen roll core | 10–12 cm | Phone chargers, HDMI | Good balance of width and rigidity |
| Postal tube | 12–15 cm | Heavy cables, extension leads | Cut to size; add labels on both ends |
Coil the cable in relaxed loops roughly matching the tube’s diameter, secure with a soft tie if needed, then slide it in. Label clearly: “Laptop USB‑C 65W”, “TV HDMI 2”, “Camera Charger”. Consistent labelling saves rummaging. If you can read the label at a glance, you’ll actually put the cable back. For a drawer grid, stand tubes upright in a shoebox; for a shelf, align them horizontally and group by device type.
To expand, tape tubes together into blocks of four or six. Add a spare tube marked “Misc” for temporary leads. Refresh scuffed rolls with new tape rings and retire any that become soft. This tiny bit of maintenance keeps the organiser dependable and presentable, especially if it lives on a visible shelf in a shared workspace.
Smart Placement, Labelling, and Safety Tips
Place the organiser where you actually grab cables—by the TV, near the router, inside the hallway drawer. Put labels at the exposed end so identification is instant. Group by task: a row for charging, one for audio/video, and one for data. Use contrasting marker colours—blue for network, red for power—to reduce decision time. Small visual cues shave seconds off every search. For travel, drop a couple of short tubes into a pouch; they prevent the dreaded suitcase snarl and protect delicate connectors from abrasion.
Keep rolls away from damp areas, radiators, and oil-based substances. Cardboard is fine for low-voltage leads and peripherals, but don’t cram warm power bricks into tight tubes where heat can build. Store mains extension leads loosely in wider postal tubes, allowing airflow. If a cable’s insulation is nicked, recycle it; the organiser is no substitute for electrical safety. When in doubt, space it out—give heavier or heat-generating gear more room and choose thicker-walled tubes for sturdiness.
Sustainability and Cost Advantages
Turning a waste stream into a tidy system is a clear win. Every cardboard tube reused avoids immediate recycling energy costs and delays the purchase of plastic organisers. The approach fits the circular economy mindset: repair, reuse, then recycle. When a tube is past its best, it returns to the paper cycle. Because the organiser encourages gentle coiling, it can extend cable life by reducing kinks, which in turn cuts e‑waste from prematurely failed leads. Less clutter, less waste—same utility is the ethos.
Financially, it’s hard to beat. Commercial cable boxes run £10–£30; this version costs pennies and time you’ll recoup the first morning you don’t hunt for a charger. For teams, a labelled shoebox grid standardises storage across desks at virtually zero cost. Calculate it this way: ten staff, five minutes saved weekly equals hours returned monthly. Low-cost efficiency isn’t flashy, but it’s consistently effective—and instantly scalable if your kit list grows.
In a digital life packed with chargers, dongles, and display leads, the cardboard-tube organiser proves that simplicity scales. It segments, protects, and speeds retrieval while nudging you towards greener habits. Add smart labels, size the tubes to the job, and keep the system where you actually reach for cables. Order isn’t about perfection; it’s about reducing friction. With a few recycled cores and a marker, you’re minutes away from calm drawers and faster setups. How will you customise your own DIY cable hub to suit the way you work and travel?
Did you like it?4.4/5 (21)