In a nutshell
- 🥥 Chemistry: Coconut oil’s fatty acids, especially saturated MCTs like lauric acid, build a hydrophobic barrier that repels water, resists oxidation, and avoids sticky residues.
- 🪵 Moisture defence: Oil penetrates wood pores, aligns non‑polar tails outward, creating a breathable seal that reduces fibre‑raising and preserves a matte‑satin finish on wooden utensils.
- 🧴 Application: Clean and thoroughly dry items, apply a pea-sized amount of refined coconut oil with the grain, rest 20–30 minutes, wipe excess, buff, and allow 12–24 hours; repeat for thirsty wood and avoid dishwashers.
- 🔧 Maintenance & safety: Use food-grade oil, store well, recondition after abrasion or heat; optional beeswax blend adds hardness; better shelf stability than many seed oils and a plant-based alternative to mineral oil.
- ✅ Benefits: Enhanced water and stain resistance, longer utensil lifespan, food-safe conditioning, and a cost-effective, sustainable care routine using a common pantry staple.
Wooden spatulas, spoons, and chopping boards reward care with years of service, but water exposure scuffs their grain, raises fibres, and invites cracks. A deceptively simple remedy is hiding in your pantry: coconut oil. Its distinctive fatty acid profile creates a resilient, water-shedding film inside timber pores, guarding against swelling and staining while bringing out a warm, satin sheen. Unlike many seed oils, it resists going sticky. Used correctly, coconut oil forms a protective barrier that locks in strength and locks out moisture. Here’s the chemistry behind that protection, the practical method to apply it, and how to maintain your wooden utensils without compromising food safety or sustainability.
Why Coconut Oil Works on Wood
At the heart of coconut oil’s success is its unusually high share of saturated medium‑chain triglycerides (MCTs). These molecules are compact and highly hydrophobic, so they slide into open capillaries in the wood, then repel water. Because saturated fats have no double bonds, they’re far less prone to oxidation, which means no gummy residue on your spatulas and no tacky surface that attracts dirt. This stability makes coconut oil a low‑maintenance conditioner that keeps its performance over time. Its semi-solid nature at cool kitchen temperatures also helps it stay put on the timber, building a uniform, semi-occlusive layer that supports the grain rather than smothering it.
The standout player is lauric acid (C12), which contributes to mild antimicrobial behaviour and a dry-touch finish after buffing. Coconut oil also contains myristic (C14) and palmitic (C16) acids that lend body to the film. By contrast, many vegetable oils rich in polyunsaturates can oxidise quickly, creating odours and sticky patches. For a food-contact surface you wash and reuse daily, resistance to rancidity is a practical advantage.
Fatty Acids That Form a Moisture Barrier
Wood swells when water penetrates its cell walls; the goal is to block that ingress without trapping dirt or masking the timber’s tactile feel. Coconut oil’s fatty acids align within the microstructure, with long, non-polar tails facing outwards, discouraging water molecules from clinging. The result is a subtle, breathable seal that reduces fibre-raising and keeps utensils from drying out between uses. Lauric acid dominates, supported by shorter chains like caprylic (C8) and capric (C10) that improve spreadability, helping the oil wick evenly into tight grain. After buffing, the conditioned surface remains matte-satin, not glossy or plasticky.
| Component | Typical Share (%) | Function for Wood |
|---|---|---|
| Lauric (C12) | 45–53 | Hydrophobic barrier; clean, dry-touch finish |
| Myristic (C14) | 16–21 | Adds body; supports durable film |
| Palmitic (C16) | 8–10 | Stabilises conditioning layer |
| Caprylic/Capric (C8/C10) | 10–18 | Improves spread and penetration |
| Oleic/Linoleic | 6–10 | Minor; softens film without stickiness |
Because the mix is predominantly saturated, the conditioned wood resists oxidation and moisture damage without repeated heavy reapplication. That chemistry explains why an inexpensive pantry staple can rival specialist conditioners in day‑to‑day kitchen use.
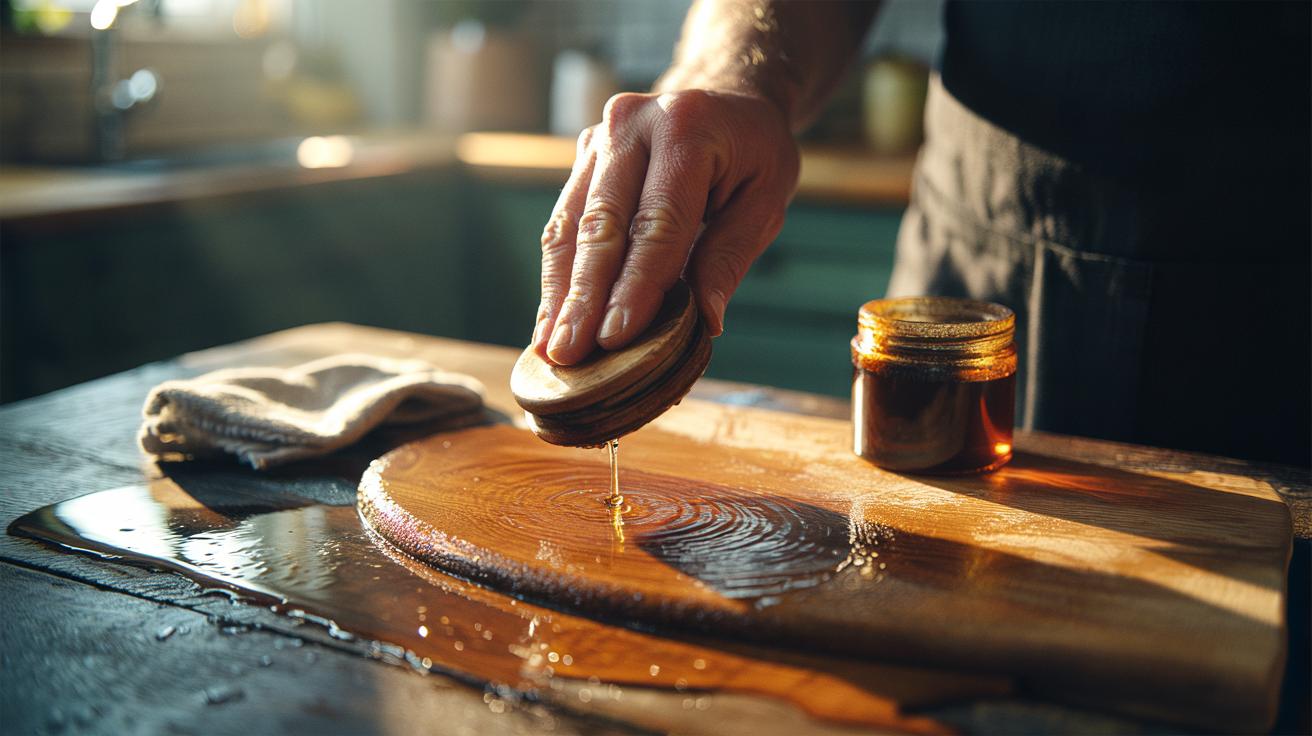
Step-by-Step Application for Wooden Utensils
Start with clean, dry utensils. Wash with mild soap, rinse, then air-dry for several hours; trapped water will block oil penetration. Warm a teaspoon of refined coconut oil until soft but not hot. Work a pea-sized amount into each utensil with your fingertips, moving with the grain to fill pores rather than smear the surface. For boards, treat both sides to prevent cupping. Add a little more oil if the wood absorbs it instantly, but avoid visible pooling; excess invites dust and uneven curing.
Leave the oiled wood to rest for 20–30 minutes. Wipe off all surplus with a lint-free cloth, then buff for a dry, satin feel. Allow 12–24 hours for the conditioning layer to settle before the next wash. For new or very thirsty pieces, repeat once a day for three days; thereafter, top up monthly or when the wood turns pale and feels rough. Never put oiled wooden utensils in the dishwasher—the cycle strips oil and stresses the grain.
Maintenance, Safety, and Sustainability Considerations
Choose refined, food-grade coconut oil if you prefer a neutral scent; virgin oil also works but may lend a faint aroma. Store the jar sealed and away from heat to preserve freshness. While coconut allergies are uncommon, discontinue use if any sensitivity occurs. Because the oil is highly saturated, it has better shelf stability on wood than many seed oils, reducing the risk of rancid odours. If you want extra hardness, blend a small amount of beeswax into melted coconut oil and apply as above, then buff well.
Compared with mineral oil, coconut oil offers a plant-derived option with a more substantive, moisture-repellent finish. It also avoids the drying behaviour and potential allergen risk of some nut oils used in finishes. Remember that no oil makes wood waterproof; it simply slows movement and guards against stains. Recondition after abrasive scrubbing, heat exposure, or seasonal humidity swings. Light, regular care is more effective than heavy, infrequent treatments.
In daily kitchen life, coconut oil’s fatty acids give wooden utensils a reliable defence against water, stains, and fibre-raising, while keeping the tactile pleasure of natural timber. The application is quick, the finish is food-safe when properly buffed, and the chemistry is on your side: saturated MCTs build a thin, hydrophobic shield that lasts. Think of it as preventative maintenance that saves you from splits and premature replacements. Ready to refresh your spatulas, spoons, and boards—and perhaps test a beeswax blend on your busiest chopping block to compare results?
Did you like it?4.6/5 (29)