In a nutshell
- 🧊 Use the cold-iron method: press chilled metal onto wax to embrittle it, reduce adhesion, and lift cleanly without heat or smearing.
- 🛠️ Follow a clear process: chill the tool (iron, spoon, scraper), flake loose bits, press 10–30 seconds, lift at a shallow angle, and re-chill frequently; back fabrics with a cold tray.
- 🔬 Understand the science: metal’s thermal conductivity rapidly removes heat so wax contracts and turns brittle, lowering friction and preventing pigment or oils from being driven deeper.
- 🧱 Make surface-specific adjustments: glass/tile with a chilled razor or spoon, sealed wood with a rounded spoon, natural stone kept dry, textiles supported from beneath; finish with gentle buffs or pH-neutral wipes.
- 🧴 Keep chemicals minimal: prioritise re-chilling; if colour/scent residues remain, use a tiny amount of isopropyl alcohol only after bulk removal and spot-test delicate finishes.
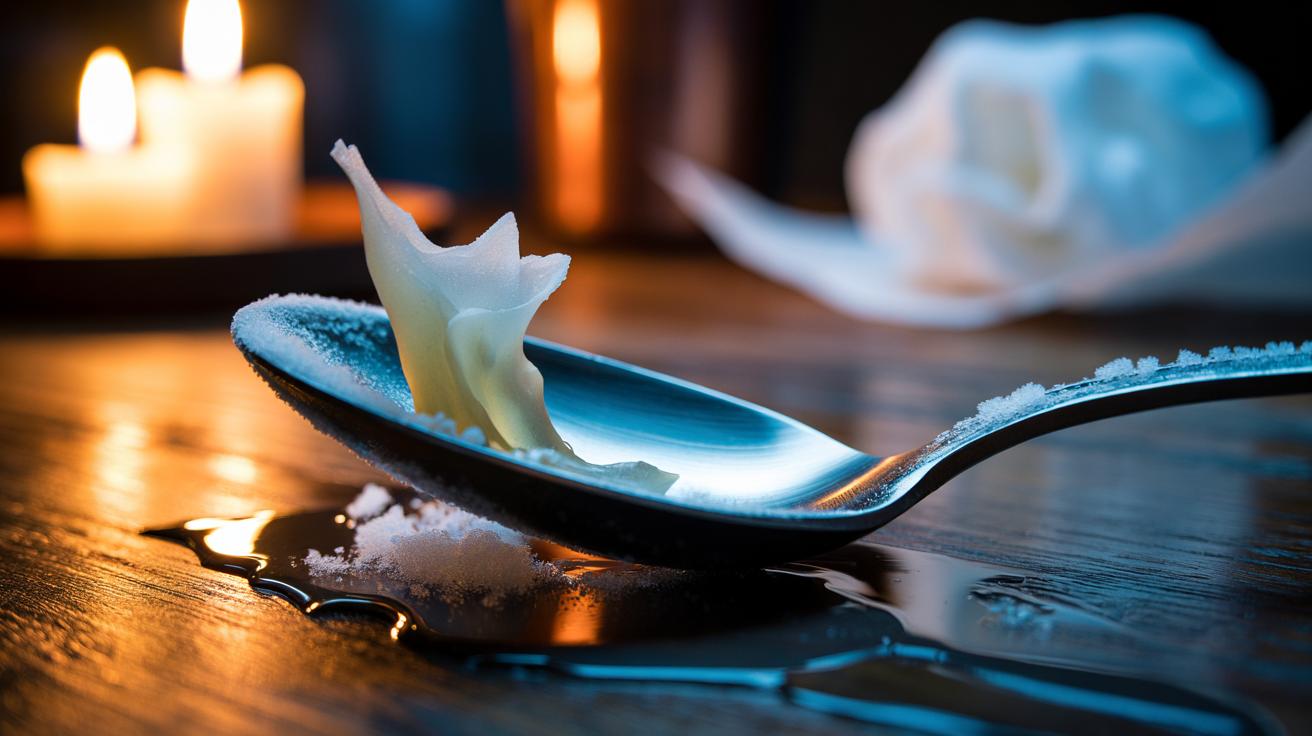
Spilled candle wax still feels like an avoidable calamity until you learn the cold-iron method. Instead of melting and smearing the mess deeper into fibres or grain, you chill it fast and lift it clean. The secret is simple physics: metal steals heat, wax contracts, and adhesion gives way. A refrigerated iron, a frozen spoon, even a bag of ice pressed against a metal ruler turns into a precise, solvent-free remover. Do not heat the wax first; keep it solid and brittle. This method is kinder to delicate surfaces, quicker than scraping alone, and ideal for tidy, residue-free results.
What Is the Cold-Iron Method?
The cold-iron method uses a piece of chilled metal as a portable heat sink to stiffen wax instantly. By pressing a cold iron plate, spoon, or butter knife onto the spill, you draw out warmth from the wax far quicker than ambient air can manage. As the wax temperature falls, it contracts and turns brittle. The bond between wax and surface weakens, allowing the residue to shear off cleanly. The aim is not to smear or melt, but to embrittle and lift. That’s why chilled metal outperforms fingers, plastic scrapers, or room-temperature tools.
Think of the metal as both a cooler and a controlled lever. A flat, cold iron face steadies fabric; a spoon curves around drips on glass; a thin, chilled palette knife slides under flakes on wood. The result is targeted, low-force removal with minimal risk. For most household waxes, including scented blends and beeswax, a few seconds of firm, cold contact is enough to start the lift.
Step-by-Step: From Drip to Debris-Free Surface
Start by refrigerating or freezing your metal: a clothing iron (unplugged), a stainless steel spoon, or a thin metal scraper. While it chills, gently flake away any loose lumps with a plastic card to avoid gouges. Place a paper towel next to the spill for the chips you’ll lift. Keep the area dry to prevent condensation marks on vulnerable finishes. When the tool is cold, set its surface onto the wax for 10–30 seconds. You’re looking for a visible dulling and a hard feel under light pressure.
Switch from cooling to lifting. Hold the chilled edge at a shallow angle—about 15–25 degrees—and slide under the wax. Work in short strokes, refreshing the tool in the freezer or on an ice pack as it warms. On fabric, back the stain with a cold metal tray or an upside-down baking sheet to block penetration into fibres. On carpet, compress with a cold spoon first, then chip upward in layers. If residue persists, repeat the chill-and-lift cycle rather than resorting immediately to solvents.
Why Chilled Metal Works: The Science in Brief
Wax’s structure makes it responsive to temperature. As it cools below its softening point, its ductility plummets and it behaves like a brittle solid. Simultaneously, its volume contracts. That shrinkage loosens the interface with pores and fibres, cutting the energy needed to pry it free. Metal excels here because its thermal conductivity shuttles heat away fast, delivering a localised “cold shock” without spreading moisture or chemicals. Lower adhesion plus higher brittleness equals clean separation.
There’s another advantage: a chilled tool reduces friction. The metal’s smooth face glides under the wax with less drag, which limits smearing and protects finishes. For delicate varnish or soft timber, use a rounded, cold spoon rather than a sharp blade and expect several short passes. If micro-residue remains, a final cold press followed by a soft cloth buff usually restores clarity. Avoid hot irons and aggressive rubbing, which can drive pigments and fragrance oils deeper.
Different Surfaces and Quick Adjustments
Every material tolerates pressure and moisture differently, so adjust your approach. On glass and glazed ceramics, a chilled scraper at a low angle produces a near-instant release. On sealed wood, cool the wax longer and lift with a rounded edge to protect the finish. Natural stone prefers no water; keep tools dry and follow with a pH-neutral wipe. For textiles, support the fabric with a cold tray beneath so wax can lift upward rather than wedging into threads. Patience and frequent re-chilling often beat brute force.
| Surface | Preparation | Best Tool | Post-Clean Touch |
|---|---|---|---|
| Glass/Tile | Dry, dust-free | Chilled razor or spoon | Microfibre buff |
| Sealed Wood | Test hidden spot | Cold rounded spoon | Dry polish, no water |
| Natural Stone | Avoid moisture | Cold metal spatula | pH-neutral wipe |
| Fabric/Carpet | Cold backing tray | Chilled butter knife | Lint roll; spot clean |
| Painted Walls | Light pressure only | Cold plastic-backed spoon | Soft damp cloth |
If colour or fragrance oils linger, dab with a tiny amount of isopropyl alcohol on a cloth—only after the bulk has lifted cold. Keep solvents away from vulnerable finishes unless you’ve spot-tested first. Re-chilling remains the safest first resort.
The elegance of the cold-iron method is its restraint: rapid chilling, gentle leverage, clean lift, and minimal risk. It’s thrifty, kind to surfaces, and effective across glass, wood, fabric, stone, and paint. When wax splatters during a power cut or a dinner party, you now have a calm, quick plan that avoids smearing and harsh chemicals. Chill first, lift second, polish last—and the shine returns without drama. Which surfaces in your home challenge you most with wax, and how might you adapt this chilled-metal technique to make the next cleanup effortless?
Did you like it?4.6/5 (22)