In a nutshell
- ❄️ The freeze-first hack works by stiffening pressure-sensitive adhesives (PSAs) near their glass transition temperature (Tg), cutting tack and peel strength for a cleaner lift and less residue.
- 🧊 Method: cool the sticker for 60–120 seconds, then use a low-angle peel (15–30°); re-chill if it resists, and roll off softened residue—clean removal with fewer scratches and more cohesive failure in the glue.
- 🧰 Tools: match the job to a freezer, wrapped ice pack, or an inverted air duster; prioritise safety with short bursts, microfibre barriers, dry surfaces, and ventilation to avoid frostbite and finish damage.
- 🧱 Surfaces: on glass, plastics, painted wood, paper, electronics, and vehicle clearcoat, control chill to prevent brittleness and condensation; always test a hidden area first.
- 🔄 Follow-ups: after peeling, use a dab of cooking oil or citrus remover, then isopropyl alcohol on glass/metal; for decals, alternate brief chilling with gentle heat and repeat cycles for aged or crosslinked acrylic PSAs.
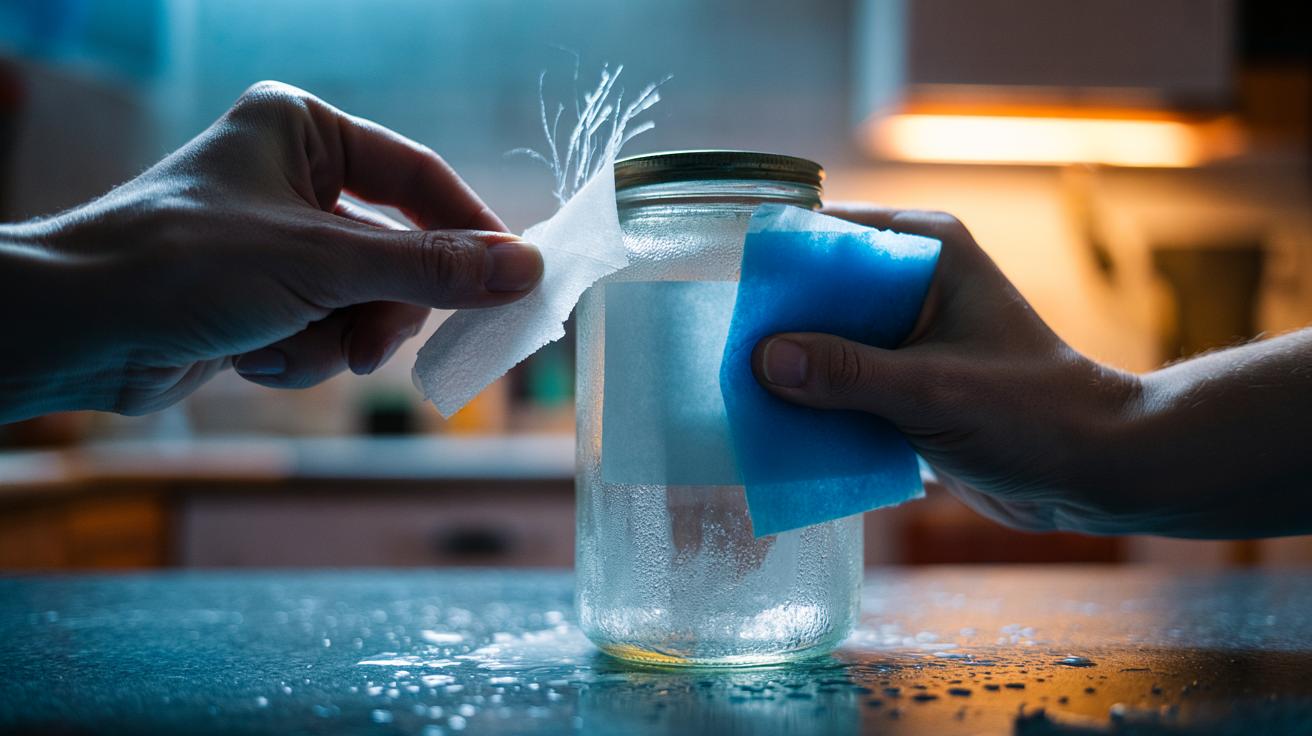
Stickers and labels cling with surprising tenacity, turning a five‑second tidy-up into a gummy ordeal. A quiet revolution has arrived from the world of materials science: cool it before you pull it. The freeze-first hack uses cold air to stiffen the adhesive, shrinking its grip and breaking that stretchy, rubbery bond. You get a cleaner lift, less residue, and fewer scratches from impatient scraping. Cold makes sticky simple. Whether you are de-badging a bike, rescuing a glass jar, or removing price tags from gifts, understanding why temperature matters is the difference between a mess and a breeze. Here is how cold air weakens adhesive—and how to use it safely.
Why Cold Air Disarms Adhesives
Most sticker glues are pressure-sensitive adhesives (PSAs), designed to be soft enough to flow into microscopic pores and tack instantly. When you expose these polymers to low temperatures, their mobility drops. The material approaches its glass transition temperature (Tg), switching from rubbery to glassy behaviour. In this stiffer state, the adhesive can’t dissipate peel forces by stretching, so the bond fails earlier and more cleanly. Cold robs the glue of its elasticity, which is exactly what makes it so clingy at room temperature.
There’s also a physical nudge at work: chilled layers contract slightly, loosening the interface between sticker and surface. That contraction, paired with reduced viscoelastic flow, lowers peel strength and tack. The result is less fibre tear on cardboard, fewer “strings” on glass, and a manageable edge to lift without gouging the substrate. It is a reversible, low-risk approach that avoids the fumes and finish damage sometimes caused by solvents.
Step-by-Step: The Freeze-First Method
Start with a test patch if the surface is delicate. Then choose your chill: a household freezer for removable objects; an ice pack or bag of frozen peas for fixed surfaces; or an inverted air duster for targeted, instant cold. Cool the sticker, not the whole object, wherever possible. Hold the cold source on the label for 60–120 seconds. On jars and metal, go longer; on thin plastics, keep it brief to avoid brittleness.
Once the adhesive firms, lift a corner with a plastic card or your thumbnail. Peel back slowly at a low angle—about 15–30 degrees—to keep stress at the adhesive line, not the surface. If the sticker resists, pause and re-chill. For thick vinyls or tamper-evident tabs, use short, stop-start peels rather than one long pull. Any remaining residue should now roll off with a finger or a dab of cooking oil on a cloth, thanks to the cold-induced cohesive failure within the glue.
Choosing the Right Cooling Tool
Selecting the right cold source depends on the item, the adhesive type, and the risk of moisture or thermal shock. The freezer is efficient for jars, metal tins, and removable lids; ice packs give control on furniture and windows; inverted air dusters deliver pinpoint, rapid cooling on electronics housings and awkward corners. Always balance cooling power with surface safety. Porcelain and tempered glass handle cold well but dislike sudden extremes; painted wood needs a gentle, wrapped ice pack to prevent condensation marks.
Compressed-gas dusters sprayed upside down can vent very cold propellant; use short bursts to avoid frostbite and to protect finishes. For car paint and lacquered furniture, interpose a microfibre cloth between the ice source and the surface. Keep the area dry, and ventilate if using aerosols. The guide below summarises typical use cases and cautions.
| Cooling Method | Approx. Temp | Best For | Typical Time | Cautions |
|---|---|---|---|---|
| Freezer (home) | -18°C | Jars, tins, metal lids | 10–30 mins | Condensation on thaw; dry fully |
| Ice pack/peas | 0 to -5°C | Glass, wood, plastics | 1–3 mins per pass | Wrap to avoid water marks |
| Inverted air duster | Down to -30°C | Edges, electronics housings | 5–15 sec bursts | Gloves; short bursts; ventilate |
Material-Specific Dos and Don’ts
On glass, aim for steady cooling and avoid shocking a sun-warmed pane. Lift from a corner and keep the peel angle shallow to prevent chipping at the edge. With plastics such as polypropylene or ABS, limit exposure to intense spot-cooling, as some grades turn brittle when chilled; use a wrapped ice pack instead. Never drench consumer electronics or battery compartments in cold that will cause condensation; target the label only and let the device return to room temperature before powering.
For painted wood and varnished furniture, place a soft cloth between ice and finish, then peel slowly to protect the film. On paper and book covers, chilling reduces fibre tear, but work in short intervals and roll residue gently with a finger. Vehicle clearcoat tolerates brief icing, yet always test a hidden spot and avoid trapping salty road moisture under the pack. Stone and ceramic generally behave well; just dry thoroughly to stop water spotting.
When to Combine Cold With Other Tactics
The freeze-first hack often removes the sticker cleanly, but some residues still cling. Cold prepares the glue for painless follow‑ups. After peeling, massage residue with a drop of cooking oil or citrus-based remover, then lift with a microfibre cloth. On glass and metal, isopropyl alcohol tidies the last haze. Use solvent only after cooling and peeling, not before, so you exploit the brittle phase to minimise spread.
For vinyl badges or decals, alternate short chilling with careful use of a warm hairdryer once most of the area is off—cold to crack the bond, gentle heat to smooth the remaining film. On cardboard packaging, stick to cold plus mechanical rolling; liquids can stain fibres. If an old acrylic PSA has crosslinked, multiple chill-peel cycles beat brute force. Patience pays: repeated brief cooling creates micro-fractures within the adhesive, reducing the need for aggressive scraping.
Cold air doesn’t just numb; it disarms the very physics that make stickers stubborn. By driving the adhesive closer to its glass transition, you trade rubbery grip for brittle compliance, letting low-angle peels do the work without gouging, fumes, or drama. Keep moisture in check, test sensitive surfaces, and let cold lead the way before any solvent or heat. The simplest fix is often the smartest. With a freezer shelf, an ice pack, or a short burst from an air duster, sticky problems become tidy solutions. Which item in your home is begging for a cool-headed rescue today?
Did you like it?4.6/5 (20)