In a nutshell
- 🧊🔥 Use the hot spoon + ice sequence to exploit wax’s thermoplastic behaviour: chill to make it brittle, then apply gentle heat to release a clean finish.
- 🧰 Follow the steps: ice in a zip bag, lift chunks with a plastic card, lay paper towel as a buffer, glide a warmed spoon’s back with conductive heat, replace towels, then buff to restore sheen.
- 🪵 Protect finishes: keep heat moving on polyurethane, blot moisture on hardwax oil, and go light on waxed floors; test discreetly and aim for low, even heat.
- 🧯 Try safe alternatives for tricky spots: low hair dryer with towel, compressed-air freeze, or a tiny bit of odorless mineral spirits on dyed residue (avoid on polyurethane).
- 🚫 Avoid damage: no knives, razors, scouring pads, steam mops, irons, or heat guns; keep grit away and rely on multiple gentle passes rather than pressure.
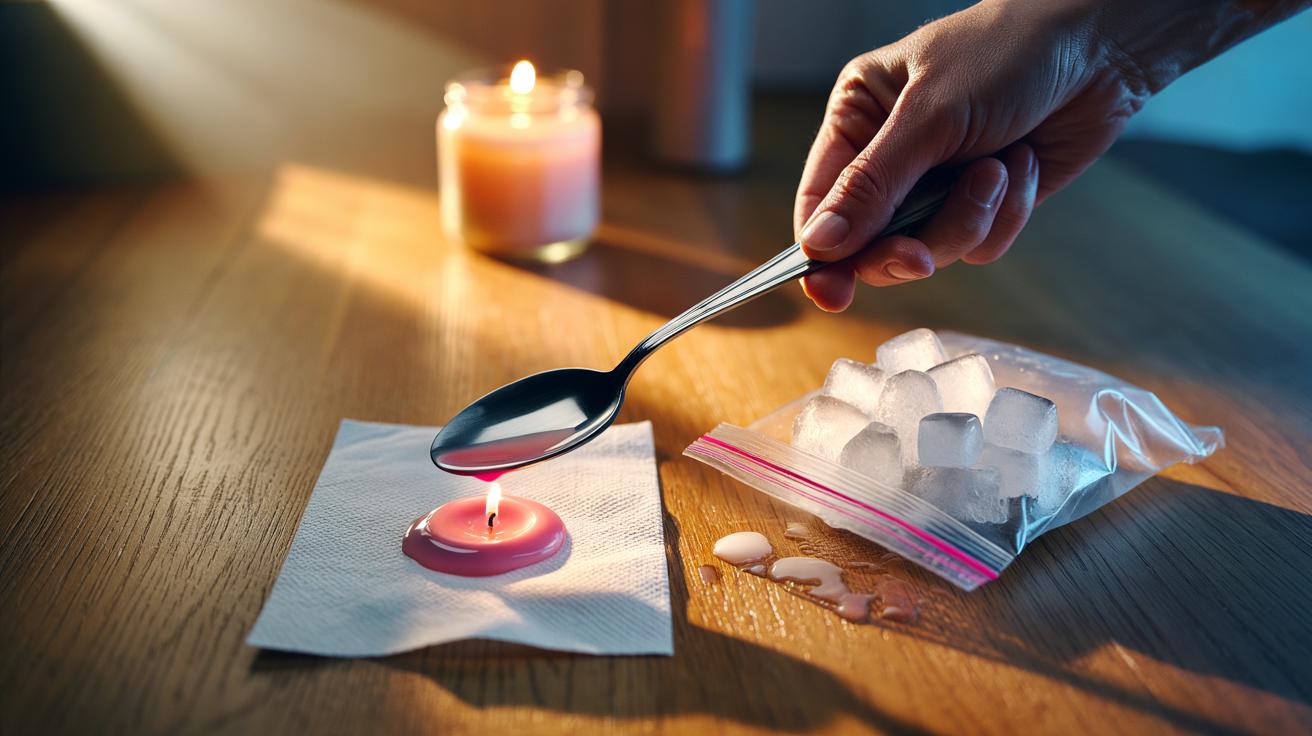
Spilled candle wax on a wooden floor looks disastrous, but the simplest fix uses two household standbys: ice and a hot spoon. The cold-then-heat sequence exploits wax’s thermoplastic nature, turning a sticky smear into a removable film with minimal risk to your finish. Begin by chilling the blob until it turns brittle, then apply gentle, focused warmth to liquefy only the upper layer, drawing it into an absorbent barrier. This method avoids harsh solvents and aggressive scraping, so it’s ideal for polyurethane, oil, and even waxed surfaces. Here’s the science, the exact steps, and the pitfalls to avoid when restoring a clean, gleaming floor.
Why Cold-Then-Heat Works on Wax and Wood
Wax is a phase-change material: soft and smear-prone when warm, but brittle below its glass transition point. Icing drives the temperature down so internal bonds tighten and the mass fractures, reducing adhesion to the floor. That lets you lift bulk wax mechanically with far less force. Wood finishes, by contrast, can be marred by pressure or scuffed by grit. By making the wax fail before the finish, you preserve the surface while removing most of the contaminant in seconds.
Heat then reverses course—but only in a controlled, localised way. Warming a metal spoon and gliding it over a paper towel melts the thin residue, which capillary action wicks into the fibres. The spoon’s curved back delivers gentle, even conductive heat that never lingers in one spot. Because the towel sits between tool and timber, you avoid direct hot contact, steam, and pooled liquid wax. Precision heat plus an absorbent buffer equals a clean release, leaving the finish intact and the grain free of cloudy halos.
Step-by-Step: The Hot Spoon + Ice Technique
First, trap the wax: place a few ice cubes in a zip bag to keep moisture off the wood and press over the spill for 60–90 seconds. When the wax turns opaque and hard, lift away chunks with a plastic card or fingernail, working with the grain. Vacuum grit. Lay two layers of plain, white paper towel on the spot. Submerge a metal spoon in hot tap water, dry its back quickly, and test the warmth on your wrist. The spoon should feel hot, not scorching.
Now, stroke the back of the spoon over the towel in small arcs, moving continually so heat stays gentle and even. Replace the towel as it absorbs molten wax. Re-warm the spoon in water as needed; avoid open flame. For edges and grooves, fold the towel into a firm pad and press with the spoon tip. Finish by buffing the area with a dry microfiber cloth. If shine looks dull, a tiny dab of floor polish restores uniform gloss.
| Item | Use | Notes |
|---|---|---|
| Ice in zip bag | Brittlises wax for easy lifting | Prevents meltwater on wood |
| Metal spoon | Applies gentle, even heat | Use the curved back only |
| Paper towel | Wicks melted wax away | Choose plain white, unscented |
| Plastic card | Flicks off chilled chunks | Work with the grain |
| Microfiber cloth | Final buff to even sheen | Clean and lint-free |
Avoiding Damage to Finishes and Floors
Different finishes tolerate heat and moisture differently. Polyurethane is tough but can imprint from prolonged heat; oil finishes repel water but mark under pressure; waxed floors are more forgiving to wax contact but sensitive to solvents. Keep water in the bag, wipe condensation promptly, and limit spoon temperature. Never park the hot spoon in one place. Work clean: a single grain of grit under a towel can scuff a satin sheen. Always test on an inconspicuous corner if the floor is antique or French-polished.
As a rule of thumb, aim for under 60°C on the spoon’s back—the heat that’s uncomfortable to hold but not dangerous. If the wax stain contains dye from a scented candle, expect faint tinting in the pores; repeat the cycle or use a targeted cleaner suited to your finish. On bare, softwood boards, moisten the towel very lightly with mineral oil before heating to slow absorption. Patience beats pressure: many light passes outperform one aggressive attempt.
| Finish Type | Sensitivity | Practical Tip |
|---|---|---|
| Polyurethane | Heat imprints, solvent sensitive | Keep heat moving; avoid spirits |
| Hardwax Oil | Pressure marks, water spots | Blot condensation quickly |
| Waxed Floor | Solvent softens finish | Use minimal heat; re-wax if needed |
When to Try Alternatives—and What to Avoid
When the residue sits deep in cracks or textured planks, try a hair dryer on low with a diffuser, paired with a folded paper towel, or blast the spot briefly with an inverted can of compressed air to freeze hard-to-reach crumbs before the spoon stage. On old waxed floors, a drop of odorless mineral spirits on a cotton bud can lift tinted smears after the main removal. Ventilate and keep solvents away from polyurethane unless the manufacturer approves.
A few tactics belong firmly on the do-not list. Do not attack wax with knives, razor scrapers, scouring pads, or steam mops; they cut, haze, or swell wood and finishes. Avoid colored paper towels that may bleed under heat. Skip irons and heat guns; they concentrate too much energy and can telegraph shine changes. If a cloudy ring remains, the culprit is often micro-scratching: re-clean, then buff with a drop of floor polish matched to the sheen—matte, satin, or gloss.
Mastering the ice-plus-spoon method turns a domestic mishap into a quick, almost satisfying mini repair. It leverages simple physics to shift wax from your floor into an absorbent barrier, leaving the finish calm and unchanged. Keep the sequence in mind—cool to fracture, warm to release—and handle heat with care. Stock a zip bag, a clean towel, and a trusty spoon in your cleaning kit, and you’re ready for the next candlelit evening. Which step or small tweak would make this technique easiest to use on the floors in your own home?
Did you like it?4.6/5 (25)