In a nutshell
- 🔬 The science: thermal contraction makes chilled wax brittle and reduces adhesion; low, dry heat then liquefies residue so it wicks into paper.
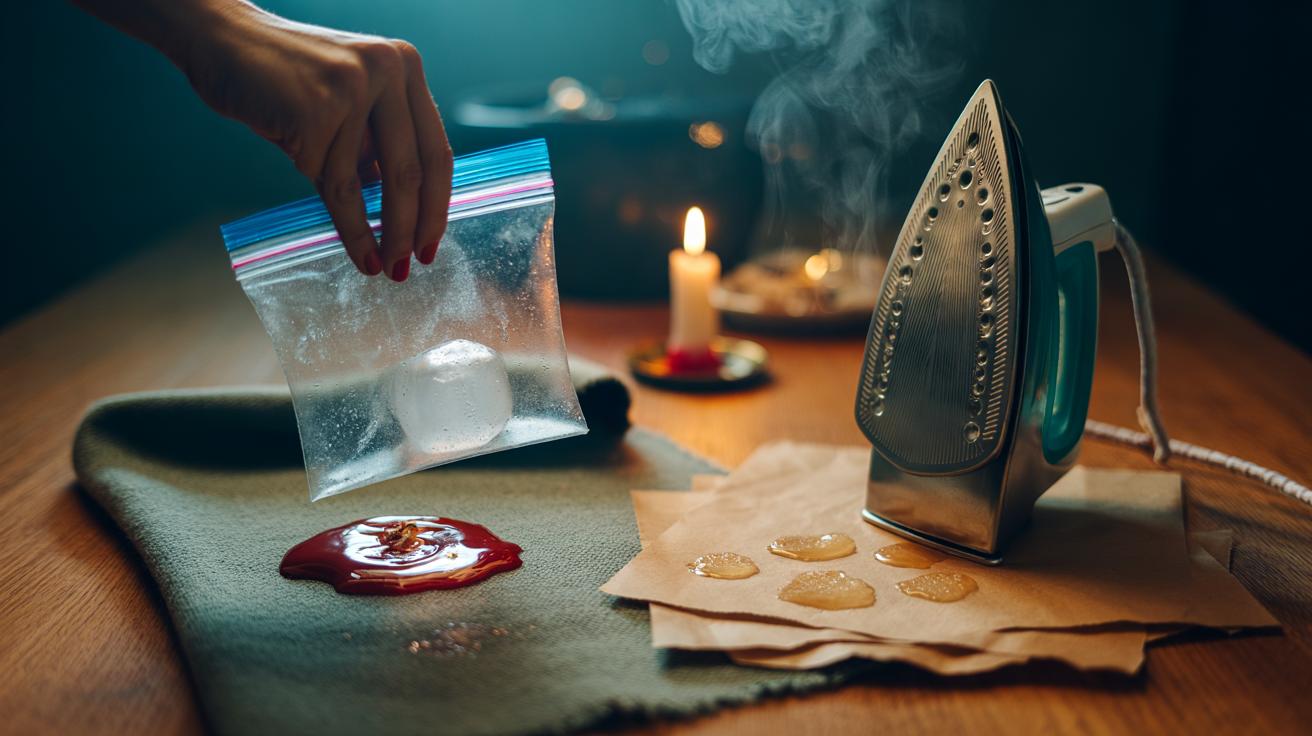
- 🧊 Method: Bag an ice cube, chill until wax turns opaque and rigid, gently scrape, then iron on low with absorbent paper, refreshing sheets as they saturate.
- 🧵 Surface-specific tips: Natural fabrics handle low–medium heat; synthetics need lowest settings; wood requires bagged ice and a light buff; carpets benefit from section-by-section treatment, with dye tackled after wax removal.
- ⚠️ Safety essentials: Use no steam, keep the iron moving, avoid knives on finishes, perform patch tests, and protect surrounding areas from flakes.
- 🌿 Eco-savvy choices: Prefer unprinted brown paper and reusable ice packs; rely on short, repeated passes—freeze, flake, and wick—and seek pros for velvet or suede.
Spilt candle wax can feel like a domestic disaster: a glossy puddle that grips table tops, carpets, and jumpers with uncanny tenacity. Yet the simplest cure is hiding in your freezer and your ironing cupboard. The ice cube + iron trick uses temperature control to make wax first brittle, then mobile, so it lifts away cleanly. Cold shrinks and stiffens the residue; gentle heat then draws out the last traces. This approach is quick, low-cost, and kinder to surfaces than harsh scraping or solvents. Here’s how the physics works, why it’s safe when done properly, and the precise steps to rescue everything from wool throws to oak sideboards.
The Science: How Cold Makes Wax Snap Off
Most candles are made from paraffin or beeswax, long-chain hydrocarbons that soften with warmth and harden as they cool. When you apply an ice cube, thermal contraction sets in: the wax shrinks faster than the surface beneath it. This mismatch in movement creates micro-gaps at the interface, weakening adhesion. Cold turns pliable wax into a brittle shell that fractures cleanly, so you can flick off large flakes rather than smearing a greasy film deeper into fibres or grain.
The transformation hinges on wax’s glass-transition behavior. As temperature drops, wax shifts from rubbery to glassy, losing flexibility. That rigidity prevents it from deforming around the tiny bumps of fabric or wood pores. Reduced surface contact equals reduced grip. On textiles, fibres spring back when chilled, further breaking the bond. On hard surfaces, contraction encourages the wax to lift at the edges, ready for a careful nudge with a plastic card.
Then comes controlled heat. Low, dry ironing warms residual wax just enough to liquefy it without spreading. An absorbent barrier—brown paper or plain kitchen towel—acts like a wick. The wax migrates upward into the paper rather than sinking downward, leaving the surface below clean and dry.
Step-by-Step: The Ice Cube and Iron Method
Start by protecting the area. Pick off any loose chunks with fingers; do not rub. Wrap an ice cube in a zip bag or cloth to avoid condensation stains, then press it on the wax for a few minutes until the deposit turns cloudy and hard. When wax looks opaque and feels rigid, it’s ready to crack. Use a plastic scraper or the edge of a loyalty card to lift the mass gently, working from the perimeter inward to avoid gouging wood or pulling fabric threads.
For the faint residue, switch to heat. Lay two layers of unprinted brown paper or plain kitchen towel over the spot, set the iron to low or medium with no steam, and glide lightly for a few seconds. Lift, move to a fresh section of paper, and repeat. You’ll see translucent patches in the paper as wax transfers. Keep the iron moving and refresh the paper frequently to prevent re-depositing.
Finish by blotting with a clean cloth. On fabrics, launder as normal if the care label permits. On wood, buff with a small amount of neutral furniture wax or a drop of mineral oil to even the sheen. For carpets, comb the pile with fingers to restore texture. If colour from a dyed candle lingers, treat as you would a grease-plus-dye stain with a gentle, colour-safe detergent test on an inconspicuous patch.
Fabrics, Wood, and Carpet: Surface-Specific Tips
Different materials respond best to slight tweaks. On wool or cotton, chill thoroughly before any scraping to avoid fraying. Synthetics can melt, so iron on the lowest safe setting with a thick paper barrier. For delicate blends like silk or viscose, freeze and flake only, then use a barely-warm iron through several sheets of paper. On wood, ensure the ice is bagged to keep moisture off the finish; water can raise grain. Always test heat and solvents on hidden areas and avoid aggressive blades that score varnish.
| Surface | Cooling Time | Iron Setting | Notes |
|---|---|---|---|
| Natural fabrics (cotton/wool) | 3–5 minutes | Low–Medium, no steam | Use two layers of brown paper; launder after. |
| Synthetics (polyester/nylon) | 4–6 minutes | Low, no steam | Short iron passes; avoid melting fibres. |
| Wood (varnished/oiled) | 2–4 minutes | Low, brief touch | Ice in a bag; finish with a light buff. |
| Carpet | 5–7 minutes | Low–Medium, no steam | Work in sections; lift pile after. |
If the candle was strongly coloured, lingering dye may need separate attention. Dab, don’t rub, with a mild, colour-safe stain solution after you’ve removed the wax itself. Deal with wax first, pigment second. Avoid silicone-coated baking parchment during the heat step—it resists absorption. Unprinted paper towel or kraft paper remains the best capillary wick.
Troubleshooting, Safety, and Eco-Savvy Alternatives
If wax smears rather than lifts, it wasn’t cold enough. Re-chill until it turns brittle. If paper sticks during ironing, your setting is too high or the paper is saturated; switch to a fresh sheet and reduce heat. Never use steam: water pushes molten wax deeper into fibres. For textured woods, use a soft toothbrush after chilling to dislodge crumbs from pores, then a minimal heat pass through paper to draw out the trace film.
Safety matters. Keep the iron moving to avoid scorching. Do not use knives on polished finishes. Shield nearby areas with a cloth to catch flakes. If your candle contained fragrance oils, a faint scent may linger; air the room and consider a gentle wipe with diluted, pH-neutral soap after the wax is gone. Patch tests prevent nasty surprises, especially on antiques and delicate synthetics.
Prefer greener materials? Choose unprinted brown paper over glossy magazines, which can transfer ink. Reusable ice packs stop drips and can be re-frozen. Where heat is risky—velvet, suede—limit the process to the cold step plus a meticulous flake-off, then use a professional cleaner if needed. The secret is patience: short, repeated passes beat one overheated blast, preserving fibres and finishes while restoring your surface to its pre-candle calm.
The ice cube + iron trick thrives on simple physics: cool to break the bond, warm to lift the residue. With a plastic scraper, absorbent paper, and a steady hand, wax surrenders from fabrics, timber, and carpet without drama—and without harsh chemicals. Small adjustments for surface and candle type make all the difference, from avoiding steam to bagging your ice. Once you’ve mastered the rhythm—freeze, flake, and wick—you’ll never fear a toppled taper again. Which surface in your home challenges you most with wax spills, and what clever tweak might refine this method for your setting?
Did you like it?4.4/5 (29)