In a nutshell
- 🎯 A taut rubber band stretched across the can acts like a squeegee, stopping drips, keeping the rim clean, and delivering a noticeably clean edge as excess paint falls back into the tin.
- 🛠️ Step-by-step setup: choose a wide, sturdy band; stretch it across the centre; dip the brush 1/3–1/2 bristle depth; wipe lightly on the band; keep the rim pristine and cover the can during breaks for consistent controlled loading.
- 🧪 Choose materials wisely: natural rubber for water-based paints; Nitrile or Silicone for oil-based/solvent coatings; match band width to brush size and keep spares to avoid fatigue and snapping.
- 📏 Edge quality: measured loading enables crisp cutting-in, reduces sags and lap marks, and prevents pigment crust on the rim, helping the brush lay off smoothly for crisp lines.
- ♻️ Practical benefits: less waste and mess, better lid resealing, longer paint life, and a faster, cleaner workflow—all from a low-cost, high-impact hack.
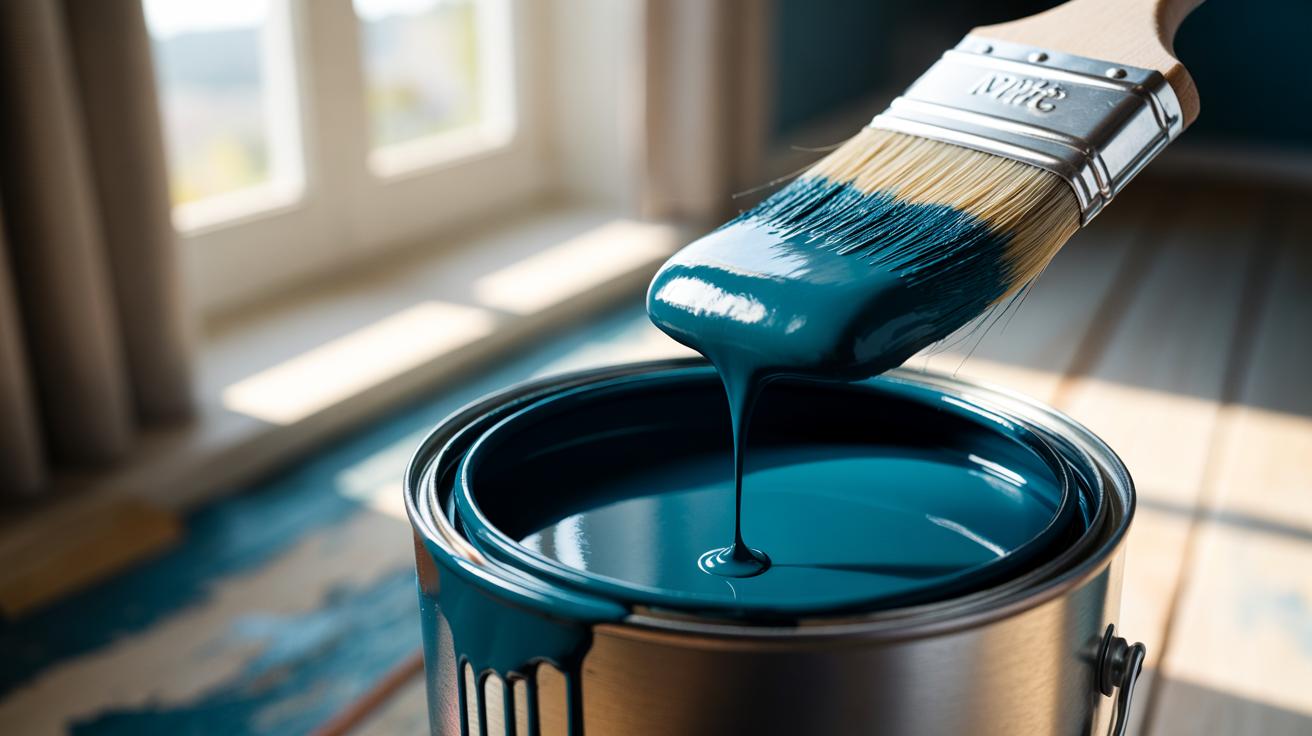
There’s a humble decorator’s hack that saves time, paint, and patience: the rubber band stretched across an open can to stop drips. Instead of wiping a brush on the tin’s rim—where paint pools, gums up the lid, and trickles down the side—you swipe across the band so excess falls straight back into the can. The result is tidier hands, cleaner tins, and a noticeably clean edge on skirting and trim. Keep paint out of the rim channel and you prevent mess before it starts. For DIYers and pros alike, this tiny tweak refines brush loading, protects finishes, and turns a weekend job into a crisp, controlled operation.
Why a Rubber Band Beats the Tin Rim
Wiping on the rim seems logical, but it creates a trap. The groove around the lid captures paint, then capillary action pulls it over the lip. As you pour or move the tin, those glossy beads escape and smudge your work. A taut rubber band stretched across the centre of the opening behaves like a flexible squeegee. It shears off just enough paint from the bristles while leaving a consistent film on the brush. Consistent loading equals consistent lines. Because the excess drips back into the reservoir, you lose less paint and keep the container’s edges clean, ready to reseal without a crust forming.
This method also improves flow. By avoiding the rim, you reduce air bubbles and spatter caused by aggressive scraping. The band’s slight give limits damage to bristle tips, which helps the brush lay off smoothly. Less overload also means fewer sags on verticals, fewer lap marks, and steadier cutting-in along ceilings, frames, and coving.
Step-by-Step: Setting up the No-Drip Band
Open the tin and wipe any factory seal residue from the rim so the band seats cleanly. Choose a wide, sturdy band and loop it vertically around the can so it crosses the opening dead centre. It must be taut; twist and re-loop if needed. Dip the brush only a third to half its bristle length into the paint, then pull it gently across the band on both sides. The aim is to remove excess, not to wring the brush dry. Rotate the can occasionally to keep the wipe point fresh and to avoid wearing one spot thin with pigment.
As you work, return to the same light wipe. If you see paint pooling on the band, it’s too loose or too narrow; tighten or swap it. Avoid scraping on the tin’s rim—keep that area pristine for a clean reseal. If you pause for tea, cover the can with a card and the band still in place. This slows skinning and keeps dust out while preserving your loading routine.
Choosing the Right Rubber Band and Can
The best results come from matching band to paint and can. Wider bands (8–12 mm) spread pressure, offering a smoother squeegee effect. For water-based emulsions or acrylic trim paints, standard natural rubber works well. Solvent-rich varnishes and oil-based systems can swell or degrade ordinary bands; opt for nitrile or silicone when in doubt. On 2.5 L and 5 L tins, use bands that can stretch without thinning to a thread. Too tight and the band may snap; too slack and it droops into the paint.
| Band Material | Pros | Compatible Paints | Notes |
|---|---|---|---|
| Natural Rubber | Cheap, grippy | Water-based (emulsion, acrylic) | May soften with solvents |
| Nitrile | Solvent-resistant | Oil-based, alkyds, primers | Stays elastic longer |
| Silicone | High heat and solvent tolerance | Specialist coatings | Often reusable, easy to clean |
| EPDM | Weather-resistant | General purpose | Check for paint compatibility |
Match band width to brush size; a 50 mm brush benefits from a broader wipe zone than a 25 mm sash brush. If your can has a built-in pour lip, place the band off-centre to avoid pooling. Keep a few spares in the kit; paint and solvents slowly fatigue even premium bands.
Edge Quality: How Controlled Loading Delivers Crisp Lines
Sharp lines rely on the right amount of paint at the brush tip. Overloaded bristles flood the edge, leaking under tape or bleeding onto adjacent surfaces. The centred rubber band meters paint to a fine, repeatable film, enabling the feather-light pressure needed for fine cutting-in. Less paint on the brush equals more control and a cleaner edge. The band also keeps pigments mixed; every wipe returns heavy solids to the pot rather than leaving them drying on the rim where they flake later into your finish.
When edging, angle the brush so the longest bristles meet the line first, then glide and lift at the end of each stroke to avoid ridges. The controlled load helps the paint level before it tacks, reducing lap marks. Pair the technique with quality tape or a steady hand on bare lines. On doors and trim, the payoff is immediate: fewer touch-ups, minimal sanding between coats, and a smooth, continuous sheen across panels and profiles.
A simple rubber band delivers a real upgrade: cleaner tins, better brush care, and sharper edges, all for pennies. It streamlines workflow, cuts waste, and keeps the lid sealing properly so your paint lasts longer. Small interventions can transform the finish. Once you’ve trained your hand to wipe on the band, you’ll notice steadier lines and less fatigue, because the brush simply behaves better. Ready to test it on your next room, banister, or front door—and to experiment with different band materials to suit your favourite paints—what surface will you perfect first?
Did you like it?4.4/5 (27)