In a nutshell
- 🔧 A Finnish-inspired method uses everyday tape to seal door draughts, creating a quick, reversible gasket that cuts convective heat loss and boosts comfort.
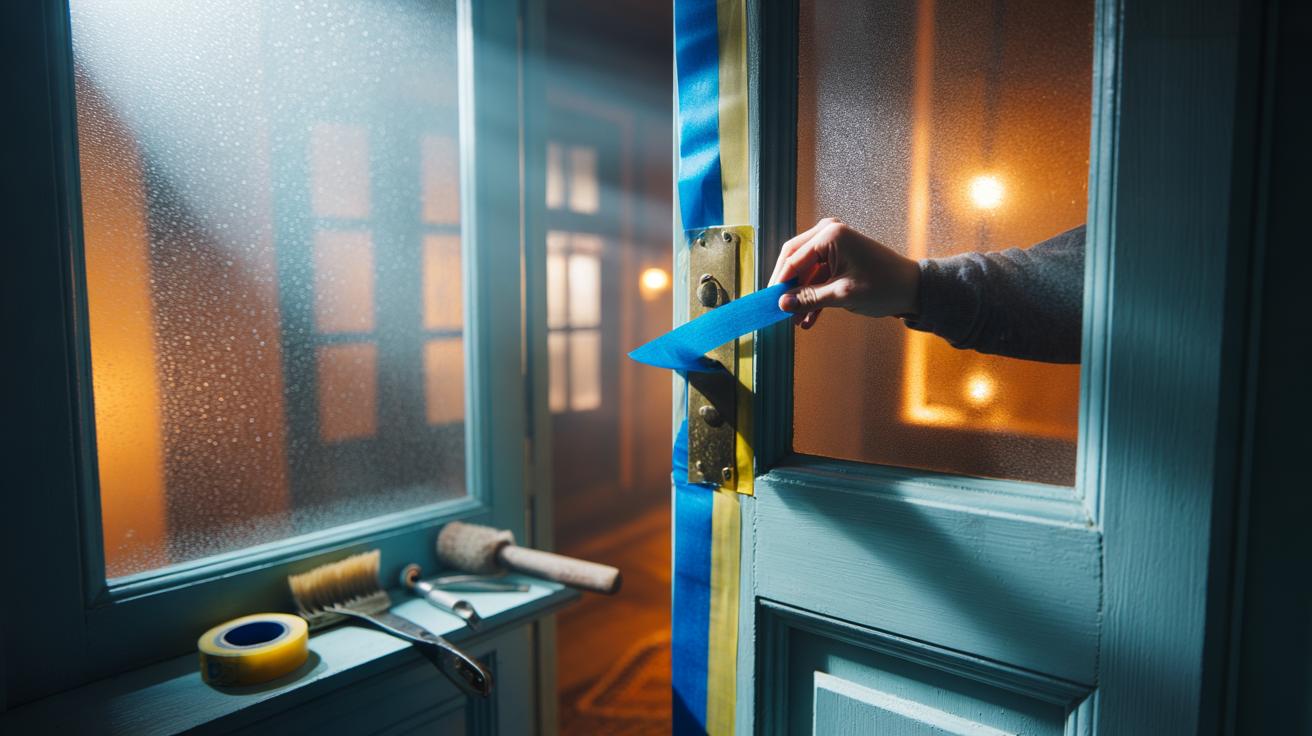
- 📝 Step-by-step: clean the frame, apply continuous strips along the stop bead on latch, top, and hinge sides, overlap for bigger gaps, and trim near the latch—temporary, landlord-friendly, and done in minutes.
- 🧰 Choose wisely: painter’s tape (clean removal), masking tape (stronger grip), or electrical tape (flexible in cold); test first on older finishes to avoid residue.
- 💷 Potential savings: reducing infiltration can trim heating demand by a few percent—adding up to tens or even low hundreds of pounds across a UK winter, especially at higher tariffs.
- ⚠️ Safety and upgrades: keep exits clear, don’t block vents, check seals weekly, and plan durable fixes like compression weatherstripping, threshold seals, or self-adhesive foam for longer-term results.
Households across Britain are quietly borrowing a smart idea from Finland’s famously frugal winters: sealing door gaps with ordinary tape. This quick fix targets the draughts that siphon warmth from hallways and living rooms, forcing boilers to work harder. With minutes of effort and a roll of masking or painter’s tape, you can create a temporary seal that trims infiltration and shaves pounds off your next bill. It is not a full retrofit; it is a seasonal hack that buys immediate comfort while you plan longer-term weatherstripping or door adjustments. Because air leakage compounds heat loss, closing even small gaps can deliver outsized comfort gains, turning a chilly threshold into a snug barrier against the wind.
What Is the Finnish Tape Method?
At its simplest, the Finnish approach treats a door like a leaky valve and uses low-cost tape to form a compressible gasket along the frame. Cold air sneaks in through tiny perimeter gaps, the key driver of convective heat loss. By adding a thin line of tape to the stop bead or the rebate, you create a flexible edge the door presses against, cutting the draught without changing the hardware. In a country where winters bite hard, Finns have long prized these low-tech barriers as a stopgap until permanent weather seals are fitted.
Physics is on your side: infiltration becomes most noticeable when wind pressure builds outdoors and warm air rises indoors, drawing in cold air at the lowest gaps. Sealing the latch side, hinge side, and top edge reduces that pathway. It’s a reversible, landlord-friendly tactic that costs pennies and works within minutes, turning a rattling door into a tighter, quieter panel with noticeably fewer whistling draughts.
Step-by-Step: Sealing a Draughty Door With Everyday Tape
First, gather supplies: a clean cloth, isopropyl alcohol or mild soapy water, scissors, and a roll of painter’s tape or masking tape at least 25 mm wide. Test for leaks by moving a lit incense stick or a tissue around the frame on a breezy day; flutter shows the worst gaps. Clean and dry the frame where the tape will sit. Run a continuous strip along the stop bead on the latch side, pressing firmly so it bonds, then repeat on the top and hinge sides. Close the door and check for uniform resistance without excessive force on the latch.
For oversized gaps, lay a second strip slightly overlapping the first, or fold the tape lengthways to create a cushioned ridge. Reinforce the threshold with a draft brush or a temporary rolled cloth if needed. Never block gas appliance vents, trickle vents, or any dedicated ventilation grilles; target only the door perimeter. If the handle catches, trim the tape neatly around the latch plate. Label the date discreetly: temporary seals are easiest to maintain when you inspect them once a fortnight.
Which Tape Works Best and How Much Could You Save?
Different tapes have distinct strengths. Painter’s tape is the safest bet for most painted frames because it peels cleanly. Masking tape sticks a little harder but can leave residue on old paint. Electrical tape flexes well in cold but can stretch and creep. If you have a period door, test a small patch first; older varnishes can be fussy. The goal is a compliant, low-residue seal that holds through damp days and nightly temperature swings without tearing paint when removed.
| Tape Type | Typical Price (UK) | Pros | Cons | Best For |
|---|---|---|---|---|
| Painter’s tape | £3–£5/roll | Clean removal, low residue | Medium hold; may need doubling | Painted frames, rentals |
| Masking tape | £1–£3/roll | Good grip, widely available | Residue risk on old paint | Larger gaps, short-term seal |
| Electrical tape | £2–£4/roll | Flexible, cold-tolerant | Can stretch and creep | Uneven frames, cold snaps |
In a typical draughty terrace, cutting door infiltration can trim heating demand by a few percent; across a winter that can be tens of pounds, and in leakier homes nudging into low hundreds—especially at high tariffs. This quick fix doesn’t replace permanent weatherstripping or door planing, but it buys comfort and immediate savings while you plan upgrades. Pair it with letterbox brushes and keyhole covers for compounding benefits.
Safety, Durability, and When to Upgrade
Check the seal weekly. Look for peeling edges, damp spots, or friction marks that suggest the door is binding. Replace any loose sections promptly. To remove residue, warm gently with a hairdryer and roll off the adhesive before it hardens. Keep exit routes operable at all times and avoid taping over locks, chains, or fire safety devices. Where condensation is an issue, crack the coldest room’s trickle vent or schedule a 10-minute daily air exchange.
View tape as a seasonal measure. If the door still rattles or visible light shows around the edges, invest in compression weatherstripping, an adjustable strike plate, or a threshold seal. Tenants can choose self-adhesive foam strips for a tidy, longer-lasting finish. Homeowners might opt for routed silicone seals that last years. The Finnish-style tape trick is the bridge between discomfort and a proper fix—cheap, reversible, and surprisingly effective for a problem that steals warmth one invisible draught at a time.
In a winter defined by rising costs, this Finnish-inspired tape method offers an elegant, low-risk way to tame draughts and steady your energy bills. It’s the classic “do it now, upgrade later” tactic: a few measured strips today, a warmer hallway tonight, and a pathway to better sealing when time and budget allow. Used alongside basic draught-proofing, the cumulative savings can be substantial for a small outlay. Which door or window in your home would benefit most from a 15-minute tape test this week, and what results might you measure by your next bill?
Did you like it?4.4/5 (20)