In a nutshell
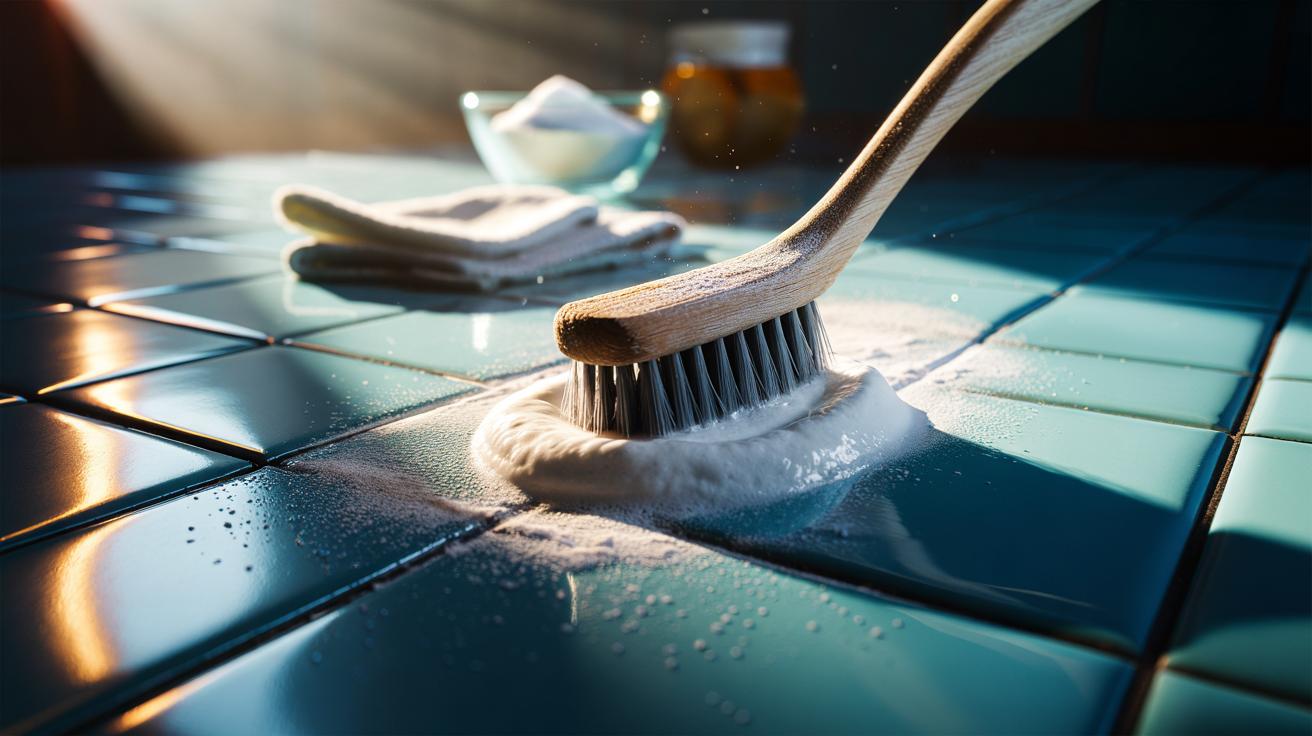
- 🪥 Toothbrush hack delivers precise grout cleaning: medium nylon bristles target narrow joints, keep paste contained, and lift dirt where mops and sponges smear.
- 🧪 Follow a step-by-step: dry prep, 3:1 bicarbonate of soda paste (swap water for hydrogen peroxide (3%) on mould), scrub across then along, rinse and dry; use white vinegar for limescale on non-stone surfaces and do not mix acids with bleach.
- 📋 Smart ingredients, clear ratios: safe abrasives, oxidisers, and degreasers; optional oxygen bleach (sodium percarbonate) for deep stains, with good ventilation and thorough rinsing.
- 🧼 Maintenance made easy: squeegee after showers, quick weekly brush with a dab of bicarb, thorough drying to prevent rings, and a protective grout sealer to slow re-soiling.
- 🧰 Tackle tough stains and know when to upgrade: bicarb–peroxide poultice for rust, oxygen bleach for organic marks; consider recolouring or regrouting if grout stays dark; an electric toothbrush helps in corners with gentle pressure.
Grout lines have a habit of stealing the spotlight for all the wrong reasons, turning a gleaming floor or shower into a grubby grid. The simplest fix hiding in your bathroom cabinet? A humble toothbrush. This toothbrush hack offers precision, power, and surprising speed, slicing through embedded grime without wrecking the surrounding tiles. It’s cheap, it’s effective, and it’s oddly satisfying. With a dab of the right paste and a few smart moves, you can restore crisp lines and fresh colour. Test on a discreet spot first, especially with natural stone, and you’ll be set for a deep clean that actually lasts.
Why a Toothbrush Beats Fancy Tools
Grout is a narrow trench, not a flat plain, so control beats brute force. A toothbrush gives you micro-targeting: short bristles concentrate pressure at the grout’s edges, lifting soil where mops and sponges smear. The head shape lets you run perpendicular to the joint, then along it, catching debris hiding under the tile lip. Old but firm bristles work best. Soft is gentle; medium is the sweet spot. An electric toothbrush? Surprisingly capable on stubborn corners, especially around taps and shower niches.
Pairing the brush with a mildly abrasive paste turns it into a tiny scrub plane. Bicarbonate of soda creates a fine grit that disrupts oily films without scouring glaze. Add a drop of washing-up liquid to cut soap scum, and you’re working smarter. Crucially, the toothbrush keeps paste in the joint instead of flooding the whole floor, saving time on rinse-down. Small tool, big leverage, minimal mess. That’s why professionals still carry one.
The Step-by-Step Grout Cleaning Method
Start dry. Dislodge loose grit with a vacuum crevice tool or a dry brush; grit left in the joint works like sandpaper on tiles. Mix a paste: 3 parts bicarbonate of soda to 1 part water. For mould-stained grout in showers, swap water for 3% hydrogen peroxide. Apply with a fingertip or small spatula, pressing into the joint. Work in half-metre sections; it keeps dwell times consistent. Leave for 5–10 minutes so the chemistry can soften grime and oxidise stains.
Scrub across the joint with short, choppy strokes, then along its length to pull residue out. Wipe slurry with a damp microfibre. Rinse well and buff dry to prevent mineral rings. In limescale-prone areas, a light spritz of white vinegar after rinsing helps dissolve chalky haze—never on marble or limestone. Never mix vinegar with bleach. Finish by drying the area thoroughly; moisture invites mould back. If you have unsealed cement grout, consider sealing once fully clean and dry.
Smart Ingredients and Safe Combinations
The right pairing makes the toothbrush unstoppable. Bicarbonate of soda acts as a safe abrasive. Hydrogen peroxide (3%) brightens and targets mould. White vinegar dissolves mineral deposits, but treat it as off-limits for natural stone. A touch of washing-up liquid lifts body oils and shampoo residue. Ventilate, wear gloves, and keep mixes simple. If you prefer powdered oxygen bleach (sodium percarbonate) for deep cleaning, dissolve fully and rinse generously to avoid residue.
| Purpose | Ingredient | Ratio | Dwell Time | Suitable For |
|---|---|---|---|---|
| Everyday grime | Bicarb + water | 3:1 (paste) | 5–10 mins | Ceramic/porcelain grout |
| Mould/mildew | Hydrogen peroxide 3% | Neat or 2:1 with bicarb | 10–15 mins | Showers, splashbacks |
| Soap scum, oils | Bicarb + washing-up liquid | 3:1 + 1 drop | 5–8 mins | Bathrooms, kitchens |
| Limescale haze | White vinegar | 1:1 with water | 3–5 mins | Not for natural stone |
Do not mix acids (vinegar) with bleach; it releases toxic gas. Likewise, avoid harsh wire brushes, which gouge grout. Choose nylon bristles, steady pressure, and patience. The chemistry does the heavy lifting.
Maintenance, Stains, and When to Upgrade
Once the grout is clean, keep it that way. After steamy showers, squeegee tiles, then give grout a quick once-over with a damp toothbrush and a dot of bicarb. Weekly, run the brush along high-traffic joints by the hob or sink. Drying matters: a quick towel buff halts the mineral rings that make clean grout look grubby. For rental refreshes, a grout sealer extends the time between deep cleans and helps repel spills.
Stubborn rust marks? Try a bicarb poultice with a little hydrogen peroxide; cover with cling film for an hour, then scrub. Organic stains may lift with oxygen bleach soaks. If grout is crumbling or permanently dark despite cleaning, it’s time to regrout or apply a grout recolouring sealer. An old electric toothbrush with a medium head is brilliant for corners, but avoid heavy pressure on hairline cracks. Preserve the joint; let the chemistry and bristles do the work.
The humble toothbrush hack restores tile grout with control, thrift, and almost surgical accuracy, and it sidesteps the waste and odour of heavy-duty cleaners. That small head reaches edges mops miss, while a tailored paste attacks grime types with minimal risk to tiles. Keep ingredients simple, respect stone surfaces, and seal if you can—maintenance becomes minutes, not hours. Next time the grout turns grey, will you reach for a pricey gadget, or give the small-but-mighty brush a chance and see how far precision can take you?
Did you like it?4.5/5 (27)