In a nutshell
- 🌱 Cardboard beats plastic: it blocks light, stays permeable to rain, decomposes into humus, and supports soil life—choose uncoated, non-glossy sheets and remove tape.
- 🛠️ No-dig layering method: overlap cardboard 10–15 cm, soak well, add 5–8 cm peat-free compost and 5–7 cm mulch; weight edges to prevent gaps and slash weeding by 70–90%.
- 📅 Planting made easy: set transplants through an X-cut in the card; autumn builds settle over winter, while spring builds need steadier moisture; top up mulch mid-season.
- 🐌 Troubleshoot smartly: keep edges tidy to deter slugs, weed lightly in surface mulch, double overlaps for bindweed, and use only plain cardboard to avoid coatings.
- 🌿 Long-term gains: expect less labour, healthier soil, and resilient beds that retain moisture, support worms and fungi, and deliver cleaner harvests.
The simplest weed control tool in a gardener’s arsenal isn’t a spray or a spade, but a sheet of plain cardboard. Laid thickly and topped with organic matter, a cardboard weed barrier smothers couch grass, nettles, and dandelions while nourishing the soil beneath. This layered, no-dig method turns tired beds and stubborn lawn into plantable ground in weeks, cutting maintenance to a fraction of the usual time. By blocking light while allowing air and water to pass, the barrier halts weed regrowth and accelerates soil life. For busy growers and first-time gardeners alike, layering offers a clean, low-cost route to abundance without back-breaking effort, chemicals, or plastic membrane.
Why Cardboard Beats Plastic for Weed Control
Plastic sheeting creates a quick blackout, but it also suffocates the ground, sheds water, and leaves microplastics behind. Cardboard, by contrast, decomposes into humus, feeds worms, and stays permeable enough for rain to reach roots. It forms a flexible lightproof barrier that suppresses weed growth while softening compacted soil. In British climates where rain is frequent, that permeability matters: the bed stays hydrated and plants establish faster. Choose uncoated, non-glossy boxes, remove all tape and labels, and avoid heavy inks. The aim is a breathable cover that breaks down cleanly while blocking light completely.
Weed seeds will always arrive by wind or birds, yet a well-made barrier prevents dormant banks from erupting. It denies perennial weeds the energy to reshoot, saving months of tug-of-war. As the cardboard softens, roots slip through into a thriving, crumbly substrate enriched by compost above. This living system is the opposite of sterile plastic mulches: it’s cleaner, cooler, and far kinder to pollinators and soil fungi. The result is resilient beds that demand less watering and far less weeding across the season.
Step-by-Step Layering: From Lawn to Productive Bed
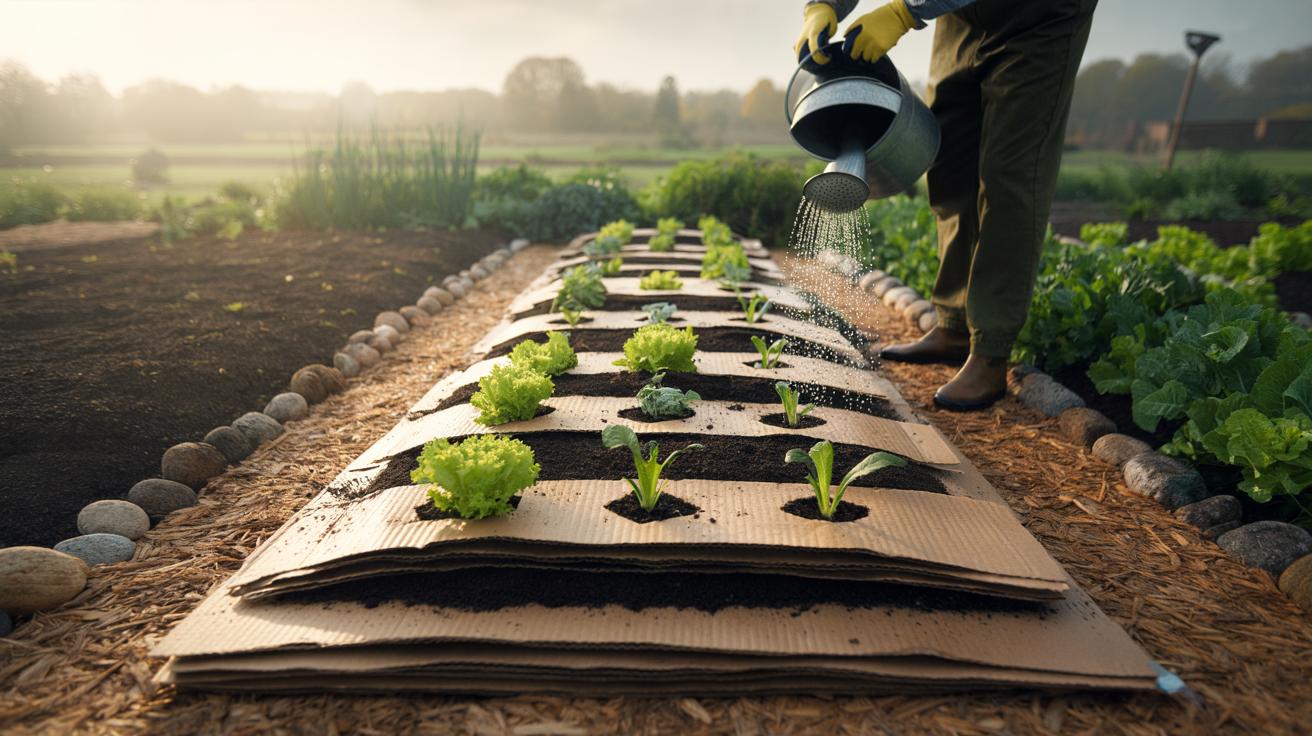
Start by scalping lawn or tall weeds to soil level, leaving the roots in place to decay. Lay overlapping sheets of cardboard with no gaps—think roof tiles—with at least 10–15 cm overlap at the edges to stop rhizomes slipping through. Soak the cardboard until it’s floppy; this locks sheets together and activates decomposition without inviting regrowth. On top, spread 5–8 cm of peat-free compost or well-rotted manure, then cap with 5–7 cm of mulch such as wood chips or straw. Edges are critical: weight them with stones or extra mulch to prevent lifting in wind.
For spring builds, plant immediately by pulling mulch aside, slicing an X through the cardboard, and tucking transplants into the compost layer. For autumn builds, let winter rains do the work and plant in early spring. Keep beds evenly moist for the first month to help soil biology knit layers together. Done properly, this method can reduce weeding by 70–90% in the first growing season. Replenish the mulch by 2–3 cm each year to maintain suppression and soil carbon.
| Layer | Recommended Thickness | Purpose | Notes |
|---|---|---|---|
| Cardboard | 2–3 sheets | Blocks light, halts weeds | Remove tape; overlap 10–15 cm |
| Compost/Manure | 5–8 cm | Planting medium, nutrition | Use well-rotted, peat-free |
| Mulch (chips/straw) | 5–7 cm | Moisture retention, ongoing suppression | Keep 2–3 cm from stems |
| Water | Until soaked | Binds layers, kick-starts decay | Essential on dry, windy days |
What to Plant and When: Timing Your No-Dig Plot
Transplants thrive in new layered beds because they bridge the initial settling period. Think brassicas, lettuces, beans, squash, and herbs. Cut an X through the cardboard for larger plants like pumpkins; for quick salads, sow directly in the compost strip where fine roots will exploit the upper layer. If building in late winter or early spring, prioritise transplants for reliability and speed. By midsummer, the barrier softens and most roots can pierce it with ease. Root crops such as carrots and parsnips do best once the compost is well-settled and free of lumps.
Timing matters in the UK’s stop-start seasons. Autumn builds are ideal: the barrier suppresses weeds over winter, worms churn the layers, and you plant into a ready bed by March or April. Spring builds still work—just water more diligently and expect a tad more weeding for the first month. Feed heavy croppers via an extra 2–3 cm of compost mid-season. Mulch top-ups after harvesting keep the cycle going and reduce watering during heatwaves.
Troubleshooting and Myths
Concerned about slugs? They relish damp edges, so avoid leaving thick cardboard exposed. Keep a clean edge, use minimal watering at night, and deploy beer traps or wildlife-friendly predators like frogs. Most slug pressure drops once the surface dries under a good mulch and plants are established. If weeds appear, they often sprout in surface mulch, not through the cardboard. Hoe lightly or hand-pull before they seed. Persistent invaders such as bindweed may slip in at edges; double your overlap, patch gaps fast, and consider a second layer mid-season where needed.
Another myth is that cardboard “poisons” soil. Plain, non-glossy card breaks down into carbon-rich material that feeds microbes; glossy, plastic-coated packaging is the culprit to avoid. Take out staples, tapes, and coloured plastic labels. In windy sites, peg edges with biodegradable pins or lay a temporary mesh until rain beds layers in place. If the bed dries out and lifts, re-soak and re-weight immediately to maintain a tight seal. With basic care, a cardboard barrier outperforms landscape fabric without leaving a trace behind.
Layering with cardboard offers a rare gardening trifecta: less labour, healthier soil, and cleaner harvests. It converts awkward spaces into productive ground while choking off the weed cycle at its source. Over time, the bed becomes a dark, friable sponge teeming with life, demanding little more than seasonal mulch and compost. That is the quiet magic of no-dig: fewer tasks, better results. If you’re staring at a weedy corner or tired lawn this weekend, why not test a single 1 m² patch and watch what changes by spring—what would you plant first, and how would you adapt the layers to your site?
Did you like it?4.6/5 (20)