In a nutshell
- 🌱 Source it free: collect 2‑litre PET bottles and HDPE milk jugs, plus pallets, canes, and salvaged cable ties/twine; clean, de‑label, and prep with safe tools and gloves.
- 🧭 Design smart: pick a footprint for your space (cold frame, tunnel, or cloche), aim south/south‑west, plan drainage, add simple doors, and build in low‑level gaps for ventilation.
- 🏗️ Build steps: cut bottle bases and sleeve into columns, make milk‑jug panels, lash a sturdy pallet frame with diagonals, tile a lightweight roof, and include a hinged lid plus a top vent.
- 💨 Hold fast and maintain: anchor with bricks, pegs, or sand‑filled bottles, add guy lines, manage daily ventilation, clean algae with diluted vinegar, support snow loads, and swap panels seasonally.
- ♻️ Why it wins: zero‑cost, waste‑cutting reuse that extends the growing season, shields seedlings from wind and rain, and stays portable, modular, and easy to repair.
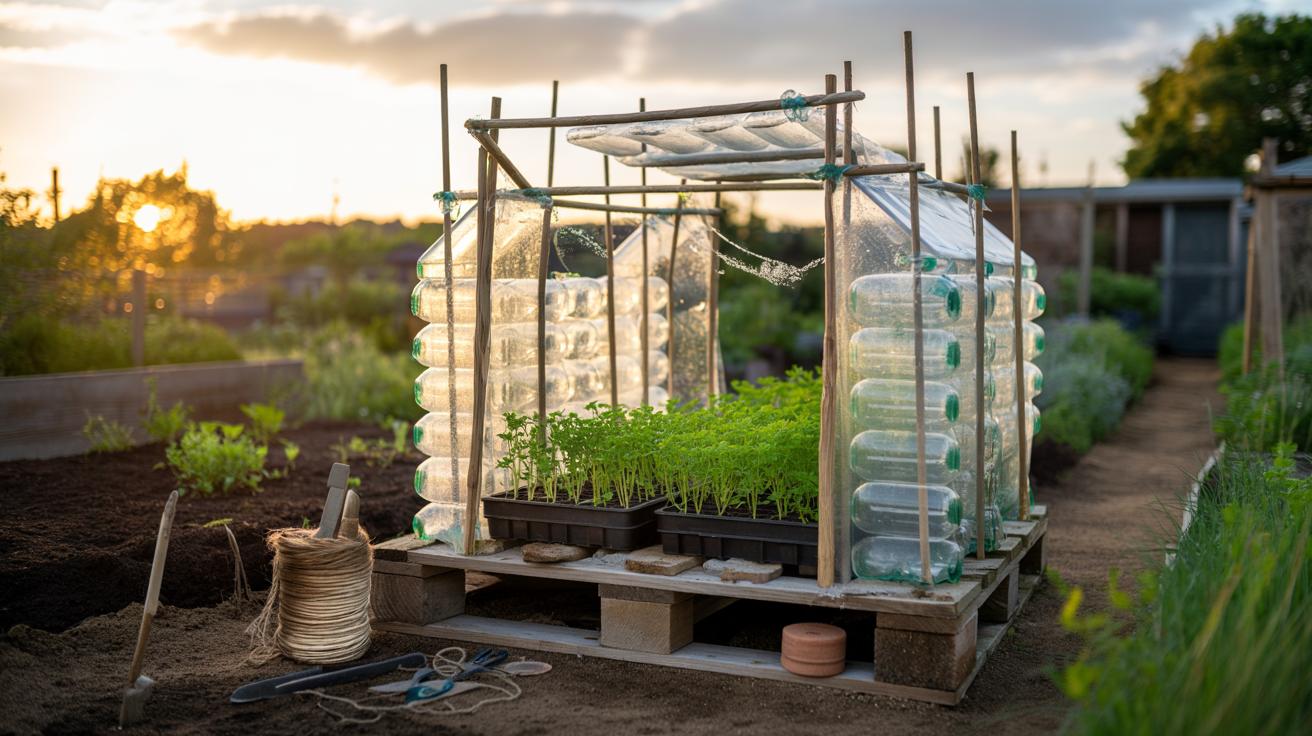
For gardeners with more creativity than cash, a DIY mini greenhouse built from discarded plastic bottles is a brilliant, waste-busting project. It’s quick to start, surprisingly sturdy, and kind to the wallet. Many UK households throw out a flood of clear PET and HDPE containers every week. Harness that stream. Build warmth, shelter, and a longer growing season for seedlings and salads. In a small yard. On an allotment. Even a balcony. The essential idea is simple: turn bottles into transparent bricks or columns, then fix them to a light frame to trap heat and block wind. What follows is a practical, street-smart guide that costs next to nothing.
Scavenging Free Materials and Safe Tools
Your best material is the humble 2‑litre clear PET drinks bottle. They’re light, tough, and readily available, as are translucent HDPE milk jugs for diffused light. Ask neighbours, cafes, school events, and office kitchens to save them for a week. Visit community recycling points with permission. Remove labels, rinse thoroughly, and let them dry to prevent mould. Keep an eye out for free pallets, discarded garden canes, or straight hedge cuttings. If you gather the right mix of clear bottles and sturdy sticks, you’ve already done half the job for free. Prioritise safe cutting: a sharp craft knife, scissors, and gloves. Work on a stable surface.
Think fixings without spending. Twine, cable ties from a neighbour’s shed, or wire reclaimed from old spiral notebooks all work. Bricks, stones, or sand-filled bottles make solid anchors. If a tool is missing, borrow from a community shed or swap with a friend. Don’t overcomplicate it—light framing plus bottle walls equals a weather-shedding shell that warms soil fast.
| Item | Recommended Quantity | Free Source | Role |
|---|---|---|---|
| 2‑litre PET bottles | 80–120 | Neighbours, cafes, events | Transparent walls/roof |
| Garden canes/straight sticks | 10–15 | Prunings, allotment swaps | Vertical supports |
| Pallet boards | 2–3 boards | Free pallet pile | Frame and base |
| Cable ties or twine | A handful | Salvaged/borrowed | Fasten bottles |
| Bricks/stones | As needed | Garden leftovers | Anchoring |
Design Options for Different Spaces
Space dictates form. For patios and balconies, a low cold frame built inside a crate concentrates heat near seedlings and salad troughs. On allotments, a waist‑high bottle wall set on a pallet base protects tender veg and keeps slugs at bay. Long, narrow beds suit a tunnel style using arched canes with bottles strung like beads. Windowsill growers can improvise a cloche from halved bottles clipped together. Pick a footprint you can reach comfortably from both sides to avoid crushing soil while you weed or water. Keep doors simple: a lift‑off panel or flap secured with string.
Light matters. Aim for a south or south‑west orientation to catch weak winter sun and early spring rays. Leave deliberate gaps low down for ventilation or cut a sliding window from a milk jug panel. Think wind load: sheltered corners outperform exposed rooftops. Finally, plan drainage; a gravel or pallet base stops cold, wet feet. It’s small design, big dividends. Sketch first, cut later—ten minutes on paper can save an afternoon of fixing mistakes.
Step-by-Step Build: Walls, Frame, and Roof
Prepare the bottles. Rinse, remove labels, and slice off the base of each PET bottle so they sleeve together end‑to‑end. Thread four to six onto a cane to form columns. For milk jugs, cut flat panels; they become shingle‑like tiles. Dry‑fit everything before you tie a single knot. You’ll spot wobbles now, not after an hour of lashing.
Build a simple frame. Two pallet boards can make a sturdy rectangle base; screw or lash corners. Add vertical sticks at each corner and mid‑span, then brace with diagonals to stop racking. Stand bottle columns upright, binding top and bottom to the frame with cable ties. Stagger joins to avoid weak points. Add a second horizontal rail midway and tie columns to it for stiffness. Short of ties? Twist salvaged wire tightly with pliers.
For the roof, lay a light cane ridge and pitch two slopes. Fix bottle columns horizontally like tiles, or overlap milk‑jug panels to shed rain. Create a basic hinged lid with a scrap hinge or cloth tape, so you can water and vent. Seal draughty gaps with offcut plastic and string. Leave a thumb‑sized vent near the top—heat without ventilation invites mildew.
Anchoring, Ventilation, and Winter Care
UK gusts test any structure. Anchor the base with bricks, tent pegs, or sand‑filled bottles wired to the frame. Add guy lines to windward corners. Keep the profile low if your site is exposed; a higher wall catches more gust. Ventilation is a daily habit: prop the roof on a stick at midday, close at dusk. Slide a bottle up or remove a panel on warm days to prevent cooked seedlings. A mini greenhouse should hold warmth, not trap excessive heat. Condensation is fine; dripping leaves are not. Aim for balance.
Maintenance is easy and free. Wipe algae with diluted vinegar, then rain‑rinse. Replace crushed bottles in seconds—spares are everywhere. In snow, brush off the roof promptly; add extra canes beneath for temporary support. Watch for mice nests and slug hideouts; tidy edges help. When summer hits, convert to a shaded cloche by swapping a few clear panels for mesh or perforated milk‑jug strips. The beauty of bottle builds is modularity—adapt the skin to the season in minutes.
This thrifty project turns rubbish into resilience. You capture heat, block wind, and stretch the growing year without spending a penny. The result isn’t just functional; it’s a conversation starter that teaches children about reuse and microclimates. Plastic bottles become bricks, canes become beams, and seedlings get a snug, bright home. If circumstances change, you can dismantle and rebuild elsewhere, taking the frame and columns with you. Ready to harvest earlier, harden off safely, and keep rain off young leaves without raiding your savings—what design will you try first, and where will your free mini greenhouse live?
Did you like it?4.6/5 (20)