In a nutshell
- 🌱 Identify and prepare cuttings: locate the node with an aerial root nub, sterilise tools, cut 1 cm below the node on healthy vines, and remove the lowest leaf to prevent rot.
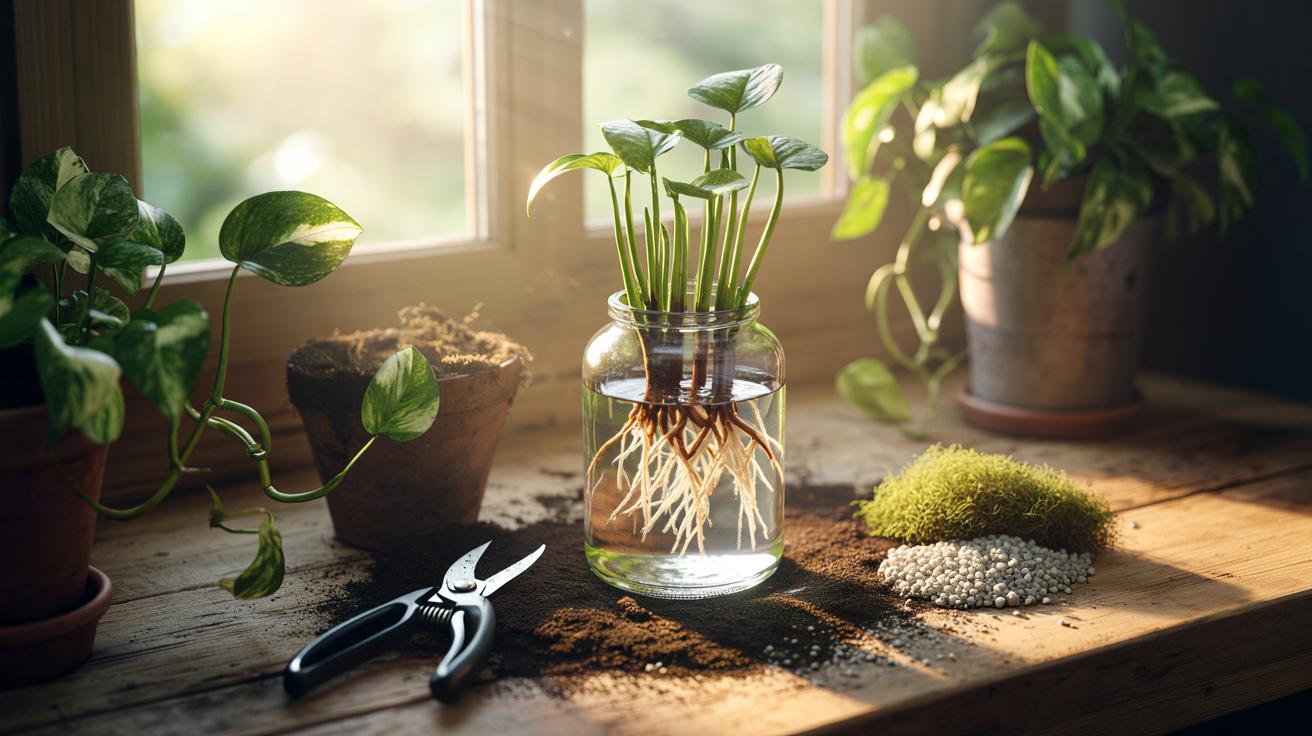
- 💧 Choose a method: Water shows progress and needs weekly changes and bright, indirect light; soil uses a peat-free mix with 30–40% perlite, with optional rooting hormone, for sturdier roots.
- 🪴 Root and pot on: submerge or bury the node only (never leaves), pot when water roots reach 3–5 cm, use a small pot and a free-draining mix, and ensure excellent drainage.
- 🌤️ Aftercare and fixes: maintain steady light and light watering, feed half-strength in spring–summer, encourage branching with pinching, watch for rot, and treat mealybugs or scale promptly.
- 🚀 Scale up quickly: build a prop box with moist perlite or moss, root labelled single-node cuttings (“wet sticks”), discard blackened nodes, and pot several together for a fuller plant.
Pothos, the ever-forgiving houseplant also known as Devil’s Ivy, is a gift that keeps on giving. With the right technique, a single vine can yield a dozen fresh starts, each ready to green a windowsill or delight a friend. Propagation is simple, low-cost, and satisfying, letting you refresh leggy plants and multiply your collection without spending a penny. Success hinges on understanding the node, sanitising tools, and providing bright, indirect light while roots develop. Focus on clean cuts and patient aftercare, and your cuttings will surge into vigorous new plants. Here’s how to propagate pothos vines for an endless supply of free greenery.
Spotting Nodes and Selecting Vigorous Cuttings
The secret to pothos propagation lies in the node—the slightly raised ring on the stem where a leaf and petiole attach, often with a tiny aerial root. Choose a healthy vine with firm, variegation-holding leaves and no signs of pests. Aim for 10–15 cm sections, each with one or two nodes and at least one leaf. Always cut just below a node because this is where new roots erupt.
Sterilise your scissors or pruning knife with isopropyl alcohol to prevent disease spread. Make a clean, diagonal cut about 1 cm beneath the node to maximise rooting surface. Strip the lowest leaf so no foliage sits in water or compost; submerged leaves invite rot. Highlight any browning, mushy tissue and discard it. Vigorous, green stems root fastest, while yellowed or crisped leaves signal stress you don’t want to propagate.
If your plant is very long, take a series of cuttings, each with its own node. Keep labels or group cuttings by variety—especially important with variegated types such as Marble Queen or Golden Pothos, where consistent light keeps patterns sharp.
Water vs. Soil Propagation: What Works Best
Water propagation is wonderfully visual: you can watch roots emerge, adjust quickly, and share the progress with curious onlookers. It suits beginners and tidy desks alike. Change the water weekly, keep stems submerged up to—but not past—the node, and position in bright, indirect light. Never park jars in harsh sun, which overheats water and cooks tender roots. When roots reach 3–5 cm, pot gently to reduce transplant shock.
Soil propagation skips the transfer stage altogether, producing sturdier, soil-ready roots from the start. Use a light, peat-free houseplant compost blended with 30–40% perlite for airflow. You can dip the cut end in rooting hormone if you wish, then plant the node just beneath the surface. Maintain even moisture, not saturation. A clear cover or propagator helps humidity, especially under UK indoor conditions of 18–24°C.
| Method | Supplies | Pros | Watch-outs | Typical Root Time |
|---|---|---|---|---|
| Water | Glass jar, tap or rainwater | See roots form; easy monitoring | Transfer shock; change water weekly | 2–4 weeks |
| Soil | Peat-free mix + perlite, pot with drainage | Sturdier roots; no repotting step | Hidden progress; risk of overwatering | 3–5 weeks |
Step-by-Step Rooting and Potting On
Prepare your station with sterile shears, vessels, and labels. For water, fill a jar so the node sits just below the surface; for soil, pre-moisten a well-aerated mix until it feels like a wrung-out sponge. Insert the stem so the node is submerged (water) or buried (soil). Leaves should never sit under water or soil, as decay invites bacteria.
Place cuttings in bright, indirect light—an east window or a couple of feet back from a south-facing one works well. Keep temperatures steady, avoid draughts, and change water weekly or lightly water soil when the top centimetre dries. Expect small white root nubs first, then longer, branching roots. In water, once roots reach 3–5 cm, acclimate by potting into a free-draining mix with at least 30% perlite or bark.
Choose a pot only one size up from the root ball and ensure proper drainage. Tuck the node just below the surface, then water thoroughly until excess drains. For the first week, shade slightly and keep humidity up with a loose clear cover. Let the top 2 cm of compost dry before watering again to minimise rot while roots establish.
Aftercare, Troubleshooting, and Scaling Up
Once settled, give your new plants bright, indirect light and regular, light hydration. Feed with a half-strength balanced fertiliser monthly from March to September; pause in winter. Encourage bushier growth by pinching the tip above a node to trigger branching. Train vines along a moss pole or trail from shelves for a full, cascading look. Consistent light keeps variegation crisp on patterned cultivars.
If cuttings yellow, check for excess water or insufficient light. Mushy stems indicate rot—trim back to firm tissue and restart in fresh water or mix. Slow progress often traces to low temperature; aim for 18–24°C. Watch for mealybugs and scale; wipe leaves with 70% isopropyl on a cotton pad and isolate if needed. Replace any stagnant water immediately.
To multiply quickly, create a “prop box” with clear plastic, moist perlite or moss, and labelled single-node cuttings (“wet sticks”). Space nodes so each has light and airflow. Discard any soft, blackened nodes to prevent spread of rot. Once rooted, pot several cuttings together for an instant, fuller plant—ideal for gifts, swaps, or brightening a dim corner.
With a clean cut at the right node, balanced light, and patience, pothos cuttings transform into robust new plants that enliven your home and stretch your budget. Whether you prefer the spectacle of water roots or the practicality of soil starts, the process is straightforward and repeatable. Gather a vine, prepare your tools, and set up a sunny-but-gentle spot. In a month or so, you’ll have fresh foliage and the satisfaction of growing it yourself. Which method will you try first, and how many new pots will you create from your next pruning session?
Did you like it?4.3/5 (23)