In a nutshell
- 🌱 Cardboard mulching creates a breathable, light-blocking barrier that delivers months of weed suppression while feeding soil life and improving moisture retention.
- 📦 Use plain, uncoated cardboard (no glossy inks or plastic), lay 2–3 corrugated layers with 10–15 cm overlap, soak well, and top with 5–10 cm of organic mulch like compost or leaf mould.
- 🛠️ Step-by-step: scalp tall growth, lay and wet sheets at right angles, cover evenly, then plant by cutting an “X” and closing flaps; keep edges tight and marked for future planting.
- 🐌 Troubleshoot by deterring slugs with coarse mulches and larger transplants; expect to weaken, not instantly eliminate, perennials like bindweed and horsetail through repeat starvation.
- ✅ Long-term gains include reduced weeding, richer tilth, cooler beds in heat, and eco-friendly reuse of waste—plus light, seasonal maintenance to refresh mulch and keep coverage intact.
Forget endless hand-weeding. Gardeners across Britain are turning to cardboard mulching, a simple technique that smothers unwanted growth while nourishing the soil beneath. It’s cheap, quick, and surprisingly elegant. Lay down the stuff that once carried your parcels and you create a breathable shield that locks out light, slows evaporation, and invites worms to get to work. In one afternoon, you can set up months of weed suppression. The result is a softer, darker, richer bed that’s easy to plant into and easier to maintain. Here’s how the method works, what to use, and the pitfalls to avoid.
Why Cardboard Mulch Works Against Weeds
Cardboard acts as a light-blocking barrier. Without sunlight, annual weeds exhaust their energy and perish, while perennial brutes are weakened until follow-up removal becomes manageable. This barrier starves weeds of light for months, buying you time and dramatically reducing labour. Yet the material still breathes; air and water can pass through dampened fibres, preventing the sour, anaerobic conditions that plague plastic sheeting.
Underneath, life is busy. As the cardboard softens, microbial communities and earthworms pull fibres down, mixing them into the upper soil as gentle organic matter. That process increases crumb structure, boosts moisture retention, and provides a slow, steady carbon meal for soil fauna. The surface stays cooler in hot spells and less splashy in rain, meaning fewer crusts and better seedling emergence nearby.
Cardboard doesn’t last forever—and that’s the point. Over three to six months, depending on climate and thickness, it decomposes into humus-like fragments. By then, the weeds underneath are largely done for. Any survivors are weakened enough to flick out by hand. What you get is control without chemicals and improvement without digging, a rare combination in the weedy months of spring and summer.
Materials, Thickness, and Safe Sources
Go for plain, uncoated cardboard: brown boxes, parcel sleeves, and corrugated sheets are ideal. Peel away all plastic tape, staples, and labels. Never use glossy, plastic-coated, or heavily inked boxes. They resist moisture, may leach residues, and ruin the soil-first ethos of the method. Heavier corrugate offers longevity; cereal boxes work, but you’ll need extra layers.
A practical rule: two to three layers of corrugated cardboard or four to six of thin card. Overlap edges by at least 10–15 cm, leaving no slits where light sneaks through. Wet the layers as you go to help them conform to the ground, then cap with 5–10 cm of organic mulch—compost, leaf mould, or well-rotted bark. That top coat keeps the cardboard shaded and moist, speeding breakdown while locking out stragglers.
Check your sources. Local shops often give boxes away, and removal firms recycle stacks after weekend moves. If buying new sheets, ask for FSC-certified cardboard. For allotments near waterways, be strict about coatings and inks. What sits on the soil ends up in the soil. When in doubt, choose the dull, brown, fibrous option every time.
| Material | Ideal Quantity | Purpose/Notes |
|---|---|---|
| Corrugated cardboard | 2–3 layers | Primary light barrier; overlaps stop gaps |
| Thin card (cereal boxes) | 4–6 layers | Use only if corrugate is scarce |
| Compost or leaf mould | 5–10 cm cover | Weighs down card; feeds soil |
| Water | Thorough soak | Helps card conform and knit |
Step-by-Step: Laying a Weed-Proof Cardboard Blanket
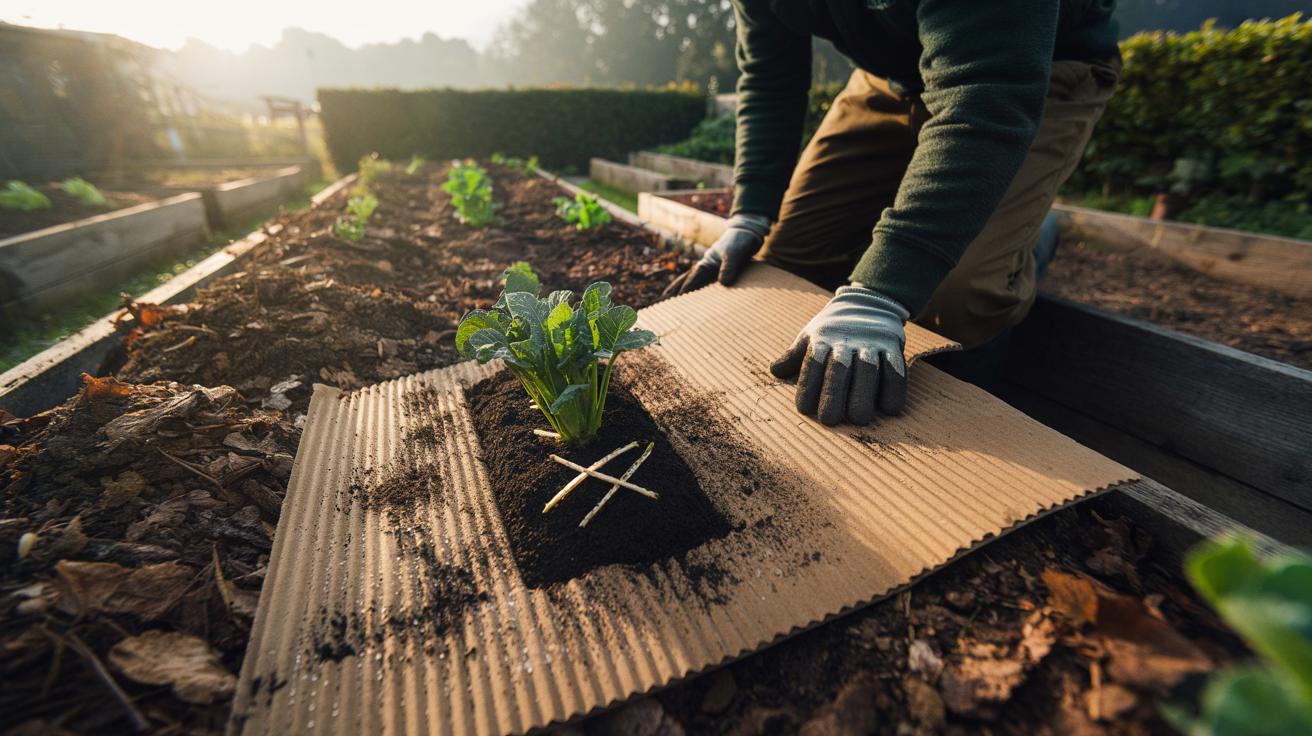
Start by scalping tall growth with shears or a strimmer. No need to dig or rotavate; leave roots where they are. Disturbing the soil wakes dormant weed seeds. Spread a thin dusting of compost to even out bumps. Now lay your first sheet of cardboard, rough side down, and soak it until pliable. Butt the next sheet close, then overlap by a hand’s width. Keep going until the bed is fully covered, including the edges.
Build thickness. Add your second layer at right angles to the first, like laying parquet. Soak again. Pay attention around tree trunks and perennials you’re keeping: leave a neat collar so the base can breathe. Where you plan to plant later, mark spots with a cane. Spread 5–10 cm of compost, bark, or leaf mould over the top, raking gently to an even finish. This top mulch is your weather shield and slow-release feed.
Planting is simple. For transplants, cut an X through the card, fold back flaps, and slot in the root ball with added compost. Water well and close the flaps snugly. For sowing, create open strips or pockets rather than scattering seed across the covered area. Keep edges tight and topped up, because edges are where weeds break through. A quick monthly check keeps the blanket working for the season.
Troubleshooting, Myths, and Long-Term Care
Concerns about cardboard toxins persist, but modern brown corrugate uses vegetable-based adhesives and minimal inks. Choose plain sources and you’re safe. The bigger risk is oxygen exclusion from using plastic-coated card. Avoid that, and your soil breathes. Another myth: cardboard “kills soil life.” In practice, it feeds it. Watch for increased worm casts and improved tilth within weeks.
Slugs can shelter under damp layers. Tactics help: use coarse, dry mulches like chipped bark on top; plant slightly larger, slug-resilient transplants; set beer traps or wildlife-friendly barriers at bed edges. Perennial bruisers—bindweed, horsetail—won’t vanish at once. Cardboard weakens them, but persistence wins. Nip emerging shoots promptly, starve them repeatedly, and they relent.
Maintenance is light. Top up organic mulch each spring to maintain depth. Where the cardboard has fully composted, you’ll find darker, sweeter soil; fork lightly to mix, don’t churn. Reapply new sheets for fresh beds or stubborn patches. In dry spells, water deeply; cardboard reduces evaporation, but plants still thirst. The result is a calmer calendar: fewer emergency weeding sessions, more steady, pleasurable gardening.
Cardboard mulching turns waste into work-saving infrastructure, blending weed control with soil care in a way that feels almost unfair. It’s frugal, climate-friendly, and forgiving of mistakes. You don’t need power tools, just boxes, water, and a weekend. The payoff lasts for months, often an entire growing season. Once you’ve seen beds stay tidy while neighbours battle regrowth, it’s hard to go back. Will you test a small patch this month and see how far a stack of simple brown sheets can take your garden?
Did you like it?4.6/5 (24)