In a nutshell
- 🧹 Brush, don’t wash: A dry nylon brush clears crumbs without moisture, protecting heating elements, reflectors, and warranties while reducing smoke and scorching.
- 🔌 Step-by-step safe clean: Unplug and cool, remove and empty the crumb tray, gently brush interiors (no metal tools), then lightly wipe the exterior—keeping liquids away from controls and slots.
- 🗓️ Tools, timings, checks: Weekly light brush and crumb dump; monthly deep brush and tray wash. Use a microfibre cloth and perform a UK plug and cord inspection; stop if you detect heat marks or tripping.
- 🧪 Troubleshooting: For baked-on sugars, use a slightly stiffer nylon brush; run empty on low for 30–60 seconds to clear dust; use a mild bicarbonate paste on stainless (via cloth). Avoid sprays inside slots.
- ✅ Real benefits: Improves browning, cuts fire risk, removes odours, and extends appliance life—turning a quick weekly brush into a reliable, low-cost kitchen habit.
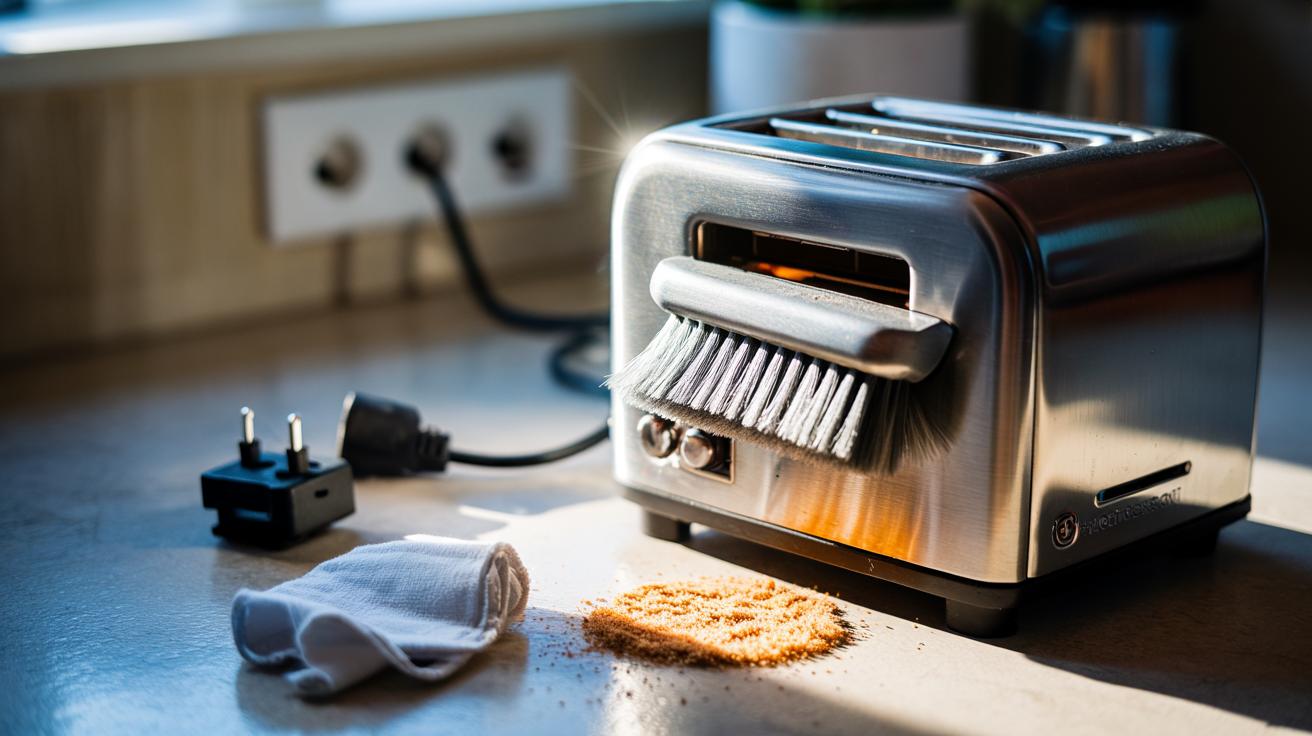
Cleaning a toaster shouldn’t involve risky rinsing or fiddly disassembly. A targeted brush method gets rid of crumbs, scorched flakes, and odours without inviting moisture into live components. Using a small, non‑metal brush, you can dislodge residue that causes uneven browning and smoke, then empty it safely via the crumb tray. It’s quick, inexpensive, and friendly to delicate heating elements. Always unplug and cool the appliance before you begin, and keep liquids well away from the slots. This approach cuts fire risk, improves performance, and extends the life of your toaster—ideal for busy UK kitchens where reliability, energy efficiency, and food safety matter every day.
Why a Brush Beats Water for Toaster Cleaning
Toasters are full of nooks near live parts, and water is an invitation to corrosion and shorts. A dry brush loosens debris without forcing moisture towards the thermostat, crumb sensors, or the mains-connected elements. Bristles reach under guards where cloths cannot, while avoiding the abrasion of metal tools that can scratch reflectors and damage nichrome wires. Because crumbs are the number one trigger for smoke and scorching, removing them dry is the safest way to restore even toasting. You’ll also dodge the lingering damp that can trap odours or lead to mould inside the body of the appliance.
Brush cleaning is kinder to finishes and consistent with most warranty guidance, which prohibits immersion or spraying cleaners into the slots. It’s also far quicker: no downtime waiting for parts to dry, and no risk of drips reaching the control board. For UK homes with 230V supply, keeping liquids out of the appliance is a crucial safety habit, especially in compact kitchens where splashes are common.
The Simple Brush Method Step by Step
Unplug the toaster and let it cool fully. Place it over newspaper or a tray to catch debris. Slide out the crumb tray and tap it into the bin; wash the tray separately with warm, soapy water and dry thoroughly before reinserting. Choose a soft, non‑metal brush—pastry brush, bottle brush, or a purpose‑made appliance brush with nylon bristles. Never insert knives, skewers, or anything metal into the slots; they can bend elements and create a shock hazard.
Hold the toaster upside down at a slight angle and gently brush the interior surfaces, working from top to bottom so particles fall away from the elements. Use small, controlled strokes along the guards and around the corners where flakes accumulate. If your model has bagel or reheat settings, brush around those side-specific zones to remove asymmetric build-up that causes uneven browning. Finish by giving the exterior a wipe with a lightly damp microfibre cloth, keeping moisture away from controls and the power cord entry point.
Tools, Timings, and Safety Checks
Set yourself up with the right kit and a routine, and the job takes minutes. The table below summarises what you need and how often to do it. A consistent monthly brush prevents burnt smells, while a quick weekly crumb dump keeps fire risk low. Always check the UK plug and cord for damage as part of the process.
| Item | Purpose | When to Use | Do / Don’t |
|---|---|---|---|
| Nylon brush (pastry or appliance) | Dislodge crumbs and flakes | Weekly light clean; monthly deep brush | Do use gentle strokes / Don’t use metal |
| Crumb tray | Collects debris for safe disposal | Empty weekly; wash monthly | Do dry fully / Don’t reinsert damp |
| Microfibre cloth | Exterior wipe-down | As needed | Do wring well / Don’t wet controls |
| UK plug and cord check | Safety assurance | Every clean | Do look for heat marks / Don’t use if damaged |
Safety checks: ensure the switch is off at the socket before unplugging; verify the crumb tray fits flush; confirm there’s no smell of hot dust at first use after cleaning. If the lever sticks or the toaster trips the RCD, stop and consult the manufacturer or a qualified electrician.
Troubleshooting Stubborn Residue and Odours
For baked-on sugars from pastries, rely on patience and a slightly stiffer nylon brush. Work methodically around the residue, breaking it into flakes rather than scraping. Avoid dissolving agents or sprays inside the slots, which can wick into insulation. If odours persist, run the toaster empty on its lowest setting for 30–60 seconds to shed leftover dust, then allow to cool and brush again. A light pass with a clean, dry toothbrush along the crumb channel often frees hidden buildup that causes smoky starts.
Exterior stains respond to a mild bicarbonate paste on stainless steel, applied to a cloth—not the appliance—then wiped away and buffed dry. For plastic casings, use a diluted washing‑up liquid solution on a barely damp cloth. If a slice jams repeatedly, inspect the slot for warped bread guides or bent guards. Any visible deformation near heating elements is a sign to stop DIY efforts and seek professional advice, as misalignment can lead to arcing or hot spots.
Regular, dry brushing is the simplest way to keep your toaster crisping evenly, prevent smoky breakfasts, and reduce the fire risk from accumulated crumbs. It respects the electrics, avoids premature wear, and takes less time than boiling the kettle. Build it into your weekly tidy, and reserve a deeper brush-and-tray wash for the end of the month. If you try this method today, what difference do you notice in browning and smell—and what extra tips from your own kitchen would you add to refine the routine?
Did you like it?4.7/5 (20)