In a nutshell
- ⭐ The £1 pantry staple is plain flour, which polishes stainless steel using a gentle micro-abrasive action; starch absorbs oils for a mirror-like finish with no residue.
- 🧽 Method: wash, rinse, and dry thoroughly (non-negotiable), dust lightly with plain flour, then buff in circles and follow the grain with a microfibre cloth; remove residue and enjoy a streak-free shine in under five minutes.
- 💷 Cost and comparison: a bag costs ~£0.75–£1.20; typical use is pennies (£0.02–£0.05); contrasted with white vinegar, bicarbonate of soda, and baby oil, flour is the fastest, fragrance-free finisher.
- ♻️ Safety and sustainability: food-safe but avoid dust clouds; never rinse large amounts down the sink; patch test coated or black stainless; gluten-sensitive? Opt for cornflour and wear protection.
- 🏠 Practical routine: go soap clean, dry, flour buff for daily care; use oil only for temporary showroom sheen; avoid scouring to protect the chromium oxide layer and prolong your appliance’s finish.
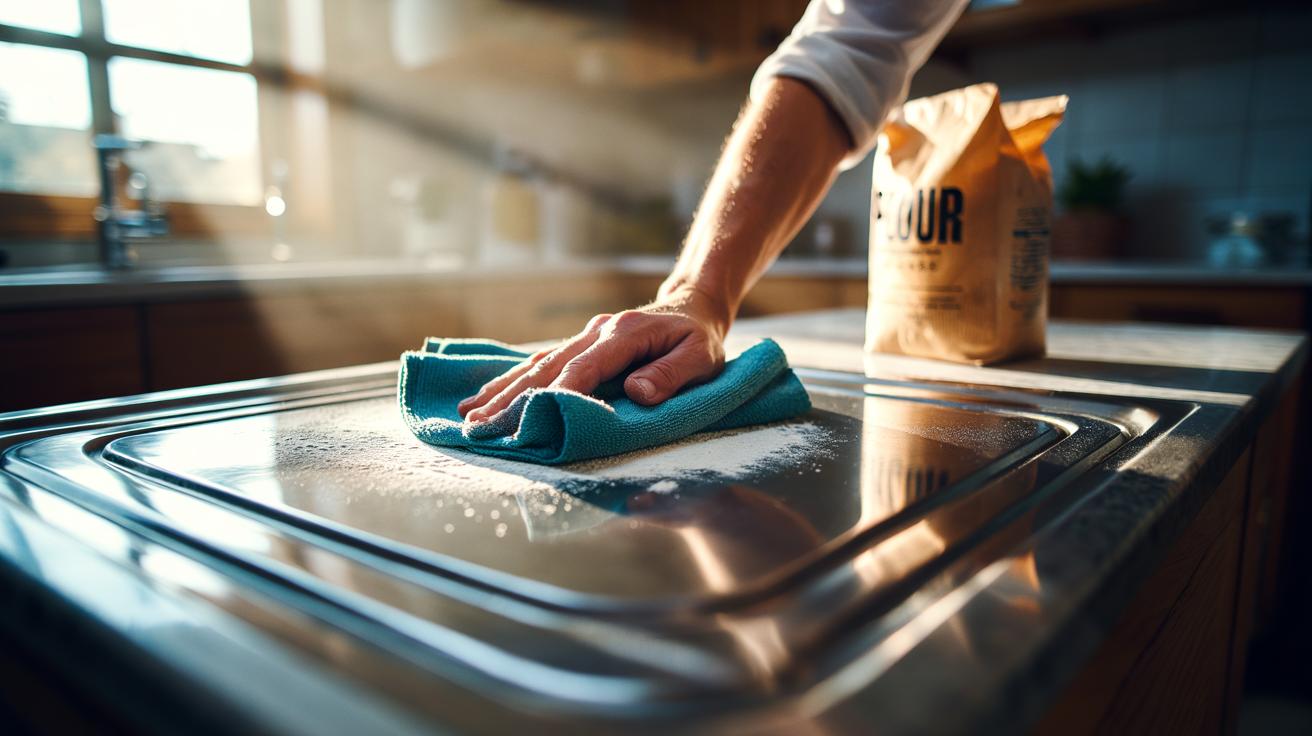
Shiny appliances signal a tidy home, yet stainless steel can be maddening: streaks, fingerprints, and smears return within hours. Cleaners promise miracles, then leave a cloudy film and a lighter wallet. The quiet hero lives in your cupboard. It costs about a pound, needs no harsh chemicals, and leaves hobs, fridges, and sinks sparkling. The humble star? Plain flour. Old-school caretakers have used it for decades; TikTok only rediscovered it. Simple, safe, and startlingly effective. With a soft cloth and a tablespoon of flour, you can buff metal to a mirror. Results arrive fast. The trick is prep, technique, and a light touch.
The £1 Secret: Plain Flour Explained
At first glance, plain flour sounds like a messy gimmick. It isn’t. The fine particles act as a micro-abrasive, gently lifting oxidation and stubborn films without scratching stainless steel. Starch granules also absorb residual oils that cause haze, which is why the finish looks crisp rather than greasy. Used dry on a perfectly dry surface, flour behaves like a jeweller’s rouge for the kitchen. Because the polish is mechanical, not chemical, there’s no lingering smell, no sticky residues, and no risk to food prep areas once wiped away.
Science aside, the economics are unbeatable. A 1 kg bag in UK supermarkets hovers around £0.75–£1.20, and you’ll use a teaspoon or two per session—pennies. There’s versatility too. It brightens sinks, revives dull kettles, and refines brushed-steel fascias. Always avoid coated “anti-fingerprint” finishes unless the manufacturer says polishing is safe. Flour won’t perform miracles on deep scratches, but for day-to-day gleam it’s startlingly consistent.
Step-By-Step: How to Polish With Flour
Start with a clean slate. Wash the surface using warm water and a drop of washing-up liquid to remove grease. Rinse, then dry thoroughly with a microfibre cloth. This drying step is non-negotiable—moisture turns flour into paste and kills the shine. Sprinkle a light dusting of plain flour over the metal. A little goes far; think pinches, not handfuls.
Using a second dry cloth, buff in small circles, then follow the grain of the steel for a final pass. Pressure should be light, almost feathery. You’ll see the haze vanish and a crisp reflection emerge. Gather the remaining flour with a clean, dry cloth or vacuum nozzle; finish with a final wipe using a fresh microfibre. If your appliance has a protective coating, test on a hidden corner first to ensure no dulling occurs. For persistent smudges near handles, repeat a quick buff. The entire process takes under five minutes for a sink.
Cost, Time, and Results: A Quick Comparison
Households typically rotate between vinegar sprays, proprietary polishes, and oil buffs. Each works, but the trade-offs differ. Flour is fast, fragrance-free, and cheap. Vinegar strips water marks but can leave streaks. Bicarbonate cleans brilliantly when wet, yet it’s not a finisher. Baby oil makes a glossy shield, though it attracts dust and fingerprints. The table below outlines the key contrasts so you can choose confidently for your surfaces and schedule.
| Method | Primary Action | Finish | Typical Cost Per Use | Best For |
|---|---|---|---|---|
| Plain flour | Dry micro-abrasive polish | Mirror-like, no residue | £0.02–£0.05 | Final shine on stainless steel |
| White vinegar | Acidic descaler | Clean but can streak | £0.05–£0.10 | Limescale spots, glass, kettles |
| Bicarbonate of soda | Mild abrasive paste | Matte-clean | £0.05–£0.08 | Baked-on grime pre-clean |
| Baby/mineral oil | Film that masks streaks | Glossy, can attract dust | £0.05–£0.12 | Short-term showroom sheen |
For daily life, a two-step routine is hard to beat: quick soap clean, dry, then flour buff. It’s repeatable and low-waste. Use oil only if you need a smudge-hiding layer for a photoshoot finish.
Safety, Sustainability, and Common Pitfalls
Flour is food-safe and low-impact, but it still demands care. Avoid generating clouds of dust, which can irritate sensitive airways. Keep bags sealed and away from open flames. Never rinse large amounts of flour down the sink; it can congeal and contribute to blockages. Instead, wipe or vacuum excess, then dispose with household waste. If you’re coeliac or gluten-sensitive, wear gloves and use a mask, or choose cornflour, which offers a similar polish with less allergen risk.
Mind surface specifics. Fingerprint-resistant coatings, powder-coated trims, and black stainless may react differently. Always patch test. For severe grime, pre-clean with mild detergent or a bicarbonate paste, rinse, and dry, then polish. Avoid scouring pads, which scratch the chromium oxide layer that makes steel “stainless.” Store a dedicated microfibre cloth for polishing to prevent cross-contamination from greasy jobs. When in doubt, follow the grain and use the lightest pressure that achieves a shine. That gentleness preserves the finish for years.
In a cost-of-living squeeze, small wins matter, and this one sparkles. A spoonful of plain flour, a soft cloth, and two minutes can transform tired appliances into sleek, modern showpieces. It’s thrifty. It’s low-waste. It works. If you crave a premium look without the chemical circus, try the flour method once and judge with your eyes. Then decide whether it earns a permanent place in your cleaning caddy. Which stainless-steel surface in your home will you test first, and what result will convince you to switch for good?
Did you like it?4.5/5 (20)