In a nutshell
- ✨ A simple flour-and-salt paste lifts brass tarnish by combining mild abrasion with ion action; add a splash of vinegar or lemon for extra bite and rely on controlled contact time for best results.
- 🛠️ Step-by-step: mix equal parts flour and salt with water or vinegar to a yoghurt-like paste, apply in circles, rest 10–20 minutes, then rinse thoroughly, dry immediately, and buff; remove all chloride residue to prevent spotting.
- ⚠️ Safety first: test for lacquered brass or thin plating, avoid abrasives on coated pieces, keep paste out of joints, wear gloves, and recognise pinkish patches as potential dezincification needing professional care.
- 🔁 Alternatives & aftercare: try bicarbonate of soda paste or commercial polish if needed, then seal with microcrystalline wax or a touch of mineral oil to slow re-tarnish, and store with silica gel.
- 🌿 Cost-effective and eco-minded: pantry powders deliver a bright golden shine without harsh chemicals, cutting expense and maintenance while preserving the character of household brass.
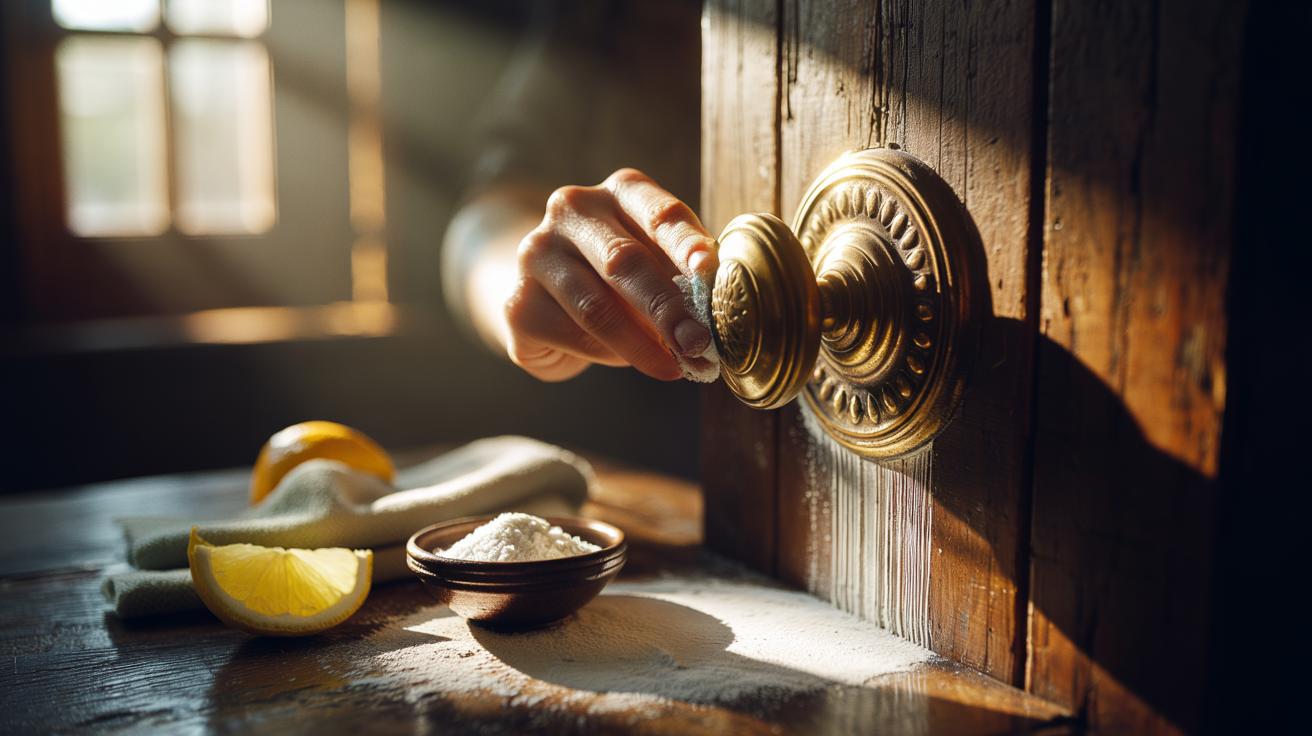
Brass door knockers, candlesticks, and instrument fittings often lose their gleam to a dull brown haze. A thrifty fix sits in the larder: a simple flour-and-salt paste that coaxes back the metal’s warm glow without harsh chemicals. These pantry powders blend into a gentle cleaner that grips surfaces, loosens grime, and polishes with minimal effort. The right paste can rival a bottled polish at a fraction of the cost. This method is swift, sustainable, and surprisingly effective, provided you prepare the surface properly and finish with careful rinsing and drying.
Why Brass Tarnishes and Why Powders Work
Brass, an alloy of copper and zinc, tarnishes when oxygen, moisture, and sulphur compounds react at the surface, forming dark oxides and sulphides that scatter light. The result is a dingy film rather than the metal’s characteristic golden lustre. A flour-and-salt paste tackles this film on two fronts. Salt supplies ions that help disrupt grime and oxide bonds, while flour acts as a soft binder and mild abrasive, keeping active particles in close contact with the metal. That contact time is the quiet secret of this method’s success.
For tougher tarnish, adding a splash of mild acid—such as white vinegar or lemon juice—gives the paste extra bite by helping dissolve copper oxides. Think of it as a controlled clean: the flour thins the acid’s punch, the salt enhances wettability, and the paste consistency prevents drip. Used properly, the powders lift the film, allowing a cloth to buff the surface back to a brighter golden sheen without aggressive scraping.
The Flour-and-Salt Method Step by Step
Begin by wiping the brass item with a damp cloth to remove dust. Mix plain flour and table salt in equal parts, then add just enough water—or a little vinegar for heavier tarnish—to form a spreadable paste, similar to yoghurt. Apply with a soft cloth or brush in small circles, working the paste into crevices without packing it tight. Let it sit 10–20 minutes so the paste can loosen the oxide film, then gently rub and rinse thoroughly with warm water. Dry immediately and buff with a clean, lint-free cloth.
Adjust dwell time to the severity of tarnish rather than scrubbing harder. The goal is to lift, not gouge: brass marks easily. Always finish by removing every trace of paste, as residual chloride from salt can encourage spotting if left behind. For architectural fittings, finish with a tiny dab of mineral oil or wax to slow re-tarnishing and make future cleans quicker.
| Mix (by volume) | Contact Time | Expected Finish |
|---|---|---|
| 1 tbsp flour + 1 tbsp salt + 1–2 tsp water | 10 minutes | Light tarnish lifted; soft satin sheen |
| 1 tbsp flour + 1 tbsp salt + 1–2 tsp vinegar | 15–20 minutes | Moderate tarnish reduced; brighter gloss |
| 2 tbsp flour + 1 tbsp salt + 2 tsp vinegar | Up to 20 minutes | Stubborn spots eased; follow with gentle buff |
Safety, Testing, and When Not to Use It
Check whether your item is lacquered brass by testing an inconspicuous spot with a cotton bud and warm water; if the finish doesn’t wet evenly, it may be lacquer. Do not use abrasive or acidic pastes on lacquered or thinly plated brass—you’ll cloud the coating or rub through the plating. If the piece has historical value or a deliberate patina, consult a conservator before cleaning. The aim is preservation, not a showroom shine at any cost.
Wear gloves to avoid skin oils redistributing onto freshly cleaned metal. Keep paste out of screw holes and joints where it can trap moisture. Rinse and dry meticulously, as chloride residues can invite pitting over time. Avoid steel wool or harsh scouring powders; the flour-and-salt blend is intentionally gentle. If the brass shows pinkish patches after harsh treatments elsewhere, that’s dezincification; polishing won’t fix it, and professional assessment may be needed.
Alternatives and Finishing Touches
If you prefer a salt-free approach, try flour with bicarbonate of soda and water; it’s less conductive and kinder to sensitive alloys, though a bit slower. Tomato ketchup works in a pinch thanks to acids and sugars that cling, but control is tricky and the smell lingers. Commercial polishes speed things up, yet they often contain solvents or stronger acids. Whichever route you choose, a light protective coat afterward extends the shine dramatically.
Once clean, seal the surface with a microcrystalline wax or a tiny wipe of mineral oil, then buff until dry. This reduces oxygen and moisture contact, slowing tarnish in damp British weather. Store small items in breathable pouches with silica gel, and handle display pieces with clean, dry hands. A quick monthly wipe with a soft cloth will keep the finish crisp, delaying the need for deeper cleans and preserving that rich, golden tone.
From pantry to polish, the flour-and-salt paste offers an elegant answer to everyday tarnish, blending chemistry and common sense to restore warmth to household brass. With mindful testing, careful rinsing, and a protective finish, you can prolong the shine and cut back on costly, harsh cleaners. The secret lies in patience, light pressure, and absolute dryness at the end. What neglected knob, lantern, or heirloom could you revive this weekend—and what story might it tell once its glow returns?
Did you like it?4.6/5 (28)