In a nutshell
- ✂️ Quick foil fix: fold aluminium foil into 8–12 layers and make 10–15 full cuts to create gentle micro‑abrasion; results often in under 60 seconds.
- 🧠 Why it works: foil induces micro‑abrasions and light edge alignment, adding a subtle micro‑serration that improves grip on paper and thread.
- ⚠️ When to skip: avoid on serrated, convex, or premium tailoring/hairdressing shears, and don’t use it to fix chips, bent tips, or a loose pivot—seek professional sharpening.
- 🧼 Maintenance matters: clean adhesive residue first, wipe and lightly oil the pivot after, test on scrap paper, store scissors closed, and keep them away from staples or wire.
- 🧰 What you need: a strip of aluminium foil, a clean cloth, optional light oil, and scrap paper—fast, budget-friendly upkeep between full sharpenings.
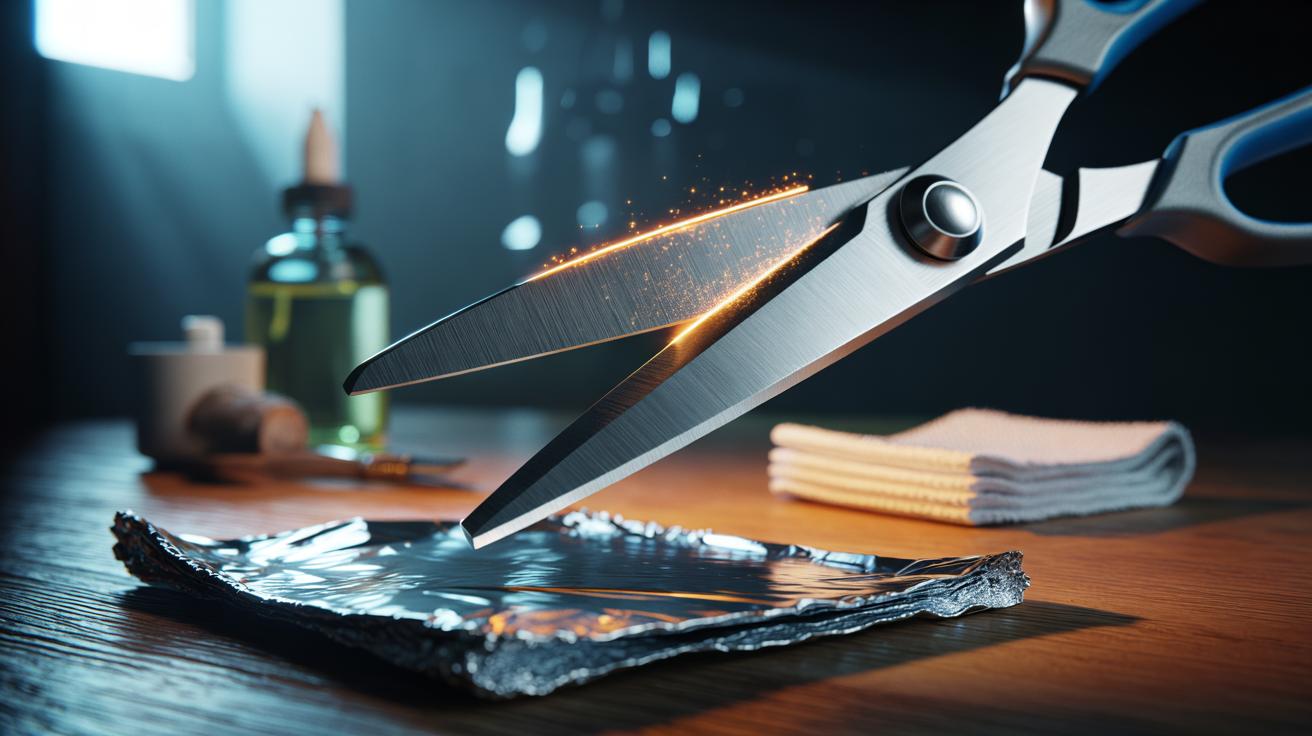
Dull scissors are a daily nuisance. Snagged fabric, chewed paper edges, the maddening crunch as blades skid instead of slice. There’s a quick fix hiding in plain sight: a simple strip of aluminium foil. Folded, cut, and used as a gentle abrasive, it can revive a tired edge fast. No gadgets. No mess. Just a household staple and a steady hand. It takes less than a minute for a noticeable improvement. This isn’t a replacement for professional sharpening, but it’s a reliable touch-up that restores utility to craft snips, kitchen shears, and office scissors. Here’s how the trick works—and when to use it.
The Foil Trick Explained
The principle is disarmingly simple. When you fold aluminium foil into several layers, the compressed sheet presents a slightly resistant surface. As the scissor blades slice through it, the foil creates micro-abrasions along the cutting edges and helps nudge them back into alignment. Think of it as a quick polish combined with a light bite. It doesn’t remove much metal; it refreshes the edge enough to stop tearing and start cutting cleanly again. For everyday scissors dulled by paper, card, or tape residue, the results can be immediate.
This trick is best for straight-edged household scissors, general craft snips, and some kitchen shears (not serrated). Avoid premium hairdressing or tailoring shears with specialised grinds, where precise angles matter. The foil method can slightly micro-serrate an edge, which is helpful for grip on fibrous materials but not ideal for ultra-smooth cutting. If your scissors are chipped, bent, or have a loose pivot, foil won’t fix the root problem; it only freshens the cutting lips.
Step-by-Step: Sharpening With Foil
Start with clean, dry scissors. Wipe away adhesive gunk first; residue can interfere with the process. Tear off a sheet of aluminium foil roughly 30–40 cm long and fold it several times to create a strip eight to twelve layers thick. Open the scissors fully. Cut smooth, full strokes from the heel to the tip through the folded foil—about 10–15 cuts. Keep your wrist relaxed and your pace consistent. The goal is even contact along the blade, not brute force. If the cut feels gritty, that’s normal; it’s the micro-abrasion at work. Finish by wiping the blades with a cloth and, if you like, a drop of light oil to remove particles.
Test on scrap paper or thin fabric. If performance improves but isn’t perfect, repeat with a freshly folded strip, reducing the number of cuts to avoid overdoing the micro-serration. Stop if you feel binding or hear a harsh scrape—your pivot may need tightening or cleaning. Finally, rinse and dry kitchen shears used on food.
| Item | Purpose |
|---|---|
| Aluminium foil | Creates light abrasion and helps realign the edge |
| Clean cloth | Wipes residue and metal particles from blades |
| Light oil (optional) | Lubricates pivot and protects against corrosion |
| Scrap paper/fabric | Quick performance test after sharpening |
Why It Works: Micro-Abrasions and Edge Alignment
A scissor’s cutting action relies on two blades meeting at a controlled angle, sliding past each other with light pressure. Over time, edges roll microscopically, and the set (the subtle bow that makes blades kiss) can drift. The layered foil introduces fine, uniform resistance, encouraging contact along the full stroke. That contact polishes away tiny burrs and re-establishes the keen lip that initiates a cut. It’s closer to burnishing than grinding, which is why it feels gentle yet effective.
There’s also a small micro-serration effect. Cutting through foil can leave minute, orderly teeth along the edge. For paper, thread, and light packaging, that grip reduces slip and tearing. For silky fabrics or hair, it’s less desirable; those tasks prefer a perfectly smooth, honed edge. Crucially, the foil trick removes very little metal, extending the time between full sharpenings and keeping everyday scissors serviceable with minimal effort.
When to Skip It and What to Try Instead
Not all blades benefit. Do not use the foil trick on serrated, convex, or high-end tailoring and hairdressing shears; their edges require precise geometry and specialist tools. If your scissors show visible chips, a bent tip, or deep nicks, foil won’t repair the damage. Likewise, a wobbly or gritty pivot signals maintenance, not sharpening. Tighten the screw gently, clean out debris, and oil the joint before attempting any edge work. If blades don’t meet evenly along the stroke, they may need professional set adjustment.
For more serious refreshes, use 600–1000 grit wet-and-dry paper laid flat, pulling the blade lightly at the correct angle, or invest in a purpose-made scissor sharpener that preserves factory bevels. Textile and culinary professionals should consider periodic professional sharpening. Day to day, prevent dulling by wiping off adhesive residue, avoiding wire or staples, and storing scissors closed. A little care beats frequent grinding, and keeps your tools cutting crisply for years.
Used thoughtfully, the foil trick is a fast, low-cost tune-up that rescues dull scissors from the brink of the bin. It restores cutting confidence, buys time between major sharpenings, and fits neatly into a tidy-up routine. The key is judgement: choose suitable scissors, use light, even strokes, then test and refine. Paired with simple maintenance—cleaning, a dab of oil, safe storage—you’ll extend the life of tools you already own. Sharp is safer, cleaner, and far more satisfying. Which pair in your drawer is first in line for a 60-second revival, and how will you know when to step up to a professional sharpen?
Did you like it?4.5/5 (26)