In a nutshell
- 🧪 The science: salt crystals form a barrier, act as a heat sink, and desiccate spills, slowing pyrolysis, cutting smoke, and preventing burnt flavours.
- 🧂 Emergency method: Reduce, cover, clear—lower heat, sprinkle table salt on the spill, let it crust, then scrape when warm; avoid water and use bicarbonate of soda for small flames.
- 🧰 Right materials: Use table salt for sugary leaks, coarse/kosher salt to dam oily drips, and rock salt for BBQ or pizza ovens; keep a ramekin, spoon, gloves, and scraper handy.
- 🧼 Aftercare: Lift the salted crust, vacuum loose grains, wipe with hot water and white vinegar, avoid steel wool, razor-scrape glass carefully, and deodorise with lemon steam.
- 🛡️ Prevention: Use a rimmed drip tray, level racks, skip foil on the oven floor, vent pies, manage fill levels, and keep salt visible for instant action.
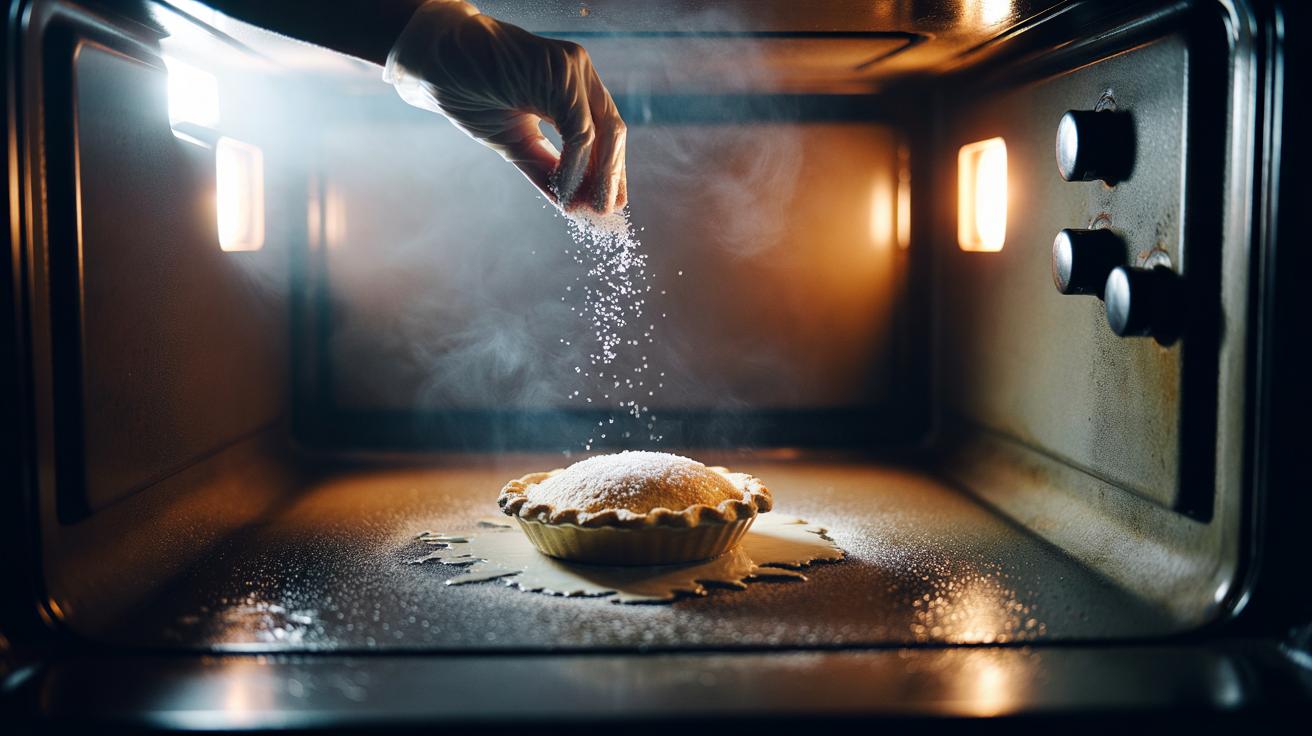
When a casserole bubbles over or a pie leaks, the mess doesn’t just coat the enamel — it smokes, stings the eyes, and bakes into a tar-like crust. British cooks have long sworn by a simple fix: toss a handful of salt directly onto the spill. The crystals instantly tame the sizzle, build a pale crust, and halt the scorched odour. It’s not magic; it’s smart material science that happens to live in your cupboard. Keep a small pot of salt near the oven and a mid-bake mishap becomes a manageable pause, not a panicked clean-up. Here’s why it works so well — and how to use it safely and effectively.
How Salt Stops Spills From Burning
Ordinary sodium chloride acts as a fast, passive extinguisher for tiny, stubborn sizzles. First, the crystals create a physical barrier: a gritty blanket that separates bubbling sugars or fats from direct heat and oxygen. By covering the spill, salt slows down the chain of pyrolysis that produces smoke and bitter flavours. With a high melting point of around 801°C, salt remains stable in the temperatures most domestic ovens reach, making it a reliable, non-reactive helper.
Salt also behaves like a miniature heat sink. Each grain absorbs thermal energy while sucking moisture from the spill, desiccating it into a friable crust. That crust is easier to lift out later, rather than scrubbing at lacquered carbon. With greasy drips, the angular crystals break the surface tension, spreading the mess into a thinner layer that cools faster and smokes less. A swift sprinkle turns a live, smoky puddle into a quiet, manageable patch.
There’s a practical bonus: salt is cheap, shelf-stable, and safe on enamel and most racks. Unlike throwing water, which can flash steam and scatter spatter, a dry scatter of crystals adds control. Just remember that salt quells smoulder; for open flames, you need the right response — see the steps below.
A Step-By-Step Method for Mid-Bake Emergencies
Act calmly, and think in three moves: reduce, cover, clear. First, lower the oven temperature a touch or switch off the fan to soften the heat blast. Gently slide the rack forward using oven gloves — you want access without hoisting the dish. Take a small handful of table salt and shower it directly onto the bubbling spill, aiming to cover the wettest, smokiest patches. If there’s a tiny flicker, close the door for a moment: the combination of salt and reduced oxygen usually does the trick.
Let the dish finish cooking if it’s safe, watching through the glass. The salt will turn pale beige as it absorbs and dries. When the oven is warm rather than hot, scrape up the crust with a silicone spatula or a blunt scraper and brush the grains into a heatproof bin. Never splash water onto hot enamel or the glass door — the thermal shock risks cracking and scattered spatter. If a fire persists beyond a small flare, shut off gas or power and use bicarbonate of soda or a suitable extinguisher, keeping the door closed.
Choosing the Right Salt and Tools
Fine table salt flows quickly and blankets sugar spills efficiently; it’s the best general choice. Coarse or kosher salt is useful when drips pool at the edge of a tray, forming a low “dam” that holds liquid in place. Rock salt shines in outdoor pizza ovens and barbecues where airflow is vigorous and temperatures soar. Baking soda remains the specialist for small grease flames, though it’s more alkaline and messier to clean. Keep your kit simple: a ramekin of salt by the cooker, a long-handled spoon, heatproof gloves, and a flexible scraper.
Prevention starts before you salt. Use a shallow drip tray under pies and roasting tins, trim overfilled dishes, and check that racks sit level. Avoid lining the oven floor with household foil — it can block vents and reflect heat onto components. Choose a manufacturer-approved liner or a sturdy baking sheet on a lower rack instead of loose foil on the cavity base. The right choice of crystals, plus sensible prep, turns mishaps into footnotes rather than full cleans.
| Situation | Recommended Material | Why It Works |
|---|---|---|
| Bubbling fruit pie or caramel | Fine table salt | Spreads fast, absorbs moisture, forms an easy-to-lift crust |
| Oily roast drips at tray edge | Coarse/kosher salt | Piles into a “dam,” wicks fat, limits splatter and smoke |
| Small flare-up in oven | Salt or bicarbonate of soda | Smothers flames; bicarbonate releases CO2 and is flame-rated |
| BBQ or pizza oven spills | Rock salt | Heavier grains resist draughts, tolerate very high heat |
Aftercare: Cleaning, Smell Control, and Prevention
Once the oven cools to warm, lift out the salted crust and vacuum loose grains with the hose attachment. For sugary residues, wipe with hot water and a splash of white vinegar, then dry thoroughly to protect the enamel sheen. Greasy films respond to a mild washing-up liquid solution; avoid steel wool, which scratches. On glass, use a razor scraper at a shallow angle and finish with a microfibre cloth. Give the cavity time to cool before any deep scrub — patience prevents damage.
To banish lingering odours, heat a small tray of water with lemon slices for ten minutes, then let the oven air. Check door seals, as brittle gaskets trap grime and smell. Calibrate with an oven thermometer if you suspect hot spots that encourage boil-overs, and space racks to keep dishes away from the hottest ceiling zone.
Finally, adopt small habits that save big cleans: park a rimmed baking sheet on a lower shelf during risky bakes, vent pies properly, and decant excess sauce before topping up. Keep that salt ramekin topped and visible. A handful of crystals at the right moment is the difference between a smoky setback and supper on time.
In a world of pricey sprays and complex self-clean cycles, the humble salt pot remains a cook’s quiet insurance policy. The tactic is low-tech, inexpensive, and adaptable, whether you’re roasting on a Sunday or baking midweek. Teach everyone in the household the “reduce, cover, clear” routine and you’ll protect your oven — and your nerves. What would you add to the ready-to-hand kit by your cooker, and which kitchen trick has saved your dinner at the last minute?
Did you like it?4.7/5 (30)