In a nutshell
- 🧪 Acidity in vinegar donates protons that dissolve soap scum (calcium stearate) and react with limescale, releasing CO₂ for fast detachment and easier wipe-off.
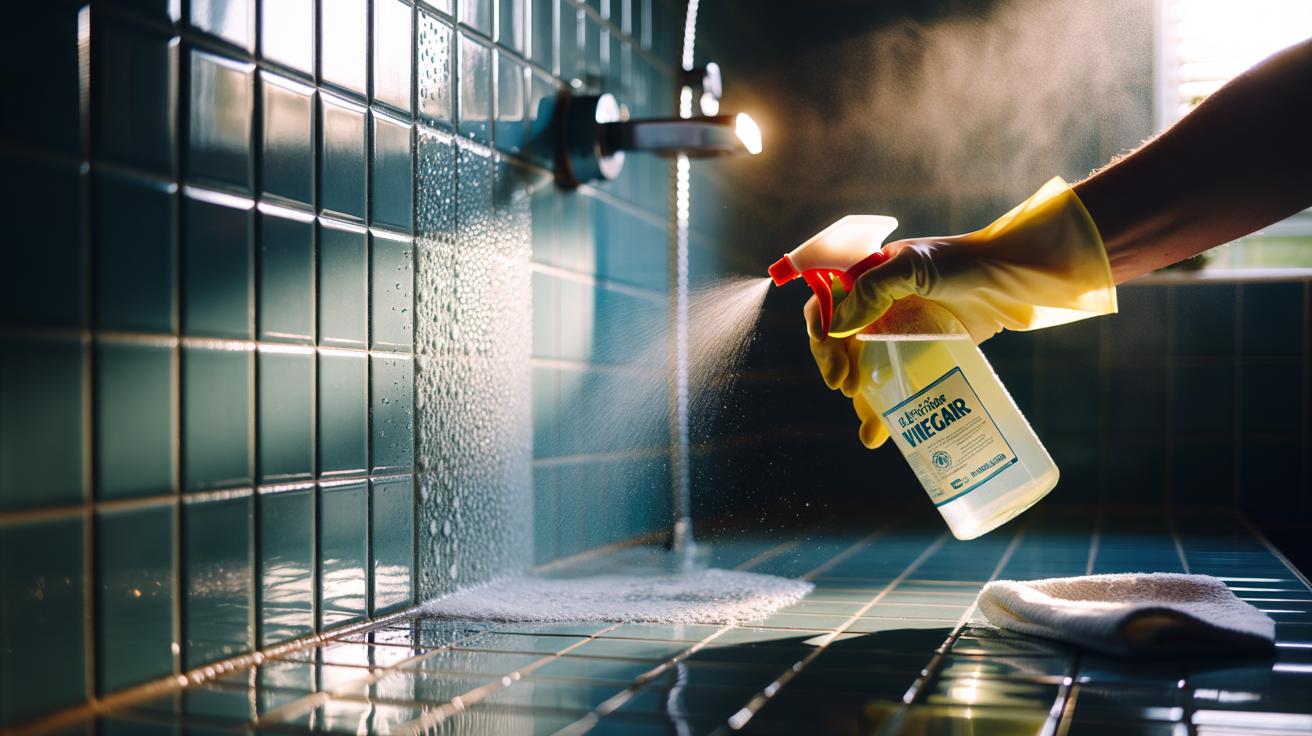
- 🧴 Method: mix 1:1 vinegar:warm water for routine film (2:1 for heavy), dwell 3–5 minutes, light scrub, then rinse and dry to prevent spotting and extend gloss.
- 🧱 Surface compatibility: ideal for glazed ceramic, porcelain, glass, and quick chrome wipes; brief on sealed grout; Avoid natural stone like marble or limestone to prevent etching.
- ⚠️ Safety and care: never mix with bleach, ventilate, patch test, and adjust dilution for 6–8% cleaning vinegar; don’t over-soak metals or grout.
- 📊 Practical tips: use the article’s ratios/times table, add a tiny surfactant if needed, and adopt a weekly rinse to halt build-up before it layers.
For household tiles dulled by bath time residue, a humble vinegar rinse can be a revelation. In many UK homes with hard water, soap reacts with dissolved minerals to form a hazy film that grips ceramic and porcelain. Vinegar’s gentle acidity tackles this film at its chemical roots, lifting it fast without specialist products. You get a bright, streak-free surface, less elbow grease, and fewer synthetic fragrances in the air. The clean begins the moment the acid hits the scum, yet a short dwell time ensures thorough results. Below, the science, the method, and the mistakes to avoid—so your tiles shine as intended.
How Acidity Dissolves Soap Scum
Soap scum is not just old suds. In hard water, fatty-acid soaps meet calcium and magnesium, forming stubborn salts like calcium stearate that cling to glaze and grout. White vinegar (around 5% acetic acid) delivers protons that break these bonds, flipping insoluble residues back into forms that rinse away. It also reacts with limescale—calcium carbonate—releasing carbon dioxide and creating soluble calcium acetate. That’s why fizzing can appear on contact. The result is rapid soil detachment and easier mechanical wipe-off, even when the film seems set.
There’s a second advantage: acidity disrupts the thin biofilm of body oils and shampoo polymers that helps scum stick. Warm vinegar moves faster, reducing surface tension so the rinse wets evenly. The pH shift is modest enough for glazed tile yet decisive against mineral soap residues. Think of it as targeted chemistry rather than brute-force scrubbing; letting the acid work saves both time and grout wear.
Step-by-Step Vinegar Rinse for Brilliant Tiles
Mix one part white vinegar with one part warm water for routine film, or two parts vinegar to one part water for stubborn build-up. Apply with a sprayer until the tile is evenly damp but not dripping. Allow 3–5 minutes of dwell time so the acid can dissolve mineral bonds; agitation too soon wastes the chemistry. Lightly scrub with a soft pad, then rinse with clean water and dry with a microfibre cloth or squeegee to prevent new deposits. That final dry makes the gloss last longer between showers.
On grout, keep contact brief and avoid soaking; cement-based grout tolerates short exposure, especially when sealed, but extended acidity can nibble the surface. Never mix vinegar with bleach or chlorine-based products—this is unsafe. Work with ventilation open to tame the odour, which fades quickly. For maintenance, a weekly rinse prevents layers from compounding, meaning less concentration and effort over time.
Common Mistakes and Surface Compatibility
Vinegar excels on glazed ceramic and porcelain tiles, plus most glass and chrome when contact is brief and followed by a rinse. It is not a cure-all. Avoid natural stone such as marble, limestone, travertine, and some terrazzo: acids etch their calcite, leaving a dull patch that demands professional polishing. Unsealed or crumbling grout also calls for care—patch test, then keep exposure short. Stainless taps handle quick wipes, but prolonged soaking under acidic films can mar certain finishes. When in doubt, check the manufacturer’s care guide.
Overapplication is another pitfall. People tend to spray more instead of waiting. The reaction begins instantly, but full release needs a minute or two. Skip scouring powders during the same session; you’ll neutralise the acid and add grit that can scratch glazing. Rinse thoroughly to remove dissolved minerals and any fatty residues loosened by the acid. Finish by drying: this halts fresh limescale as droplets evaporate, preserving the bright, just-cleaned look.
Quick Reference: Ratios, Times, and Surfaces
Use this snapshot for confidence at the sink or shower wall. Remember: temperature, water hardness, and soil thickness all affect results, so treat ratios as starting points, not dogma. Always test a discreet spot before scaling up, especially on mixed-material installations with trims, seals, and painted metalwork. The key is balancing dwell time with a thorough rinse to restore neutral conditions after the acidic phase has done its job.
| Task | Vinegar Dilution | Contact Time | Suitable Surfaces | Notes |
|---|---|---|---|---|
| Routine tile rinse | 1:1 vinegar:warm water | 3–5 minutes | Glazed ceramic, porcelain, glass | Rinse and dry to prevent spotting |
| Heavy soap scum | 2:1 vinegar:water | 5–10 minutes | Same as above | Gently agitate; repeat rather than over-scrub |
| Grout refresh (sealed) | 1:2 vinegar:water | 2–3 minutes | Sealed cement grout | Keep brief; rinse thoroughly |
| Chrome tap wipe-down | 1:1 on cloth | Under 2 minutes | Chrome, stainless steel | Do not soak; polish dry |
| Natural stone | N/A | N/A | Marble, limestone, terrazzo | Do not use vinegar—choose pH-neutral cleaners |
These figures suit standard 5% acetic acid. If your vinegar is stronger (cleaning vinegar at 6–8%), dilute a little more to match the effect. A drop of mild surfactant—washing-up liquid—can help re-emulsify loosened fatty acids before the rinse, but keep it sparing to avoid streaks.
The humble vinegar rinse proves that smart chemistry beats hard scrubbing, restoring tile brilliance while trimming costs and product clutter. By understanding how acidity dismantles soap scum and by respecting surface compatibility, you can clean quickly and safely with results that last. Rinse well and dry, and you’ll slow future build-up dramatically. If you’ve relied on abrasive powders or perfumed sprays, try the gentle route for a week and compare the gloss. What surfaces in your home would benefit most from an evidence-led, acid-first clean—and what would you like tested next?
Did you like it?4.6/5 (21)