In a nutshell
- 🧪 Chemistry that works: acetic acid lowers pH to dissolve limescale and break soap scum; give it short dwell time for less scrubbing; great on glazed ceramic and porcelain, but avoid natural stone.
- 🧽 Routine in brief: warm tiles, mix white vinegar 1:1, spray top-to-bottom, wait 5–10 minutes without letting it dry, wipe with microfibre, rinse, then use a squeegee and buff dry.
- 📊 Smart dilutions: 1:1 for glazed tiles and glass, 2:1 or neat for heavy scale, 1:2 on chrome; sealed grout at 1:1; always patch-test and adjust to water hardness.
- 🚫 Safety first: Never mix vinegar with bleach; limit contact on metals, spritz the cloth not fittings, avoid abrasives, and rinse thoroughly to prevent redeposits.
- 💡 Keep it bright: use a daily squeegee and ventilation, plus a weekly vinegar wipe; add hard-water helpers (inline filter, citric-acid soaks) and mask scent with citrus infusions.
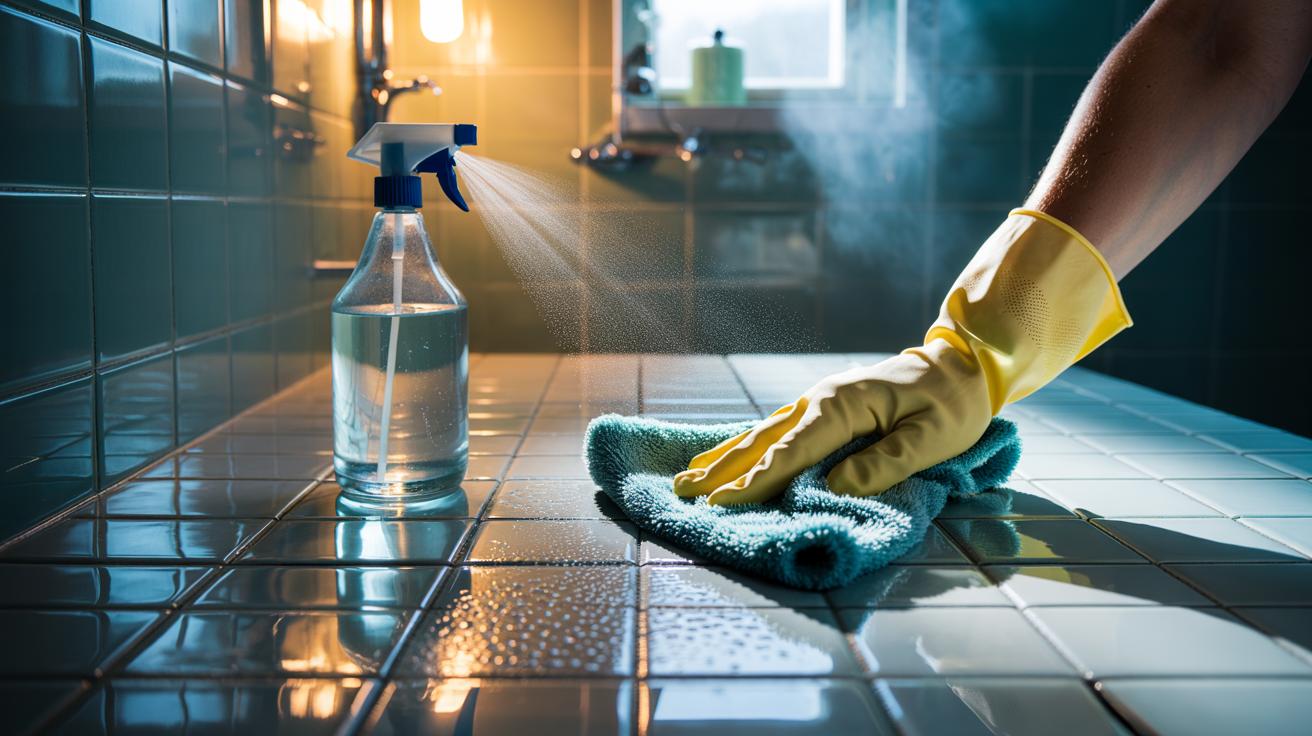
The clouded film that dulls bathroom tiles is not just dirt; it’s a stubborn blend of limescale from hard water and soap scum from surfactants and oils. A straightforward white vinegar wipe uses household chemistry to restore gleam without costly sprays. Powered by acetic acid, vinegar lowers surface pH, loosening mineral and fatty residues so they release under a cloth. When used warm and allowed a short contact time, it lifts haze on ceramic, porcelain, and glass with minimal scrubbing. Pair the routine with a microfibre cloth and a squeegee to stop fresh droplets drying into marks. Consistency, not brute force, is the secret to tiles that stay bright and streak-free.
Why Acid Beats Bathroom Buildup
Most hazing on tiles comes from calcium carbonate and magnesium salts left behind as water evaporates. Acetic acid reacts with these alkaline minerals, converting them into soluble acetates that rinse away easily. At the same time, its low pH disrupts the binding of soap scum—a mix of fatty acids, talc, and skin oils—so a microfibre cloth can lift the film in fewer passes. Add a small drop of washing-up liquid to improve wetting and help the solution creep into pits and grout lines. Letting vinegar dwell for several minutes does more than scrubbing harder, because the reaction needs a little time to break bonds.
Glazed ceramic and porcelain tolerate mild acids well, which is why this method is ideal for most bathrooms. Take care with soft metals and avoid natural stone such as marble, limestone, and travertine, which can etch. The gentle chemistry makes vinegar a useful weekly habit that prevents heavy scaling from ever taking hold.
The Vinegar-Wipe Routine, Step by Step
Start by ventilating the room and warming the tiles—run a hot shower briefly or splash with warm water—so residue softens. Mix white vinegar and warm water 1:1 in a spray bottle. For stubborn limescale bands, use it stronger (2:1) or even neat on trouble spots. Mist the tiles evenly from top to bottom and allow 5–10 minutes of contact. Never let the solution dry on the surface; re-mist lightly if needed. Wipe with a plush microfibre cloth using overlapping strokes, then agitate grout with a soft nylon brush if there’s clinging haze.
Rinse thoroughly with clean water to carry dissolved minerals away, then squeegee vertical tiles to expel droplets. Buff dry with a fresh cloth for a crisp shine. For taps and fittings, spritz a cloth rather than the metal to control runoff. Finish by rinsing cloths well, as trapped mineral residue can redeposit. Drying is as important as cleaning for a truly streak-free finish.
Choosing the Right Dilution for Surfaces
Vinegar’s versatility depends on matching strength and dwell time to the surface. Keep the solution mild for daily wipes, then step up concentration for rings of limescale around taps or along shower edges. Use warm, not boiling, liquid to improve reaction speed without risking damage to sealants. The guide below shows safe starting points; adjust based on your water hardness and tile finish. Always test on an inconspicuous area first. And one essential safety rule: Never mix vinegar with bleach; the reaction releases dangerous chlorinated fumes.
| Surface | Dilution (Vinegar:Water) | Contact Time | Notes |
|---|---|---|---|
| Glazed ceramic tiles | 1:1 | 5–10 min | Safe, wipe and rinse; buff dry with microfibre. |
| Porcelain tiles | 1:1 to 2:1 | 5–10 min | Use stronger mix for hard-water bands. |
| Glass screens | 1:1 | 3–5 min | Prevent drying; squeegee immediately. |
| Chrome fittings | 1:2 | 2–3 min | Spritz cloth, not metal; rinse and dry. |
| Grout (sealed) | 1:1 | 3–5 min | Brush gently; avoid over-soaking. |
| Natural stone | Not recommended | — | Risk of etching; use pH-neutral cleaner. |
Keep Tiles Brighter for Longer
Prevention trims cleaning time dramatically. After each shower, squeegee walls and the screen to stop droplets drying into mineral deposits. Run the extractor fan or open a window to clear steam quickly. Make a weekly habit of a 1:1 white vinegar spritz and wipe; use a stronger pass only where scale streaks persist. Choose dense-weave microfibre that clings to fine residue without scratching. Skip abrasive powders that can dull the glaze and give dirt more grip. Small, regular wipes beat occasional heavy scrubs, preserving the tile’s factory sheen.
In very hard-water areas, consider a simple inline filter for the showerhead or a citric-acid soak for removable parts. If you dislike vinegar’s scent, infuse it with lemon peel and let it sit for a week—citrus oil helps with grease while masking the odour. The result is a low-cost, low-tox routine that keeps bathrooms distinctly brighter between deep cleans.
Handled properly, a vinegar-wipe routine turns everyday chemistry into a practical ally against limescale and soap scum. The blend of mild acidity, short dwell time, and thorough rinsing maintains tile glaze, lifts haze from glass, and keeps metalwork sparkling—all without harsh fumes or hefty bills. With a squeegee for daily moisture control and a weekly wipe, the shine becomes easier to preserve than to restore. The
Bathrooms lose their sparkle when tile surfaces gather a cloudy film of limescale and soap scum. The simplest fix is a vinegar-wipe routine that uses household chemistry to cut through residue without harsh fumes. Powered by acetic acid, white vinegar shifts the pH at the surface so minerals dissolve and fatty deposits release under a cloth. Warm solution, short contact time, and a plush microfibre make the work light. Finish with a quick squeegee to stop droplets drying into marks. Consistency, not force, is what keeps glaze and grout looking bright, and the cost is little more than the price of a bottle in your cupboard.
Why Acid Cuts Through Cloudy Buildup
The stubborn haze on tiles is chiefly calcium and magnesium carbonates from hard water, glued in place by soap scum—a cocktail of fatty acids, talc, and skin oils. Acetic acid in vinegar reacts with these alkaline minerals, forming soluble acetates that lift with a wipe. Its lower pH also disrupts the bonds in scummy films, especially when the solution is warm and allowed a short dwell. Give the chemistry five to ten minutes and you’ll do less scrubbing, because the reaction does the heavy lifting before your cloth ever moves.
Glazed ceramic and porcelain handle mild acids with ease, so a vinegar wipe is ideal for most bathrooms. It also aids grout by loosening surface film without gouging. The key limits are soft metals and natural stone. Marble, limestone, and travertine can etch, as can poor-quality chrome if soaking is prolonged. Know your surface, match the strength, and rinse thoroughly to carry dissolved residue away for a crisp, streak-free finish.
The Vinegar-Wipe Routine Step by Step
Open a window or run the fan for airflow, then warm the tiles with a brief hot shower or a splash of warm water. Mix white vinegar 1:1 with warm water in a spray bottle; switch to 2:1 or neat vinegar on heavy limescale. Mist evenly from top to bottom and let it dwell for 5–10 minutes. Do not let the solution dry; re-mist lightly if it flashes off. Wipe with a dense microfibre using overlapping strokes. For grout, agitate with a soft nylon brush, not wire, to protect sealer and edges.
Rinse with clean water so the dissolved minerals don’t resettle, then squeegee vertical tiles to remove droplets. Buff with a dry cloth for a showroom gleam. Spritz a cloth—not the fitting—when tackling taps, then rinse and dry to avoid spotting. Finish by rinsing cloths well; trapped residue can streak next time. Drying is as vital as cleaning, because left-behind moisture is the feedstock for that next grey veil.
Choosing Safe Dilutions and Surfaces
Vinegar’s versatility hinges on using the right ratio and contact time. Keep 1:1 for routine wipes on glazed finishes, step up to 2:1 on stubborn rings, and shorten dwell on metals. Warm (not hot) liquid quickens reactions without risking sealants. Always patch-test on a hidden corner and watch for dulling. And one non-negotiable rule: never mix vinegar with bleach, as it releases dangerous chlorinated fumes. The table below outlines safe starting points; adjust to your water hardness and tile finish for best results.
| Surface | Dilution (Vinegar:Water) | Contact Time | Notes |
|---|---|---|---|
| Glazed ceramic tiles | 1:1 | 5–10 min | Wipe, rinse, then buff dry with microfibre. |
| Porcelain tiles | 1:1 to 2:1 | 5–10 min | Use stronger mix for hard-water bands. |
| Glass shower screens | 1:1 | 3–5 min | Prevent drying; squeegee immediately. |
| Chrome and stainless fittings | 1:2 | 2–3 min | Apply via cloth; rinse and dry promptly. |
| Sealed grout | 1:1 | 3–5 min | Brush gently; avoid over-soaking. |
| Natural stone (marble, limestone) | Not recommended | — | Risk of etching; use a pH-neutral cleaner. |
Small Habits That Keep Tiles Brighter
Prevention trims cleaning time dramatically. Squeegee tiles and screens after showers to deny mineral deposits a chance to crystallise. Run the extractor fan for 15 minutes to push humidity out. Build a weekly ritual: a 1:1 white vinegar spritz, short dwell, wipe, rinse, and dry. Select dense-weave microfibres that grip fine film without scratching glaze. Skip abrasives that leave micro-scratches, because they anchor grime. A minute a day beats an hour at the weekend, and it preserves that factory sheen.
In very hard-water areas common across the UK, fit an inexpensive inline shower filter or soak showerheads in citric acid monthly to clear scale. If vinegar’s odour bothers you, infuse it with lemon peel or rosemary for a week; the scent softens and citrus oil helps with grease. Store the bottle clearly labelled. Light-touch, regular care is the least costly way to keep tiles luminous between deep cleans.
Handled thoughtfully, the vinegar-wipe routine turns simple chemistry into an everyday ally against limescale and soap scum. Mild acidity, controlled dwell time, and thorough rinsing maintain glaze, clear glass, and keep fittings smart—without the expense or fumes of heavy-duty products. Add a squeegee and good ventilation, and brightness becomes easier to preserve than to restore. Small, consistent actions change the look and feel of a bathroom far faster than sporadic blitzes. How will you tailor the dilution, dwell time, and daily habits to suit your tiles, water hardness, and schedule?
Did you like it?4.4/5 (27)