In a nutshell
- 🧪 Vinegar’s cleaning power comes from acetic acid, which lowers pH, dissolves mineral and soap films, reduces surface tension, and neutralises odours—use white distilled vinegar for a clear, residue‑free shine.
- 📏 Optimal dilution is about 1:40–50 (roughly 100 ml per 5 litres); pair with warm water and a microfibre mop, and follow the rule: use the least acidic solution that still dries clear.
- ✅ Works brilliantly on ceramic/porcelain tile, vinyl, and sealed laminate/hardwood, lifting dull haze for streak‑free results when applied with a lightly damp mop and quick drying.
- 🚫 Avoid natural stone (marble, limestone, travertine, terrazzo), unsealed or waxed wood, and delicate coatings; treat old grout gently, and never mix vinegar with bleach due to toxic gas.
- 🧹 Use a smart routine: sweep/vacuum first, adopt a two‑bucket method, mop in figure‑eights, wring often, dwell briefly on spots, then rinse or buff and ventilate for a crisp finish.
There’s a reason your gran swore by a splash of vinegar in the bucket. This humble cupboard staple tweaks chemistry at floor level, dislodging muck, neutralising stale odours, and cutting the kind of dulling film that standard detergents sometimes leave behind. Used correctly, it’s gentle, cheap, and remarkably effective. Used badly, it can etch sensitive surfaces. The trick lies in dilution, technique, and a clear understanding of what you’re cleaning. In modern homes filled with mixed flooring—from hard-wearing tiles to fussy engineered woods—one small adjustment can make the difference between streaks and a shine. Here’s why a dash does the job.
The Science Behind the Shine
At the heart of vinegar’s cleaning power is acetic acid, a mild acid that excels at breaking down alkaline residues left by hard water, grout haze, or soap films. Those residues scatter light, so floors look cloudy even when technically clean. Lowering the pH helps dissolve mineral deposits and disrupts the bond between grime and the floor surface. It also reduces surface tension in water, encouraging a thinner, more even film that dries without streaks. That’s why a small amount delivers clarity and sparkle while avoiding the heaviness of scented detergents.
There’s more. Vinegar’s weak acidity can neutralise the molecules that cause persistent smells—pet accidents, damp hallways, yesterday’s cooking—without saturating rooms with perfume. Choose white distilled vinegar over malt or cider varieties; it’s colourless, leaves no sticky sugars, and avoids staining. Used sparingly, it’s an elegant corrective rather than a blunt-force cleaner. Think of it as a finishing tonic: it corrects, clarifies, and leaves behind less residue than many off-the-shelf floor products.
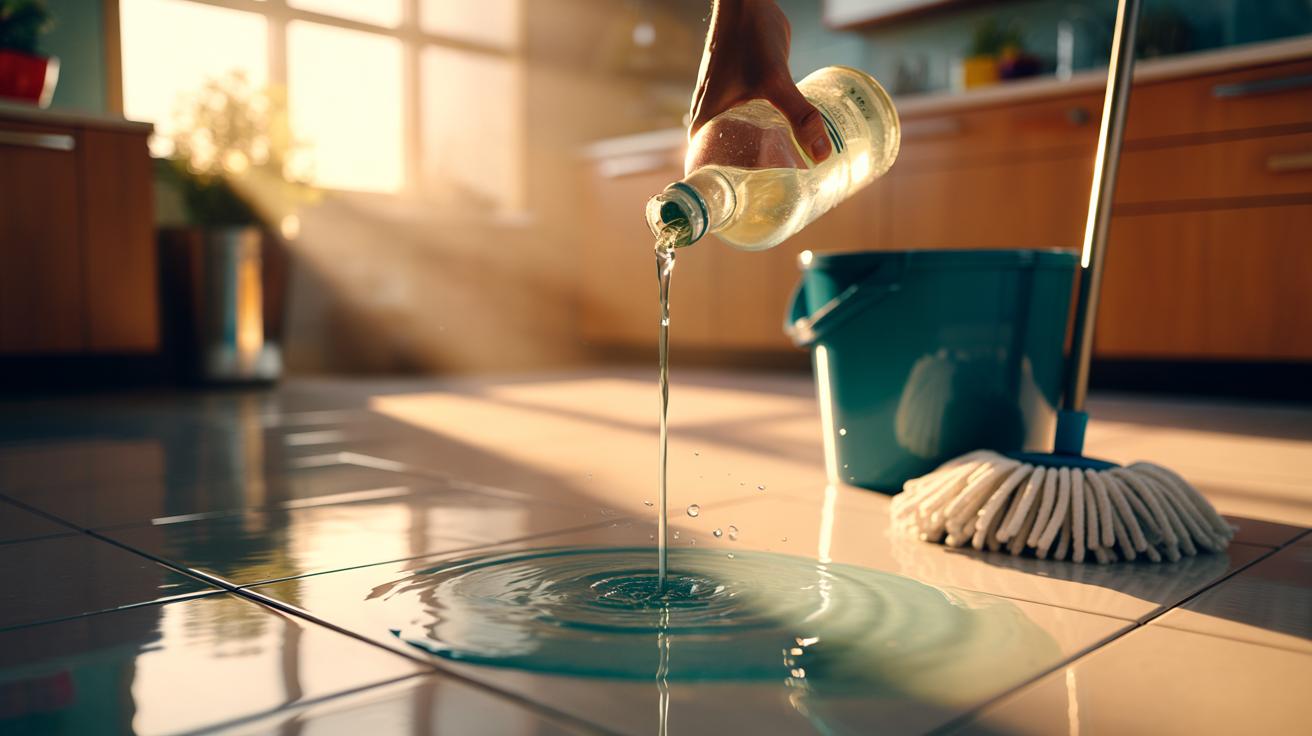
How Much Vinegar to Add
Precision matters. Too much vinegar won’t clean better; it only risks dulling finishes or irritating skin. For routine mopping, aim for roughly 1 part vinegar to 40–50 parts water. In practical terms, that’s about 100 ml of vinegar in a standard 5-litre bucket. Use warm water to help lift greasy footprints, and a microfibre mop head to trap fine particles the solution releases. Never mix vinegar with bleach or bleach-based products; the reaction can release dangerous chlorine gas. If you need a touch more bite for kitchen tiles, raise the dose modestly, not dramatically, and rinse if you see hazing.
| Bucket Size | Vinegar (White, Distilled) | Typical Use |
|---|---|---|
| 3 litres | 60–75 ml | Light dust, low-traffic rooms |
| 5 litres | 100–125 ml | Daily maintenance, kitchens, hallways |
| 10 litres | 200–250 ml | Large areas, post-party refresh |
Keep the mop well wrung. Flooding negates the benefit and leaves swirl marks. If your water is very hard, a slightly stronger mix may be justified, but treat it as a temporary corrective, not a permanent regime. The rule: use the least acidic solution that still dries clear and bright.
Where It Works—and Where It Doesn’t
Vinegar shines on ceramic and porcelain tile, vinyl, sealed laminate, and many sealed hardwood finishes. It strips away chalky mineral film, freshens high-traffic scuffs, and restores the subtle gloss manufacturers intend. In rental flats and busy family homes, the difference can be immediate: fewer streaks, less residue grab, and a floor that squeaks underfoot because it’s genuinely clean, not just perfumed. For sealed wood, keep the mop barely damp and the dilution generous. Dry quickly. That protects finishes while lifting that greyish haze that makes boards look tired.
There are firm red lines. Never use vinegar on natural stone—marble, limestone, travertine, terrazzo—or on concrete with a decorative finish. Acids can etch and dull stone, sometimes permanently. Avoid unsealed hardwoods or waxed floors; vinegar can strip protective layers or swell fibres. If you’re unsure about a factory coating—some luxury vinyls and engineered woods have delicate top layers—test in a hidden corner first. For grout, vinegar is fine on sealed lines but go gentle on older, sandy grout to prevent erosion. When in doubt, switch to a pH-neutral cleaner.
A Step-by-Step Routine That Delivers Results
Start dry. Sweep or vacuum to remove grit, because gritty slurry is what scratches and dulls finishes. Mix your solution, then adopt a two-bucket habit if possible: one with vinegar-water, one with plain rinse water. Work in figure-eights with a microfibre head, keeping it damp, not wet. Short passes for entryways. Long, smooth strokes for larger rooms. Wring often; dirty solution redeposits residue and kills the shine you’re chasing.
Stubborn spots? Pause. Lay the damp mop on the mark for 30 seconds, then lift—don’t scrub—so the acid can loosen the film. In kitchens, a second, lighter pass often makes the crucial difference between clean and gleaming. If you spot faint streaks, finish with a quick rinse mop or buff with a dry microfibre cloth. Open a window. Let airflow help the floor cure to a crisp finish. Small ritual, big reward. And no cloying scent, just the clean neutrality of a surface reset.
Used thoughtfully, a dash of vinegar turns mop water into a quiet workhorse—one that cuts residue, clears odours, and lets your floors reflect natural light instead of dulling it. The key is respect: the right dilution, the right surfaces, and a technique that keeps water to a minimum. That balance gives you the kind of gleam that looks effortless because it is. So, will your next bucket be a simple tweak away from a better clean, and which room will you test first?
Did you like it?4.4/5 (20)